Every PowerPoint file carries more than what’s visible on the slide. Reviewer comments, speaker notes, the name of whoever first created the file, a trail of edit history, and stray objects dragged just off the edge of a slide all travel along inside the .pptx package, whether you meant to share them or not. The Document Inspector in PowerPoint is the built-in tool that finds this hidden data and lets you strip it out before a deck leaves your hands, so a client, a hiring committee, or the public never sees what was meant to stay internal.
Picture sending a business proposal to a prospective client with a colleague’s blunt margin notes about the pricing still buried in the file, or publishing a template for public download with your own name attached as the last person to touch it. Left unchecked, a file can quietly expose personal information that has nothing to do with its intended audience, which is exactly the kind of content the Document Inspector is built to catch. This guide walks through what the tool checks, how to run it correctly, how to read what it finds, and the one habit that keeps the whole process safe. Whether you are preparing a client deliverable or handing off a template for someone else to reuse, learning to use the Document Inspector in PowerPoint is the final step to keep a presentation clean before it leaves your hands.
What Is the Document Inspector in PowerPoint?
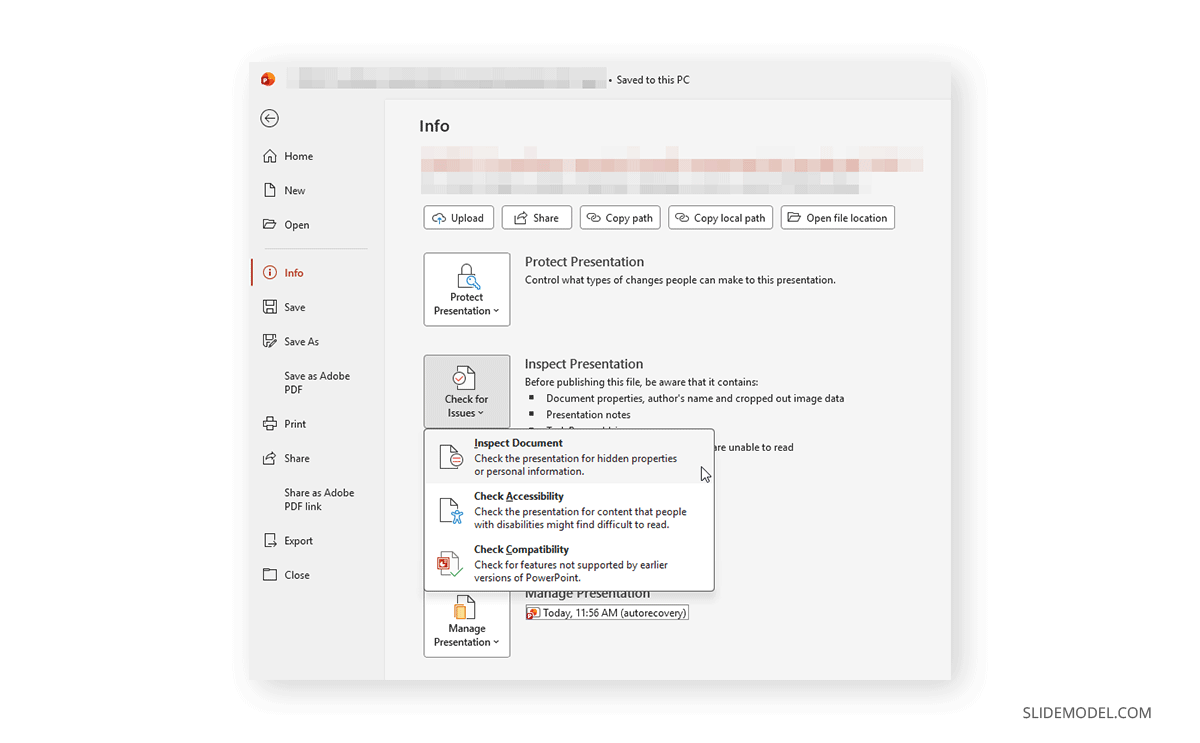
The Document Inspector is a feature built into PowerPoint that scans a presentation for hidden data and personal information, things like comments, speaker notes, document properties, and off-slide content, and lets you remove that content before you distribute the file. Microsoft groups it under Check for Issues, alongside two related tools that inspect a file for different kinds of problems rather than hidden data.
The reason the feature exists is straightforward. A presentation file is a container, and a good portion of what it holds never appears on screen. You can spend hours polishing every slide and still ship a deck that quietly reveals who wrote it, what a reviewer said about a slide, or what you decided to cut at the last minute. Running the Document Inspector in PowerPoint before you share a file is how you close that gap, and it takes less time than proofreading a single slide.
Why and When You Should Run It
Run the Document Inspector any time a presentation is about to leave your control, and that covers more situations than most people realize. Before emailing a deck to a client or an external partner, so private comments and speaker notes don’t travel with it. Before uploading a presentation to a website, a shared portal, or a public repository, where anyone can open the properties panel. Before handing off or reusing a template internally, so the next person on the team doesn’t inherit your metadata and half-finished draft content. And before publishing a deck as a download or converting it to PDF, note that a PDF export can retain the same hidden properties as the source file.
What the tool protects against is concrete, not theoretical. Reviewer comments left in the margins. Candid talking points typed into the Notes pane before a meeting. The original author’s name buried in file properties long after that person left the project. Internal revision history that shows exactly who changed what and when. And abandoned slides parked just outside the visible canvas because deleting them felt riskier than hiding them. Any one of these can turn a confident presentation into an uncomfortable conversation with a client or a manager.
How to Use the Document Inspector in PowerPoint: Step by Step
Running the tool itself takes under a minute once you know the sequence. Here is the full path from an open presentation to a clean, shareable copy.
- Save a copy of your file first. This is the most important step in the whole process, and the next section explains exactly why.
- Select File, then Info.
- Click Check for Issues.
- Choose Inspect Document.
- In the Document Inspector dialog, leave every category you want to scan checked. All of them are selected by default.
- Click Inspect.
- Review the results. Next to any category where PowerPoint found content, click Remove All to clear it.
- Click Reinspect to confirm the file is clean, then Close.
Microsoft’s own instructions mirror this same path: select File, then Info, then Check for Issues, then Inspect Document. Once you have run it a few times, checking a file becomes as automatic as saving it.
Before You Click “Remove All”: Always Work on a Copy
The Document Inspector permanently deletes content, and PowerPoint cannot always restore it. Microsoft is explicit about this: the company recommends running the Document Inspector on a copy of the original file, because it is not always possible to restore the data the tool removes. In practice, that means Undo will not reliably rescue a comment or a set of speaker notes you actually needed once Remove All has been clicked.
Before you inspect anything, build this small habit into your workflow. First, duplicate the presentation. Second, rename the copy with a clear suffix, something like proposal-SHARE.pptx, so there is no chance of confusing it with the working file. Third, inspect and clean that copy, not the original. Fourth, keep the untouched original as your working master, complete with every comment and note you might still need for the next round of edits. This one routine guarantees you never lose content you actually want to keep, and it takes about 10 extra seconds per file.
Everything the Document Inspector Can Check (and Why Each Matters)
The exact categories shown in the dialog depend on your PowerPoint version and the file itself. The current Microsoft 365 build of the Document Inspector in PowerPoint checks seven categories by default.
| Category | What it Finds | Real-World Risk it Removes |
|---|---|---|
| Comments and Annotations | Reviewer comments and ink annotations from collaboration | The private “are we sure about this number?” thread you forgot to delete |
| Document Properties and Personal Information | Author, title, subject, last-saved-by name, and routing metadata | The original creator’s name and other internal file details |
| Revision Tracking Data | Information about who edited the file and when | Your internal edit history and reviewer identities |
| Invisible On-Slide Content | Objects on a slide formatted as invisible | A hidden shape the recipient can simply unhide |
| Off-Slide Content | Text boxes, images, and tables parked outside the slide area | The rejected draft slide you dragged off-canvas instead of deleting |
| Presentation Notes | Text typed into the Notes pane | Your candid talking points, pricing notes, or reminders not meant for the audience |
| Custom XML Data | Custom XML stored in the file, often added by business apps | Data injected by a CRM or other line-of-business add-in |
A few of these deserve a second look. Speaker notes are the most commonly leaked item on this list, because the Notes pane is exactly where people type the things they would never put on a slide itself, including pricing flexibility, competitor comparisons, or a blunt assessment of a stakeholder’s concerns. Off-slide content is the sneakiest category, since dragging an object past the edge of the canvas hides it from view during a normal edit session but not from the file itself or from anyone who scrolls the slide sideways.
Document Properties and Personal Information is the category that quietly attributes your work to whoever first created the template, worth checking any time you change the author name on a file you did not originate. Revision Tracking Data matters more than most people assume too: even after every comment has been resolved, PowerPoint can retain a record of who tracked changes throughout the file’s history, which is rarely something a client needs to see.
Categories You May Also See (Depending on Your Version)
Older builds of PowerPoint, along with the Word and Excel versions of the same tool, show a few additional categories. If one of these appears in your dialog, here is what it means.
| Category | What it Covers | Important Note |
|---|---|---|
| Content Add-ins / Task Pane Add-ins | Add-ins saved inside the file | Common in the Word and Excel dialog and older PowerPoint builds; appears only in some versions |
| Embedded Documents / Embedded Files or Objects | Embedded spreadsheets, PDFs, or OLE objects | In current PowerPoint, these are detected but not removed automatically; delete them by hand |
| Macros, Forms, and ActiveX Controls | VBA macros and form or ActiveX controls | Not part of the current PowerPoint category list; macros must be removed manually |
| Document Server Properties | SharePoint workflow metadata | Appears only when the file is connected to a SharePoint library |
The practical takeaway is to treat the seven core categories as a reliable baseline and to read any extra checkboxes as version- or content-specific rather than universal. Older files and files built from shared templates are the most likely place to run into this second, shorter list.
Understanding the Inspection Results
After you click Inspect, PowerPoint marks each category with one of two symbols. A red exclamation mark means items were found in that category, and a green check mark means the category came back clean. A Remove All button appears next to any category with findings, and a single click clears everything within it at once. Reinspect re-runs the entire scan to confirm the file is genuinely clean before you close the dialog.
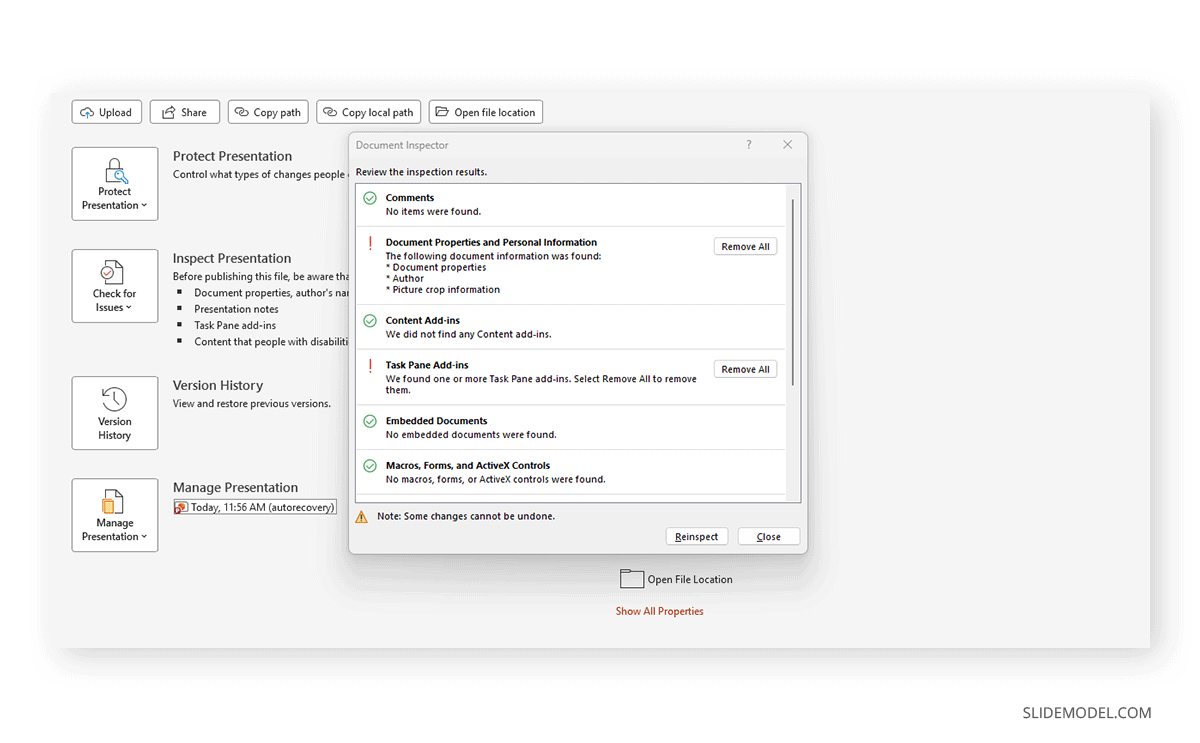
The practical approach is to work through the list top to bottom, removing what you don’t want to share, then reinspecting before closing the window. Keep in mind that each Remove All action is effectively final, which is exactly why the earlier habit of working on a copy matters as much as it does.
What the Document Inspector Can’t Do
The Document Inspector is genuinely useful, but it has clear limits, and assuming it does more than it actually does is how data leaks happen. Microsoft states plainly that not all hidden data and information can be removed with the Document Inspector, and three gaps come up often enough to call out directly.
It does not automatically remove embedded files or objects. Embedded spreadsheets, PDFs, and OLE objects get flagged, but PowerPoint leaves the actual deletion to you, since removing them automatically could break the slide layout around them. It does not strip macros either: any VBA code you have built into a file, including anything added while working with macros in PowerPoint, has to be removed by hand. And it is not a security or encryption tool. Controlling who can open or edit a file is a separate job, handled through Protect Presentation rather than Check for Issues. Mark as Final deserves a specific warning here too: Microsoft confirms it is not a security feature, since anyone who opens the file can remove the Final status with a single click and keep editing as if nothing happened.
The Document Inspector is built for the modern .pptx format, where most of the hidden data lives in the file’s XML. Use it to clean content before sharing a file, not to lock that file down once it is out.
Document Inspector on Mac and the Web
The full Document Inspector dialog described so far is a feature of PowerPoint for Windows. If you work primarily in PowerPoint for the web, the tool is not available at all, and the Mac experience differs from what Windows users see, with fewer categories exposed through the interface. That gap catches a lot of people off guard the first time they try to follow instructions written for Windows.
When the full Document Inspector is out of reach, manual review still works. Delete every speaker note using the Notes pane or Outline view, since that view makes it fast to scan a whole deck at once. Remove every comment from the Review tab rather than assuming they will be caught automatically. Check for and delete any off-slide objects sitting around the edges of each slide. And clear document properties, including author, title, and company, from the file’s info or properties panel.
A reliable cross-platform fallback, useful whether you are working in PowerPoint online or simply want extra certainty, is to copy your finished slides into a brand-new presentation. That process leaves most accumulated metadata behind, since a fresh file does not inherit the properties of the one it came from.
Document Inspector vs. PowerPoint’s Other Issue Checkers
The Document Inspector sits next to three related tools under the same Check for Issues menu, and they get confused often enough that it is worth laying out exactly what each one does.
| Tool | Where to Find It | What it Does | Use it to… |
| Inspect Document | File, Info, Check for Issues | Finds and removes hidden data | Clean a deck before sharing it |
| Check Accessibility | File, Info, Check for Issues | Flags accessibility problems: alt text, contrast, reading order | Make a deck usable for everyone in the audience |
| Check Compatibility | File, Info, Check for Issues | Flags features unsupported in older PowerPoint versions | Share a file with people on older software |
| Protect Presentation | File, Info | Mark as Final, encrypt, sign, or set read-only | Control who can open or edit the file |
Only the Document Inspector removes hidden data. The other three restrict editing, improve accessibility, or check version compatibility, and none of them touch comments, notes, or metadata. Running a full accessibility check alongside the Document Inspector catches a different category of problem: whether the audience can actually use the file, rather than what it reveals about how it was made. The same logic applies to fixing compatibility issues before sending a deck to someone on an older setup, and to password-protecting a presentation when the goal shifts from cleaning a file to controlling who can open it in the first place.
A Ship-Ready Pre-Sharing Checklist
For decks headed to clients or the public, the most reliable approach is to chain these tools into a single routine rather than remembering each one separately.
- Save a -SHARE copy of the file.
- Run Inspect Document and click Remove All for every category you do not want to share.
- Run Check Accessibility to catch missing alt text and low-contrast text.
- Run Check Compatibility if the recipient might use an older version of PowerPoint.
- Apply Mark as Final or Encrypt with Password if you need to limit further edits or access.
- Export or send the cleaned copy, keeping the original as your working file.
Make this sequence the default before any external deck leaves your hands, and the moment when someone sees a comment or note they were not supposed to see stops happening.
FAQs
What is a Document Inspector in PowerPoint?
It’s a built-in tool that scans a presentation for hidden data and personal information, such as comments, speaker notes, document properties, and off-slide content, then lets you remove any of it in one click per category before you share the file.
Where is the Document Inspector in PowerPoint?
Go to File, then Info, then Check for Issues, then Inspect Document. Select the categories you want to scan, click Inspect, then click Remove All beside any category where PowerPoint found content.
Does the Document Inspector permanently delete content?
Usually, yes. Removals are often irreversible, and Undo will not reliably restore what has been removed. Microsoft recommends running the tool on a copy of the original file so the working master stays intact.
Does the Document Inspector automatically remove macros and embedded files?
No. Macros and embedded files or objects are detected and flagged, but PowerPoint leaves the deletion to you, since removing them automatically could break the surrounding slide content.
Is the Document Inspector available in PowerPoint for Mac and the web?
The full dialog is a Windows feature. It is not available in PowerPoint for the web, and the Mac version shows fewer categories. On those platforms, manually remove notes, comments, and properties, or copy your slides into a new file before sharing.
Can I get content back after accidentally clicking Remove All?
Sometimes closing the file without saving preserves the original, but once a cleaned file has been saved, recovery usually is not possible. This is the entire reason to inspect a copy rather than the working file in the first place.
Does the Document Inspector catch hidden slides the same way it catches off-slide content?
No, and the distinction matters. Off-slide content refers to objects positioned outside the visible slide area, which the tool flags directly. A hidden slide is an entirely separate setting, and checking for one means reviewing the slide list rather than relying on this tool.
What’s the difference between the Document Inspector and Mark as Final?
They solve different problems. The Document Inspector permanently removes hidden data. Mark as Final simply discourages further edits by making the file read-only until someone chooses to undo that status, so it offers no real protection against a determined editor.
Should I run the Document Inspector before or after Check Accessibility and Check Compatibility?
Run Inspect Document first. Cleaning hidden data does not affect visible slide content, so the order of the other checks will not change their results, but starting with the Document Inspector keeps the workflow consistent across files.
Does the Document Inspector work on older .ppt files, or only the modern .pptx format?
It’s built primarily for the .pptx format, where most of the hidden data lives in the file’s XML structure. Older .ppt files store information differently, so results can be less complete, and converting to .pptx first is generally the safer approach.
Final Words
The Document Inspector is the quiet final step that separates a professional presentation from an embarrassing one. In under a minute, it strips the comments, notes, metadata, and leftover draft content that no audience should ever see, provided you remember the golden rule: inspect a copy, not your original.
Make it a habit. Save a -SHARE copy, run Inspect Document, Remove “All” where it applies, and send your deck with confidence. Want to confirm a file is actually clean before it goes out? Run it through our free PPTX Metadata Inspector, an online tool that reveals exactly what metadata a .pptx file is carrying; no PowerPoint required. For more practical walkthroughs, browse our PowerPoint tutorials, and when you’re ready to build your next deck on a clean foundation, explore SlideModel’s editable PowerPoint templates and free PowerPoint templates.