Pyramid charts are widely used in business presentations to show information, such as hierarchical relationships, stages of development, or levels of importance. This might include an organizational chart, a marketing funnel, or strategic priorities laid out as a pyramid diagram. Learning how to create a pyramid chart in PowerPoint can help presenters organize layered information in a vertical sequence for easier explanation. PowerPoint offers several ways to build these visuals, including SmartArt pyramid diagrams, custom shapes, and professionally designed PowerPoint templates.
What is a Pyramid Chart
A pyramid chart is a visual diagram that displays information across multiple levels arranged in a triangular shape. Each level typically represents a category, stage, or priority level. The largest base of the pyramid supports smaller sections that follow, to represent such information. A few common uses for pyramid diagrams include creating organizational charts to show hierarchy in an easy-to-analyze layout, business strategy models, marketing funnel stages to represent the customer journey, product development phases, and priority frameworks. Since pyramid charts emphasize structure and progression, they are often used in corporate presentations and strategic reports.
How to Create a PowerPoint Pyramid Diagram
You can create pyramid diagrams in PowerPoint using SmartArt, from scratch with shapes, or by editing PowerPoint templates to quickly generate diagrams as needed.
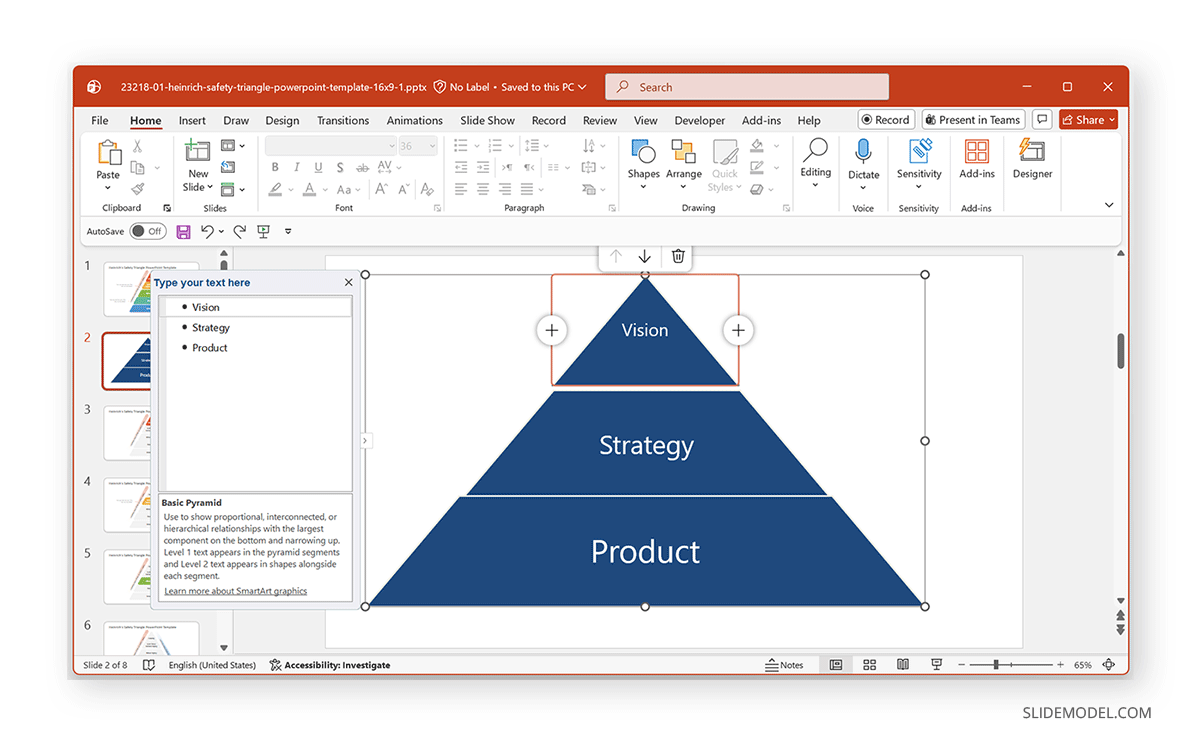
Method 1: Create a Pyramid Chart Using SmartArt
One of the easiest ways to create a pyramid in PowerPoint is by using SmartArt. SmartArt includes several built-in pyramid graphics that automatically organize information into levels.
Step 1: To get started, insert a SmartArt diagram via Insert -> SmartArt. This will open the SmartArt gallery.
Step 2: Select a Pyramid Diagram from the left panel via the Pyramid menu. From this menu, you will see several options, including a Basic Pyramid, Inverted Pyramid, Pyramid List, and Segmented Pyramid.
Step 3: Add Text to Each Level by clicking inside the pyramid. Click inside each section of the pyramid to add text. Alternatively, you can type the information in the SmartArt Text Pane.
Step 4: To customize the design, go to the SmartArt Design tab to adjust the colors, layout style, shape effects, size, and alignment.
Method 2: Create a Pyramid in PowerPoint Using Shapes
While SmartArt is convenient, creating a pyramid using shapes gives you more design control. This approach allows you to customize colors, spacing, and layouts more freely.
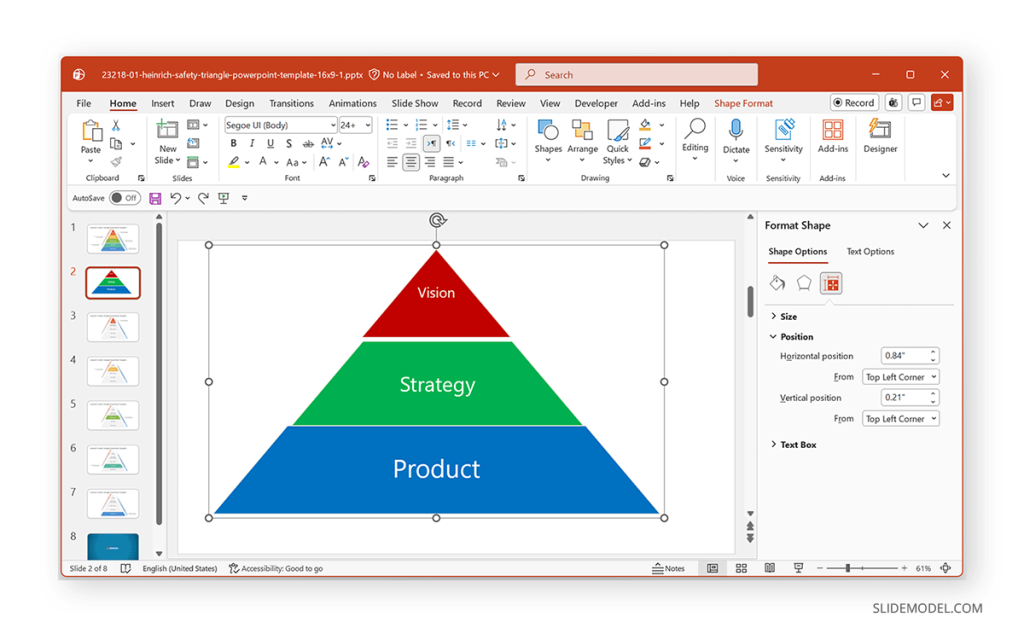
Step 1: Insert a Triangle via Insert -> Shapes -> Triangle and draw the shape on the slide. This will form the base pyramid shape.
Step 2: To create multiple levels, insert horizontal lines across the triangle to separate sections via Insert -> Shapes -> Line. For a 3-level pyramid, draw two horizontal lines dividing the triangle into three sections.
Alternative Step 2: Instead of a single triangle, many designers prefer to stack trapezoidal shapes. You can insert a Trapezoid shape via Insert -> Shapes and duplicate it twice. Then, resize each layer progressively smaller. This creates a layered pyramid effect. For the top of the pyramid, use the yellow icon to drag and convert the Trapezoid shape to a perfect triangle. Alternatively, you can also use a small triangle shape on top of the diagram for the last layer.
Step 3: Click inside each shape and add your content, e.g., hierarchy for an organizational chart. For such a chart, you can also further divide each layer by adding lines to show individuals at the same level of hierarchy on the pyramid.
Step 4: Format the Pyramid by using fill colors, outline styles, gradients, shadows, and other options via the Shape Format tab in PowerPoint. This method is particularly useful when creating customized diagrams, where you want a very specific design for your pyramid sections.
Method 3: Use a Pyramid Chart Template in PowerPoint
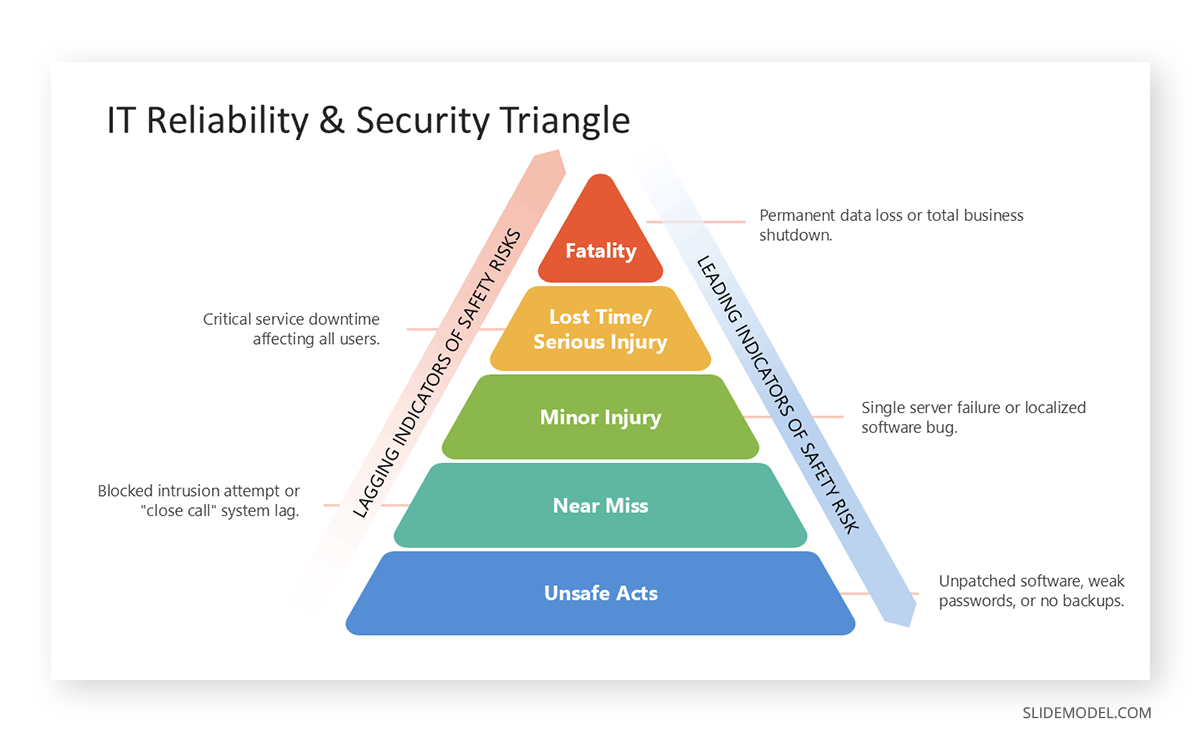
For presenters who want professional visuals without putting in a lot of design effort, using a Pyramid chart template PowerPoint design can save time. Pre-designed templates often include multiple pyramid layouts, with editable colors, animations, transitions, and multiple styles within the same slide deck. You can explore these Pyramid Chart PPT Templates with diverse designs to create pyramid diagrams without much effort. The example below shows Heinrich’s Safety Triangle PowerPoint Template, featuring a simple pyramid design with placeholders and color-coded sections.
Advanced Pyramid Chart Customization and Design Techniques in PowerPoint
There are various methods for creating unique pyramid chart designs with inverted pyramids and 3D effects, as well as advanced customization techniques to add or adjust levels and generate lists within pyramid designs.
1. How to Change the Number of Levels in a PowerPoint Pyramid
Adjusting the number of pyramid levels depends on the method used.
In SmartArt
Select the pyramid diagram created using SmartArt, open the Text Pane, and press Enter to add levels. Delete text to remove levels. PowerPoint automatically adjusts the pyramid structure.
In Shape-Based Pyramids
Duplicate or remove layers, resize shapes to maintain the pyramid structure, and align layers evenly. This approach offers greater design flexibility.
2. How to Create a 3D Pyramid Chart in PowerPoint
Adding depth to a pyramid diagram can improve visual impact.
Method Using Shape Effects
Select the pyramid shape via Insert -> Shapes -> Triangle and go to Shape Format and choose Shape Effects -> 3-D Format. Apply bevel or depth effects such as gradient, shadows, or perspective rotation.
3D PowerPoint Templates
Professional templates often include pre-designed 3D pyramid chart visuals that are easier to customize. These diagrams are useful when presenting strategic frameworks or business models. You can explore such templates from SlideModel’s collection of 3D Pyramid diagrams for PowerPoint.
3. How to Make an Upside Down Pyramid in PowerPoint
Now that you know how to create a conventional Pyramid diagram in PowerPoint, there are also other design types you might find useful. For example, sometimes a presentation might require an inverted pyramid layout. This type of diagram is useful for showing decreasing priorities or narrowing processes. The instructions below show how to create such a diagram.
Using SmartArt
To create an inverted SmartArt pyramid PowerPoint design, go to Insert -> SmartArt -> Pyramid -> Inverted Pyramid. PowerPoint will automatically display the pyramid with the largest section at the top and the smallest section at the bottom.
Using Shapes
Alternatively, you can rotate a custom pyramid. Select the pyramid shape via Insert -> Shapes and go to the Shape Format tab. From here, rotate the shape 180 degrees. This creates an upside-down pyramid structure.
Using PowerPoint Charts
By inserting a Funnel chart in PowerPoint, you can create an inverted pyramid diagram. This can be particularly useful when representing sales data or funnel charts in a slide. To make this type of chart, go to Insert -> Chart -> Funnel and insert the given chart type.
Using PowerPoint Templates
Depending on the way the Pyramid diagram is created in a PowerPoint template, you can use one of the two methods mentioned above with a bit of improvisation. For example, if a Pyramid diagram has been created using multiple shapes, you can rotate the shapes 180 degrees and rearrange them via drag and drop to create an inverted pyramid. Alternatively, you can look for inverted-pyramid templates, such as the 3D Inverted Pyramid PowerPoint Template shown below.

4. How to Convert a List into a Pyramid Chart PowerPoint Design
PowerPoint makes it easy to transform a simple list into a pyramid diagram. Just create a bullet list on a slide, select the list, go to Home -> Convert to SmartArt, and choose a Pyramid layout. PowerPoint will automatically convert each bullet point into a pyramid layer. This feature helps turn text-heavy slides into visual diagrams.
5. How to Add Levels to a Pyramid Chart PowerPoint Slide
Sometimes your pyramid needs more layers to represent additional stages. You can add levels to create such a multi-level design in PowerPoint.
SmartArt Pyramid Design
Select the SmartArt pyramid, open the Text Pane, and press Enter to add a new level. PowerPoint will automatically expand the pyramid.
Adjusting Pyramid Shapes
If you built the pyramid manually, duplicate the bottom layer, resize it to fit the pyramid structure, and adjust the spacing between layers. This allows you to create pyramids with many levels.
Using PowerPoint Templates
By using multi-level PowerPoint templates that divide the diagram into convenient sections with placeholders, you can create professional pyramid diagram designs by simply adding text to the sample slide. Furthermore, such designs come with editable shapes and colors, like this Strategies Business Goals Pyramid PowerPoint Template.

Final Words
Pyramid charts in PowerPoint enable presenters to transform structured information into a clear visual hierarchy. Whether you use SmartArt pyramid PowerPoint diagrams, manually create shapes, or use professional templates, PowerPoint provides several flexible ways to build these visuals.
For quick diagrams, PowerPoint templates are the easiest solution. For customized layouts, shapes offer more control, whereas SmartArt provides a balance between control and speed in creating diagrams. However, without professionally designed templates, you might find yourself spending more time designing and organizing slides, as well as adjusting shapes and colors.