PowerPoint files can quite easily become heavy enough to exceed the maximum size limit for email service providers. In such a case, one might need to upload the files separately to send them to a recipient or reduce the file size of the presentation file, such as by compressing images.
Why Compress Photos in PowerPoint?
PPT image compression makes attaching and sending files easier than generating links via third-party apps. Such a measure can also ensure that the PowerPoint templates you are working on don’t get too heavy or lag when running in SlideShow mode. Before we discuss how to compress pictures in PowerPoint, let’s look at some reasons for compressing pictures for a PPT and the benefits it can hold for the end user.
Reduced PowerPoint File Size
One major reason for compressing images in PowerPoint is to reduce the file size of the presentation. This can make it easier to send the file via email, direct link, or messaging services.
Improvement in Upload, Download, and Loading Time
While large files can be shared via various cloud storage and sharing services, uploading such files can take a long time. Moreover, the download time can be significant if the recipient lacks a quality Internet connection. Heavy files might also lag during SlideShow mode and online collaboration. Compressing images can improve the loading time for the presentation file. This is essential for engaging presentations, as the audience can quickly lose interest if the slideshow lags and disrupts frequently.
Image Compression and Device Compatibility
Compressing images can improve the compatibility of the overall presentation file and its embedded images for various devices. These might include low-end mobile devices, legacy devices such as projectors, slow systems, etc.
Easier File Conversion
Lightweight powerPoint files can be easier to convert to other formats such as PDF, Video, GIF, etc. Whether using PowerPoint or a third-party tool for file conversion, you will likely face fewer issues with lightweight files than with heavy PowerPoint files. Even if you use Google Slides templates in PowerPoint or other formats converted to a PPT, lightweight files will likely aid better conversion between different formats.
How to Compress Pictures in PowerPoint
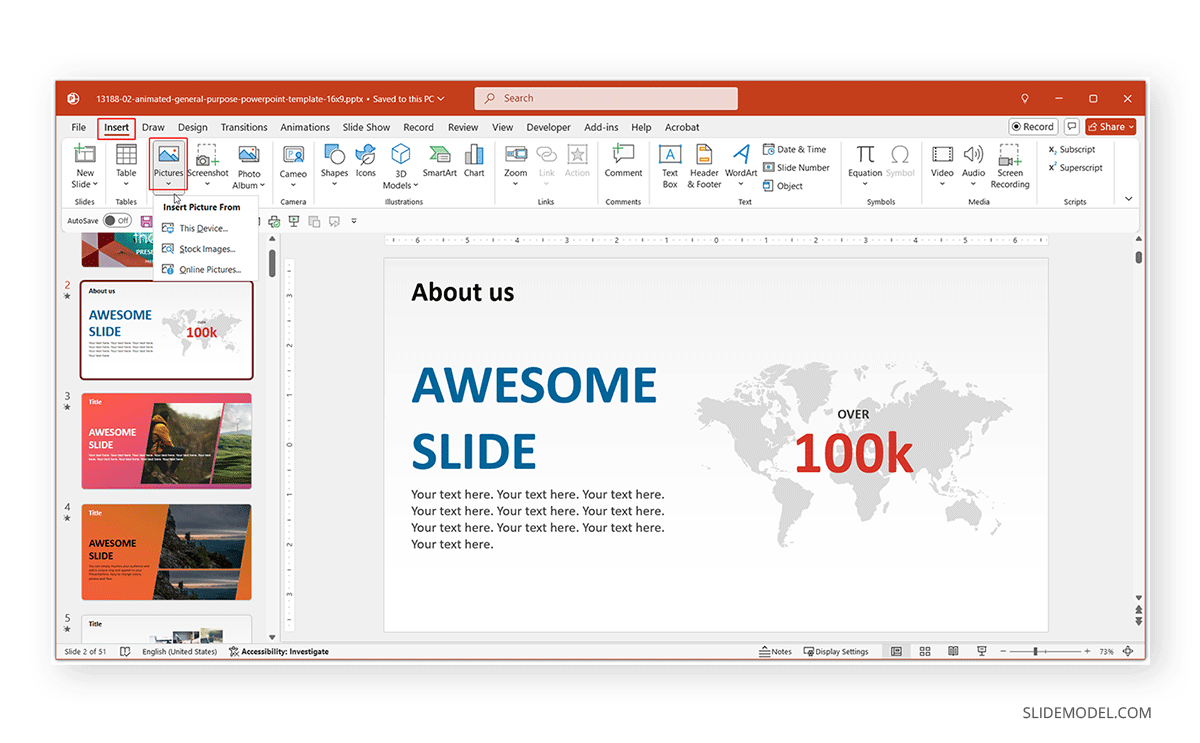
To start adding pictures in PowerPoint, go to Insert -> Pictures and select a source to add a photo. If you’re new to PowerPoint, you might want to understand the various options for adding pictures from your device, such as stock images and online pictures from Bing search.
Whether you have images placed directly or in altered form, image cropping can help reduce file size. For example, our tutorial on how to round corners in PowerPoint and how to make a picture transparent in PowerPoint show the different ways images can be added to PowerPoint using different styles. Either way, compressing images can be helpful to optimize your slide deck for better device compatibility, reduced file size, and easy sharing.
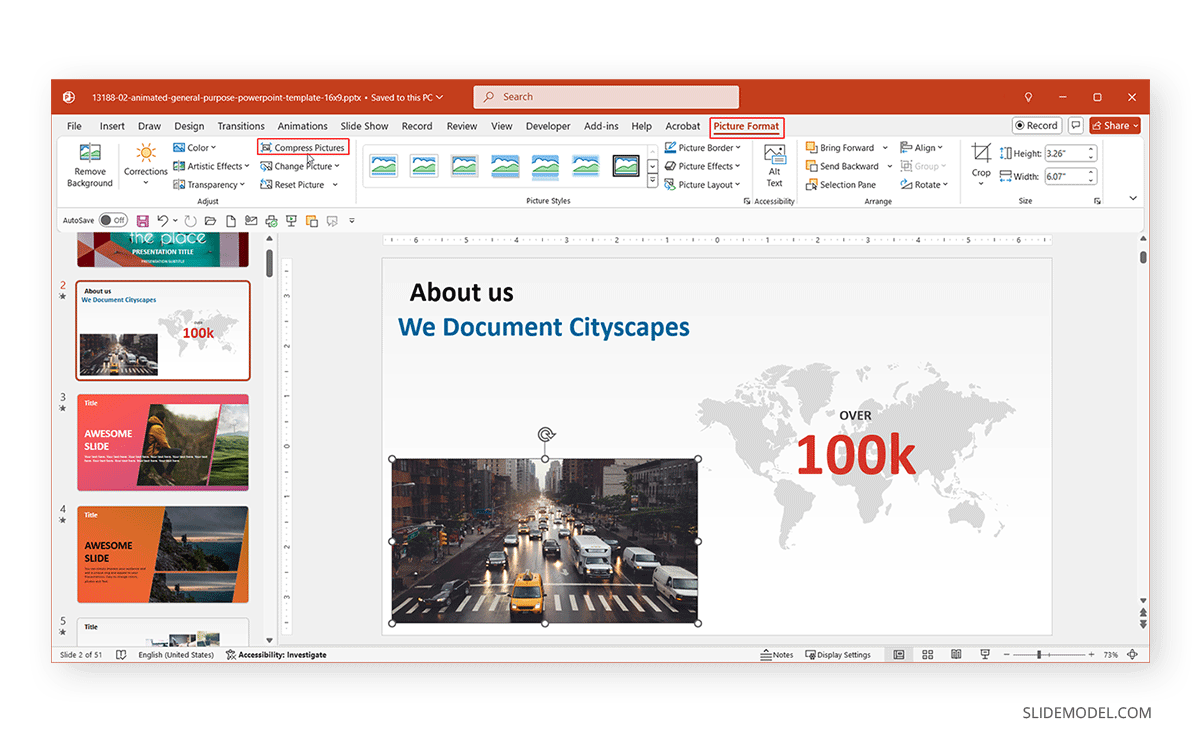
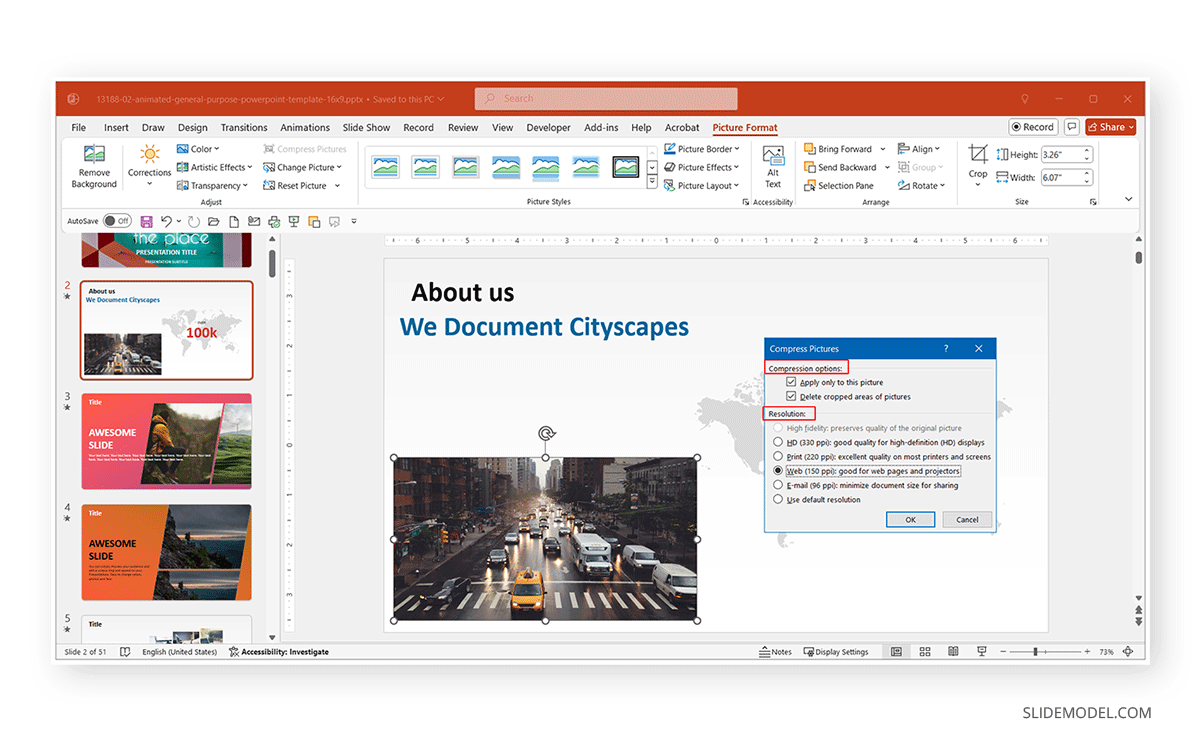
To compress a picture, select it in PowerPoint and go to Picture Format -> Compress Pictures. This option can be used to compress not only a single image in the presentation file but also all images (as explained below).
Once you select Compress Pictures, a pop-up with various compression options will appear. The dialog box has two major sections: Compression Options and Resolution Options.
Compression Options:
The Compression Options in PowerPoint enable selecting if one or all images in the file are to be compressed and provide the utility to remove cropped areas from the file to reduce its size.
Apply only to this picture: This option can be checked if you don’t want to compress all pictures in the PowerPoint file. Leaving this option unchecked will compress all photos in the file according to your selected resolution.
Delete cropped areas of pictures: As the name of the option suggests, checking this option will delete the cropped areas for pictures in the PowerPoint file. When an image is cropped in PowerPoint, the app retains the cropped areas so you can revert to them later. This option removes those cropped areas from the file, reducing the file size. This also means that you can simply edit the same image to revert to the cropped image. For more details about image cropping, see our tutorial about how to crop an image in PowerPoint.
Resolution Options:
Different resolutions are suitable for various devices and can help reduce the file size. The image resolution options for cropped images include the following:
- High fidelity: This option preserves the image’s original quality while compressing the remaining file. You might often find it disabled when using compression options since it isn’t the best option for compressing PowerPoint file images.
- HD (330 ppi): By picking HD resolution at 330 pixels per inch, the image will be compressed at a resolution suitable for modern devices that support HD or higher resolutions.
- Print (220 ppi): This option compresses photos just enough to make them suitable for printing, which is useful if you need to print slides.
- Web (150 ppi): Since many PowerPoint presentations are shared via the web or presented during remote meetings, you can compress them to 150 pixels per inch to preserve the image quality enough for web-based displays.
- E-mail (96 ppi): If the PowerPoint file is to be shared via email, the 96 pixels per inch compression can significantly reduce the file size. While this can be a handy option for compressing photos, it can significantly reduce the image quality.
Use default resolution: This option uses PowerPoint’s default resolution. To check the default resolution configured for your device, go to File -> Options -> Advanced to check or change your default resolution via Image Size and Quality.
How to Compress Images for PowerPoint Using Third-Party Tools
If you want to find ways to control image quality more during compression, third-party tools can provide lossless and lossy compression options for image files to use in PowerPoint.
TinyJPG / TinyPNG
TinyJPG (also known as TinyPNG) is a web-based tool that enables compressing JPG, PNG, and WebP files without affecting much of the image quality. The image compression algorithm of this web-based tool is quite impressive. It reduces image size without affecting too many details within the image itself, such as by reducing the colors in the image without eliminating important details. The free version of the web app provides compression for 5 MB files with support for instant batch conversion of 20 files simultaneously.

Compressor
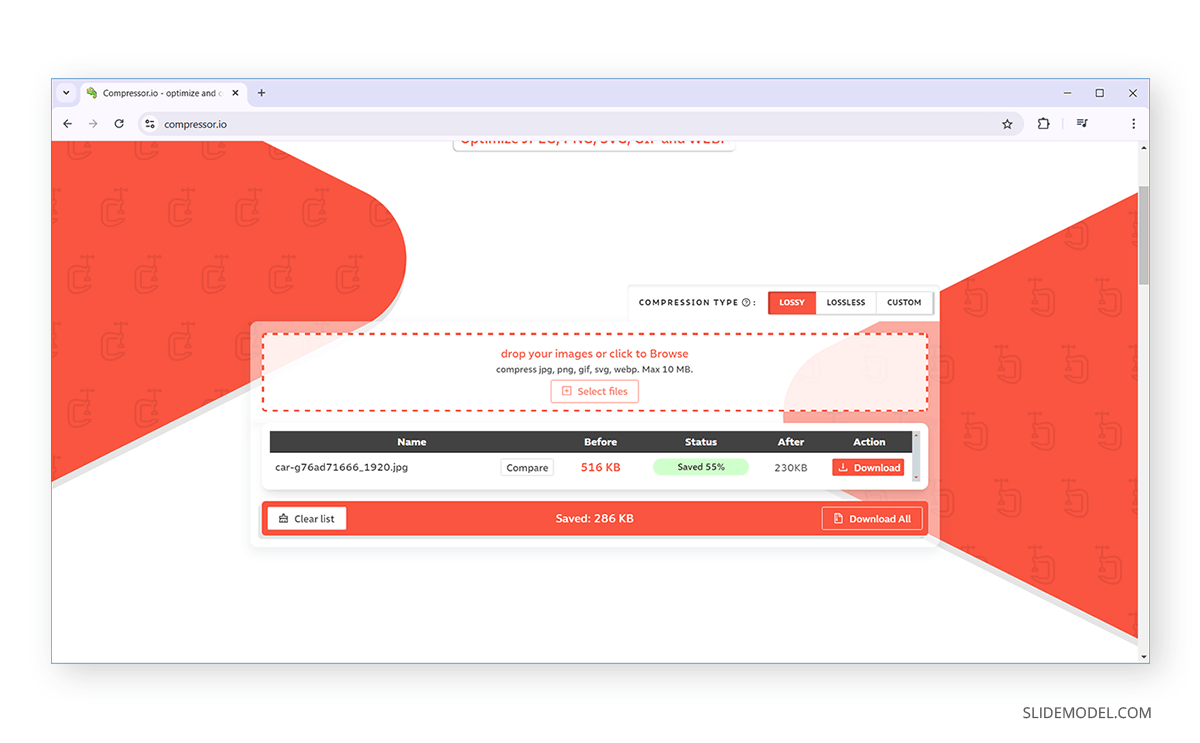
Compressor.io is another web-based image compression tool that offers lossy, lossless, and custom image compression options. It supports file conversion of up to 10 MB and supports JPG, PNG, SVG, and WEBP files.
Microsoft Paint
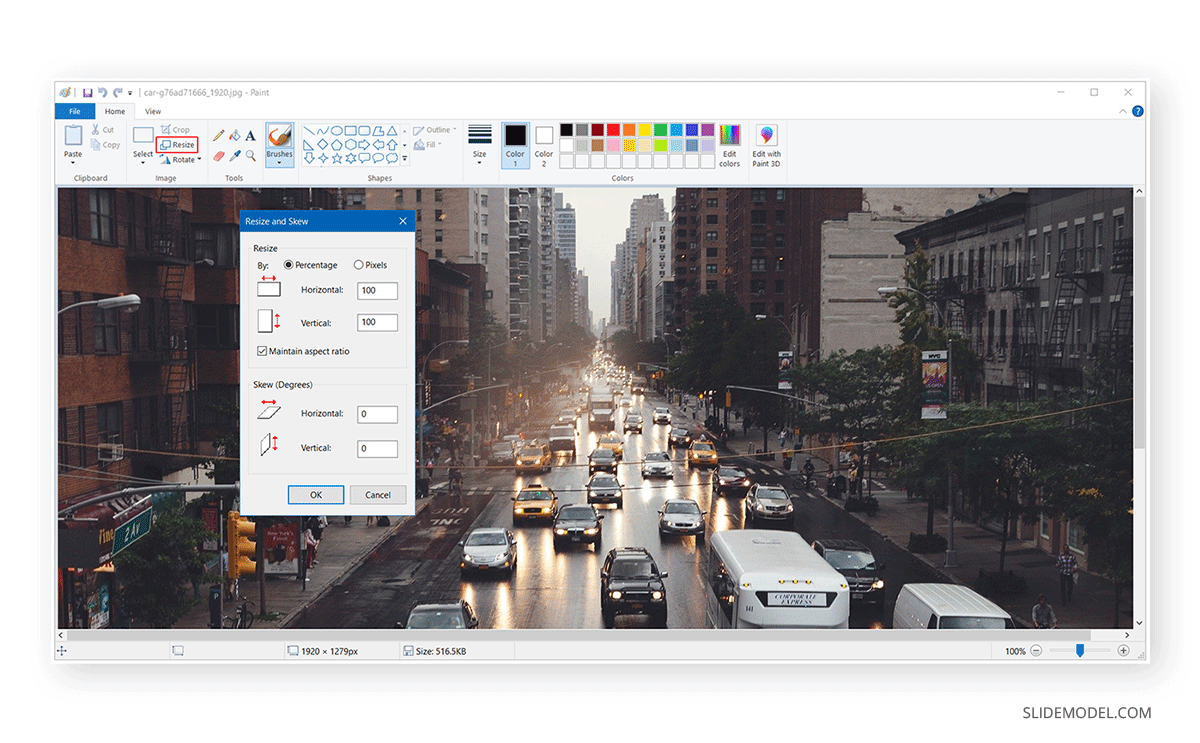
If you are looking for offline apps to get the job done, Microsoft Paint can compress images, as can many other tools. Simply open the image in Microsoft Paint, click Resize, and reduce the file resolution to reduce the file size.
Photos
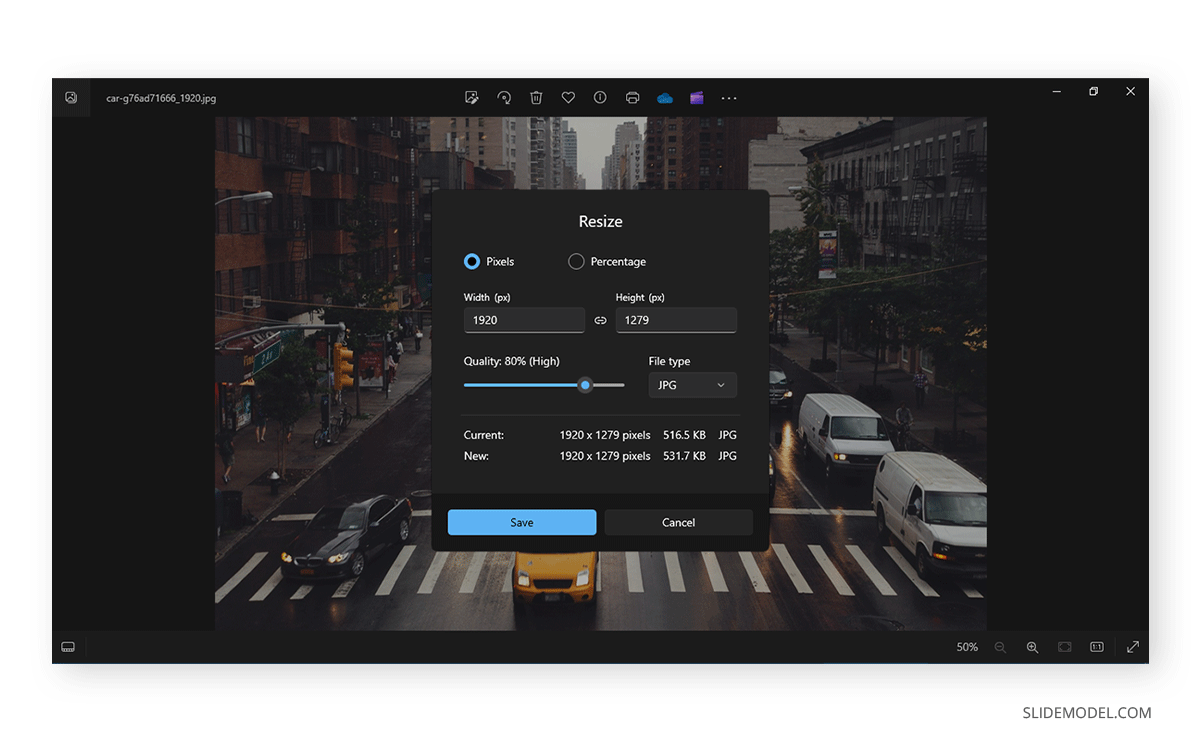
Microsoft’s default Photos app with Windows can also be used to reduce image file size. You can reduce the file size by opening the image in the Photos app and reducing the image resolution.
Photoshop and Other Advanced Photo Editors
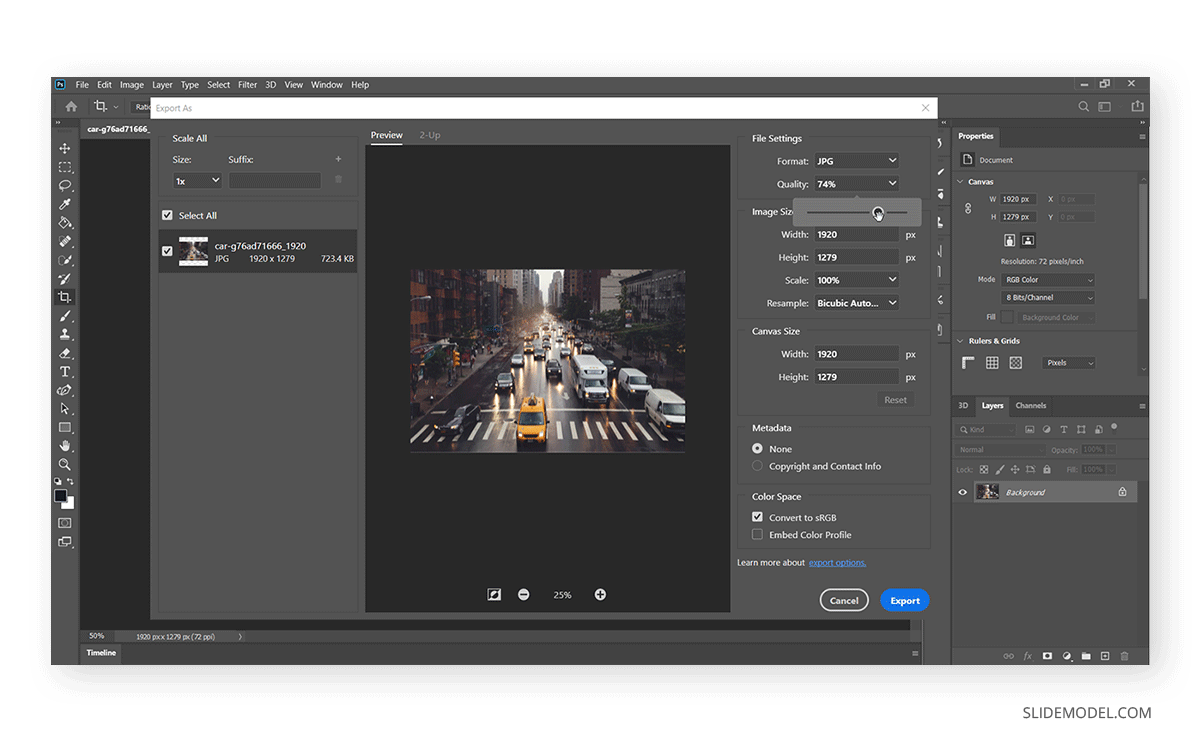
A number of advanced photo editing apps like Adobe Photoshop, Adobe Lightroom, GIMP, and others can be used to reduce image file size by specifying file quality to suit your needs.
FAQs
Can you compress images in PowerPoint?
Yes, PowerPoint provides default image compression options to change the image resolution, remove cropped areas, and apply selected compression options to one or all photos in a PowerPoint file.
How to Compress Pictures in PowerPoint?
Select a picture to compress pictures in PowerPoint and go to Picture Format > Compress Pictures.
What does the ‘use default resolution’ option do in PowerPoint compression options?
This option compresses images to the default resolution set for PowerPoint on your device.
How do you check the default resolution for compression in PowerPoint?
You can check your device’s default resolution via File > Options > Advanced under the Image Size and Quality section. This is the default resolution set for PowerPoint on your device, which is also used for compression if you select use default resolution from the Compress Pictures menu.
Final Words
When pondering over how to start a presentation or end a presentation, it is also worth considering how the slide deck will be used and what might be its optimum file size. Image compression can have a number of benefits for PowerPoint users. It can make it easier to reduce the file size of your presentation, optimizing it for easy sharing and different device types. If you’re trying to figure out how to make a presentation easy to share and present by reducing the file size, image compression is one of the first things to help you achieve that. For more information, check our article about how to compress PowerPoint presentations.

