When editing shapes or images for presentations, you might want to round corners in PowerPoint. By giving such a look to shapes and images, you can add visual appeal to your presentations and make more space for accommodating additional content on a slide. Let’s learn how to apply this creative technique into your presentation slides!
How to Create Rounded Corners for Shapes
Introduction to Rounded Corners for Shapes
Rounded corners for shapes can be used in a number of ways, such as to create simple shapes, diagrams, placeholders, and for making other design elements. You can select a rounded corner shape and refine it in PowerPoint for further use.
Step-by-Step Guide for Rounding Shape Corners
Step 1: Insert Shape in PowerPoint
To create a shape with rounded corners in PowerPoint, go to Insert -> Shapes and select a rounded corner shape to draw on your PowerPoint slide. In our example, we will use the Rectangle: Rounded Corners shape.

Step 2: Drag and Drop to Adjust Round Corners
Drag to draw the shape on your slide, select it, and click the yellow dot on the shape to refine the rounded corners further. This will help you choose the right corner radius based on your preference.

Step 3: Choose the Right Corner Radius
By dragging the yellow dot, you can make the shape as round as you like. Alternatively, you can simply opt for a rounded corner shape and use it as it is for designing your slides. For example, you can edit the shape’s colors, insert text, and turn it into a placeholder for images.

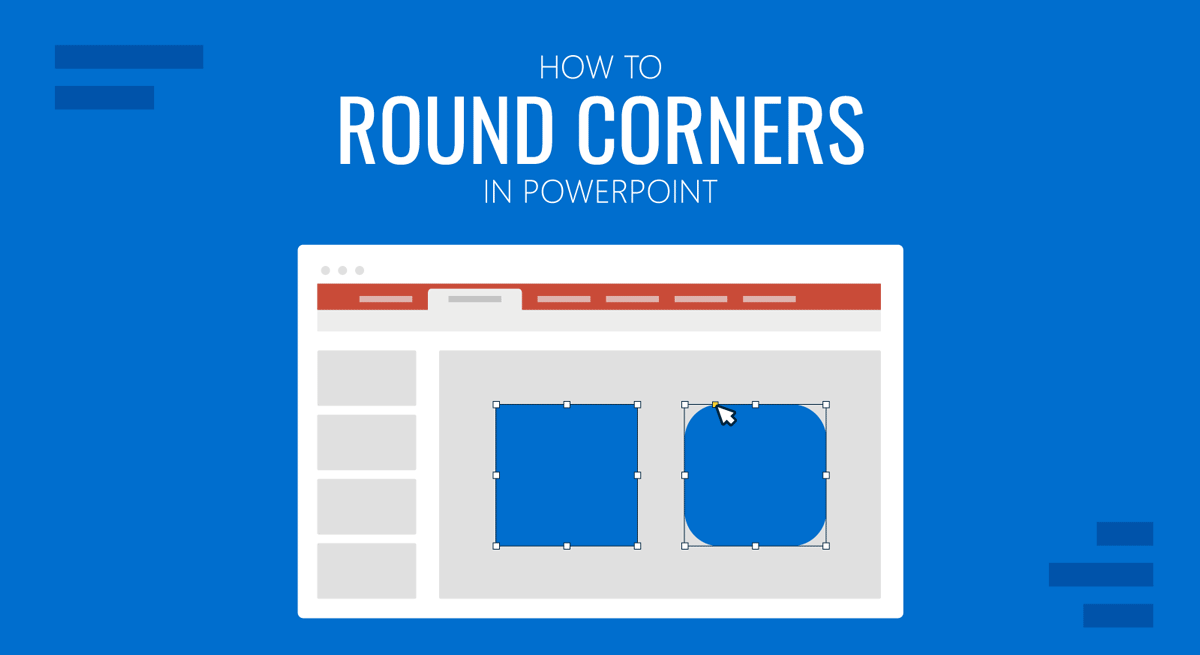
The image below shows a rounded corner rectangle in PowerPoint that is customized in size. The shape can be further refined by editing the size and corners via the Shape Format tab or by accessing the Format Shape menu by right-clicking on the shape.

How to Create Rounded Corners for Images
Introduction to Rounded Corners for Images
Making your images round-cornered in PowerPoint is similar to adjusting round-corner shapes. A quick and easy method is to crop them to a shape with round corners and adjust your image to further refine your corners. From the example below, you will notice that such photos can stand out in a slide due to their unconventional look and help add some uniqueness to your slide designs.
Applying Rounded Corners to Images
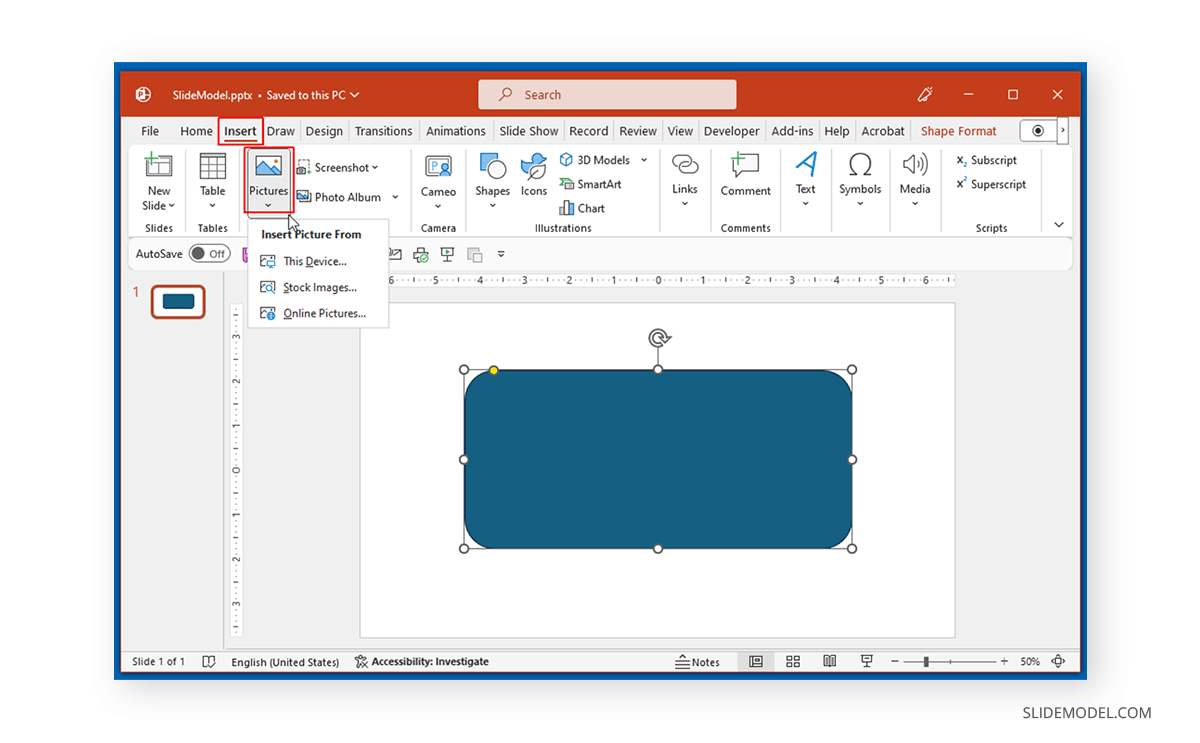
Step 1: Insert Picture in PowerPoint
To create rounded corner images, insert a shape to your slide from your device, stock images, or online pictures via Insert -> Pictures.

Step 2: Crop Image to Shape
Select the picture, go to Picture Format -> Crop -> Crop to Shape, and select a rounded cornered shape to crop your image.

Step 3: Adjust the Rounded Corners
Just like a PowerPoint shape, you can adjust the rounded corners for the selected image by moving the yellow dot to edit and control the corners for your image.

You can drag the yellow dot to adjust the rounded corner look for your image according to need.

The below screenshot shows an image in PowerPoint with rounded corners. You can further edit the image to adjust the alignment, corners, and shape via the Picture Format tab or the Format Picture menu, which can be accessed by right-clicking on the image.

Tips for Image Selection and Cropping
Now that you know how to make a picture round in PPT, you might want to consider a few image selection and cropping tips to design your slides.
Use a High-Resolution Image
Low-resolution images, let alone cropped, can look odd enough when used in slides. Use a high-resolution image to avoid pixelation and image degradation when further cropping, and adjust it in PowerPoint.
Consider using Images with a Centralized Subject
Consider using images that have the subject placed in the center. By doing so, you can avoid cropping the essential bits of an image when turning the corners round.
Avoid Image Distortion
Select an image that does not look out of place when the corners are adjusted. Sometimes, a picture can appear distorted when cropped, such as missing out on important parts of the central subject, such as a human face, which can make the image look odd. Unless you intend to create a distorted image for your presentation, use an image with ample negative space to avoid image distortion.
Don’t Eliminate All Negative Space
Negative space can provide visual calm for your audience by making the image accessible to the eyes. Try not to eliminate all the negative space in the image to give your audience some visual rest.
Consider How Round Your Corners Should Be
When using a rounded corner shape and adjusting the roundness of the image, consider how much you want your image to be rounded. Some images can look strange when the corners are rounded too much, whereas others might look fine. How rounded the corners of your image are will depend on your overall slide design and content needs.
Combining Rounded Shapes and Images
Step 1: Insert a Rounded Corner Shape
You can combine rounded shapes and images by turning your shape into a placeholder. To do this, insert a rounded corner shape via Insert -> Shapes.

Step 2: Insert the Picture into the Slide
Adjust the rounded corners of the shape using the yellow dot to drag and drop for adjustments, and insert a picture into the slide via Insert -> Pictures.
Step 3: Crop Picture for Rounded Corners
Drag and drop to place the image within the shape and crop it to a rounded corner shape. To give it rounded corners, use Picture Format -> Crop -> Crop to Shape.

Step 4: Make Design Adjustments
Once your image and shape are aligned, you can make design adjustments by adding additional content or changing the background and design of your slides.

With a bit of creativity, you can combine shapes and images in PowerPoint to create visually appealing slide designs to present your content.
Alternative Methods
You can also use various alternative methods to round shapes and images in PowerPoint. You can use a number of PowerPoint features or alternative tools to get the desired results.
Shape Effects in PowerPoint
PowerPoint Shape Effects provides a number of presets with rounded corners that you can quickly apply to shapes, including 3D effects. Just select a shape and go to Shape Format -> Shape Effects.

Picture Effects in PowerPoint
Just like Shape Effects, PowerPoint also provides Picture Effects. By selecting an image and going to Picture Format -> Picture Effects, you can select a preset with rounded corners to quickly give your images rounded corners. Like Shape Effects, Picture Effects also come with 3D presets.

Picture Styles in PowerPoint
Another easy way to give your images rounded corners is to select a rounded corner frame from Picture Styles via the Picture Format tab. This will instantly convert your selected image to the chosen style.

Online Tools to Create Rounded Images
Different online tools allow uploading images for conversion to rounded corners. You can use these tools to upload and convert your images to rounded corners. A few examples include Image Online and Pine Tools. These websites provide various image conversion options, including the utility of converting them to rounded corners. These images can then be downloaded and used in your PowerPoint presentations.

Graphic Design Tools
You can use basic or advanced graphic design tools – like Adobe Photoshop, Adobe Illustrator, Corel, etc. – to give your shapes and images the required rounded corner look. You can also combine shapes and images and later export the final output as a standalone image for use in PowerPoint presentations.

Tips for Consistency and Alignment
Use Guides and Grids
Be it PowerPoint or graphic design applications such as Adobe Photoshop, you can enable guides and grids to ensure consistency and alignment when designing your PowerPoint slides for shapes and pictures with rounded corners.
Maintain a Reference Point
When designing your slides, consider the primary object on your slide and align all objects accordingly. For example, if you use an image with a rounded corner as your central theme, such as the starting point for a mind map, you can align other shapes, such as rounded placeholders, around it. Try not to deviate from your central object to avoid a cluttered slide.
Use Alignment and Snapping Tools
PowerPoint and graphic design applications provide alignment snapping tools to help maintain consistency in aligning objects. You can use these options to consistently ensure your object is aligned in a certain direction (e.g., left, right, or center).
Copy Objects for Consistency
Generating multiple shapes of the same height, width, and color might be time-consuming. Manually change the setting each time you create a new shape. You can copy similar objects to avoid this issue and use drag and drop to rearrange them.
Lock or Group Objects
To ensure that objects don’t overlap or a part of the slide remains consistent, lock them in their place or group them. Locked objects cannot be moved unless unlocked. You can lock objects via the right-click menu. If objects are grouped, they become a single object and can be moved around simultaneously. You can select multiple objects on a slide by clicking on them while using the SHIFT or CTRL/Command key and select the Group option via the right-click menu.
Use Transparency Sparingly
It can be tempting to make certain objects semi-transparent when creating slide designs. However, when using rounded corners, transparency can result in overlapping and visually overpowering objects if not applied correctly. While there is no harm in using transparency for slide objects, you should use transparency sparingly when working with rounded corners to avoid a messy design.
Use PowerPoint Designer
The Designer option, located on the Home and Design tab in PowerPoint, is a powerful AI-featured design tool that provides design ideas that you can choose and incorporate into your slides. Simply click the Designer button to get instant AI-powered ideas based on the content in your slides.
Use PowerPoint Templates for Consistency
You can create your own or use readymade PowerPoint templates to ensure consistency and popper alignment for your slide objects and overall design. If you aren’t very handy at making professional-looking designs yourself, using readymade templates for PowerPoint can be a great way to edit and customize existing designs.
Also, check our article about how to align objects in Google Slides.
Troubleshooting
When making shapes and images with rounded corners, you can face a few potential issues that can be resolved through troubleshooting the problem.
Fixing Misaligned Corners
If the corners of your shapes and images appear misaligned, see if you are using the same size for all your objects by going to the Shape Format or Picture Format tab and checking the height and width for each. You can also get additional information by right-clicking the menu to select Size and Properties for the object via the Format Picture or Format Shape option.
Fixing Blurry Edges
Blurry edges for shapes and images can occur if you are using a low-resolution or compressed image or effect that might have distorted the object. If the image has been imported from your device after editing in a graphic design application, you might want to use an appropriate output format. For example, a static image saved as a GIF might appear blurry and pixelated. Similarly, not saving your image in HD might be another reason for the issue. Another cause can be an overlapping object or background causing the problem.
Part of Object Appears Missing
Using an image with a lot of white space instead of a transparent background can overlap some of your other objects. Whitespace or extra space on an image similar to that of the background color of your slide can hide other objects due to overlapping extra space. Crop the image properly to avoid this issue. You can also send some objects to the front or back via the right-click menu or via the Arrange menu in the Shape Format or Picture Format tab.
Objects Missing in Slideshow
If your objects with rounded corners appear missing or a part of an object isn’t visible in the slideshow, see if your design has overlapped the slide area or if an effect or animation is causing the issue. Sometimes, this can also be an issue associated with the monitor, or the PowerPoint file can become corrupt.
Final Words and Design Inspiration
While you might want to try making shapes and pictures with rounded corners for your PowerPoint slides, consider the following tips and design ideas for creating a refined slide deck.
Color Pallets and Modern Designs
Creating rounded corners for shapes and images in PowerPoint can help give your slides a professional and polished look. Rounded corners PPT can be designed with some inspiration from a PowerPoint designer or readymade PowerPoint templates. You should consider color palettes and modern designs to make your slides visually appealing and in line with recent design trends.
Less is More
Unlike in the past, the design language for PowerPoint presentations, the web, and modern apps come with fewer and simplified design elements, using solid colors. This modern or material design is meant to enhance the overall look of the design with a focus on important aspects of the primary content while avoiding clutter with fewer elements. Using fewer elements can be a great way to create slides focused on the topic and avoid making the audience look hard for the primary subject in a slide. In other words, less is more.
Account for Legibility
When using rounded corner objects, the overall design of your slides should be legible while avoiding objects that are too large or too small. This can help ensure that you aren’t using content that is difficult to view or cannot appropriately convey the primary message for your slides. Legibility can be affected due to a number of issues, these might include low resolution images, overlapping objects, inconsistently aligned objects, text that is too small to read, incompatible fonts that don’t gel with the slide design, etc. By accounting for such factors, you can avoid making rounded corner objects that don’t add visual value to your slides or might be difficult to view when you run the presentation as a slideshow.
Take Inspiration from PowerPoint Templates
Depending on how skillful you are at using PowerPoint or how much time you intend to spend on a slide deck, designing rounded corners for slide objects can help you make the most out of your content, as well as save space and make the slides easy on the eyes. Some PowerPoint templates provide rounded corners for shapes and placeholders for images and have predefined animations, transitions, and 3D designs that can give your slides a polished look. Hence, the use of professionally designed PowerPoint templates can always be helpful in not only saving time but also giving you some ideas to craft your slides. SlideModel provides a wide array of professionally designed PowerPoint templates, including designs with rounded corners that can be used for making diagrams, showcasing geographical maps, organizational profiles, and progress reports, and making other types of professional presentations related to various topics.