There are many reasons why you may consider converting a PowerPoint presentation to a High-Definition video; for example if you want to share a presentation online through YouTube or Vimeo, create a self-running presentation or save the slide show video to a DVD.
In this article we will guide you on how to convert a PowerPoint presentations to a High Definition video (as an MP4 video file,Windows Media Video .wmv file or QuickTime Video File .mov) using Microsoft PowerPoint.
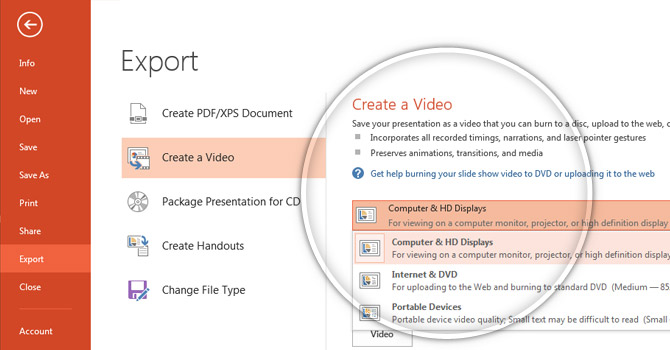
PowerPoint lets you save presentations as videos directly from the File > Save As dialog box; however if you need to choose the output video quality while saving the presentation then it is recommended to use the File > Export > Create a Video option.
High Definition (HD) or high-quality presentation uses a higher resolution (1280×720 or 1920×1080) to save the video information. It can improve the overall experience while watching a presentation online or playing a PowerPoint slideshow in a kiosk. It would be the preferred format if you plan to upload your video presentation to YouTube or Vimeo, and have higher quality. The main drawback is that the presentation video file size will be bigger and more bandwidth may be required.
Why You Should Convert a PowerPoint to a Video Format?
Converting a PowerPoint to a video format can have several advantages. From making intuitive videos to engaging your audience to address complex topics in just a few minutes.
Create a Video Slideshow
You can use the converted video file to create a video slideshow for display at an event or edit the content of the video to generate a video presentation.
Create Presentations and Tutorials
PowerPoint enables users to export their videos with voice-over narration and animations. This can help create extensive presentations for an audience
Use Professional Editing Software to Create Engaging Videos
Adding a voice-over, additional graphics, and some footage can help create a professional-looking presentation by using a video editing application. Similar to how you use Instagram tools to convert images into a stunning video, some famous video editing apps that can help you make the most out of your converted PowerPoint file to a video format include Adobe Premiere Pro, Camtasia Studio, iMovie, Final Cut Pro, etc. If you are a Windows user, you can look into alternatives to Final Cut Pro like Lightworks, Movavi Video Editor, and Shotcut.
Create a Video Instead of Using PowerPoint
You can convert PowerPoint to video by simply letting your slides play out, making the presentation easy to play for end users without the need to have PowerPoint installed. This approach can also be helpful if you intend to present your slides using a video player instead of PowerPoint, as the latter might not be available everywhere, whereas video players often come with all types of desktop and mobile operating systems.
Create Explainer Videos
Transforming your PowerPoint presentation into an explainer video can be a powerful way to engage your audience and communicate complex information in a concise, accessible format. Whether it’s for a presentation, an educational YouTube video, a training presentation, or a product launch at a major event, an explainer video ensures your message is effectively delivered and understood. By converting your slides into video format, you gain the ability to incorporate voice-over narration, animations, and other dynamic elements that enhance viewer engagement and retention.
Upload a Video Online
Many presenters also like to upload their presentations online for an audience. A teacher might be interested in making her presentation available for students, or an industry expert might wish to share a concept with others in the industry by uploading a video to a YouTube channel. Either way, converting your PowerPoint to a video can help make the content easily shareable via video streaming platforms like YouTube and Vimeo. Such a video can also be shared privately via file-sharing apps like Box, Dropbox, OneDrive, Google Drive, etc.
How To Convert PowerPoint to Video (Windows)
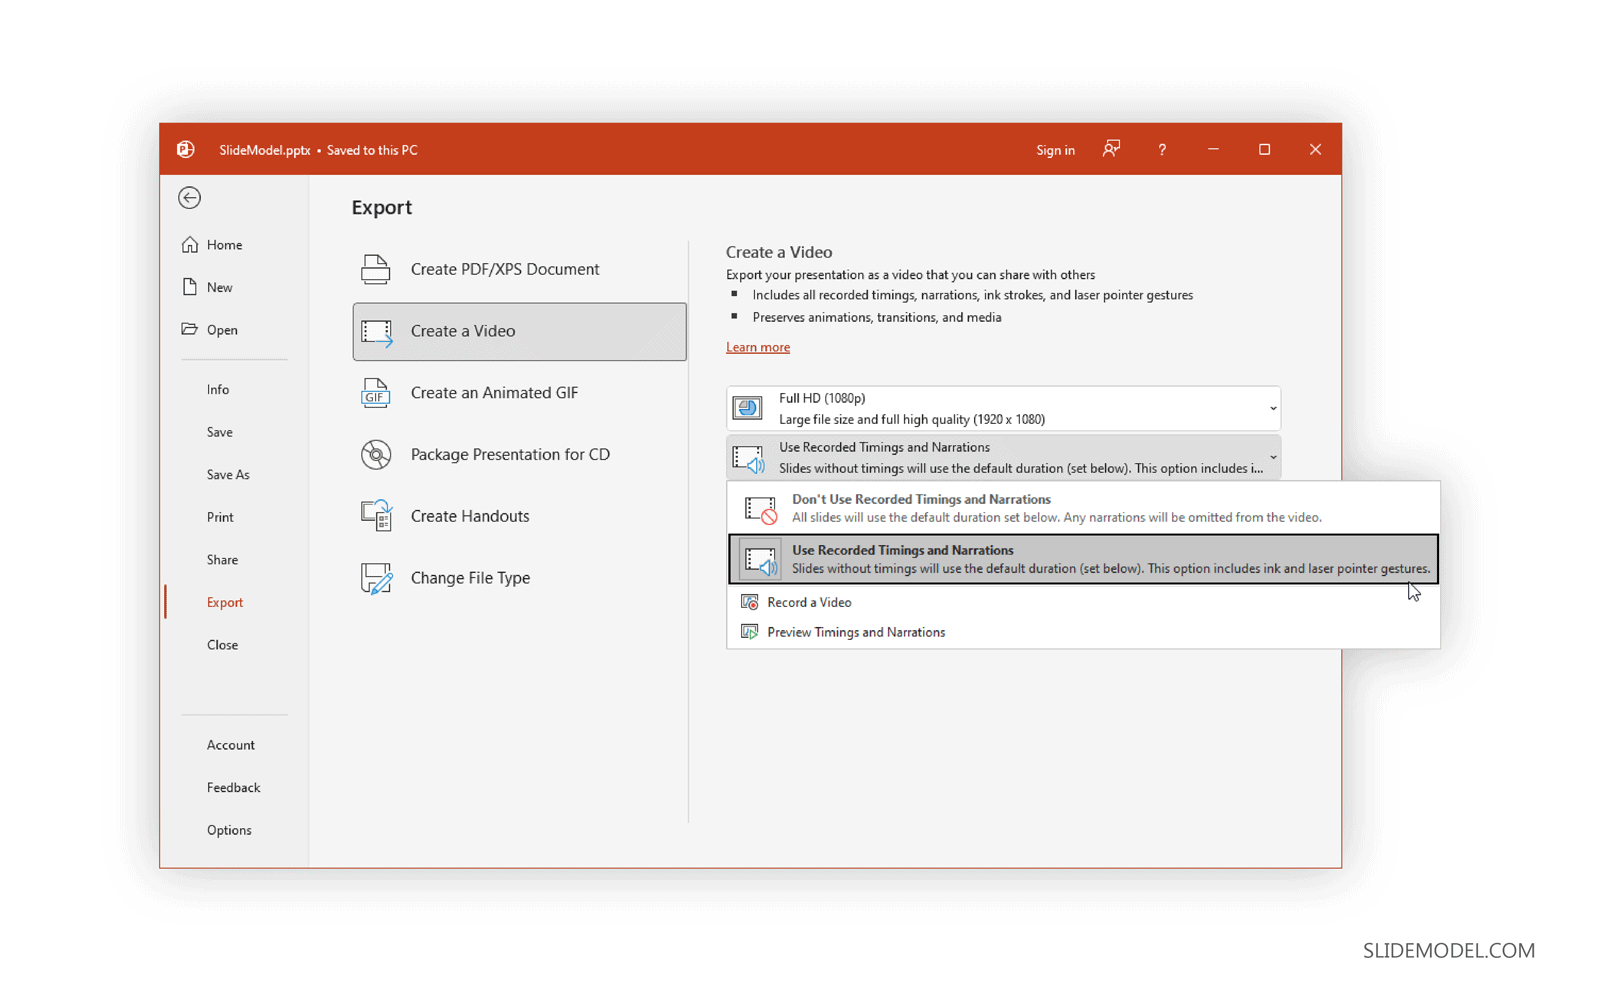
Step 1 – Go to File > Export
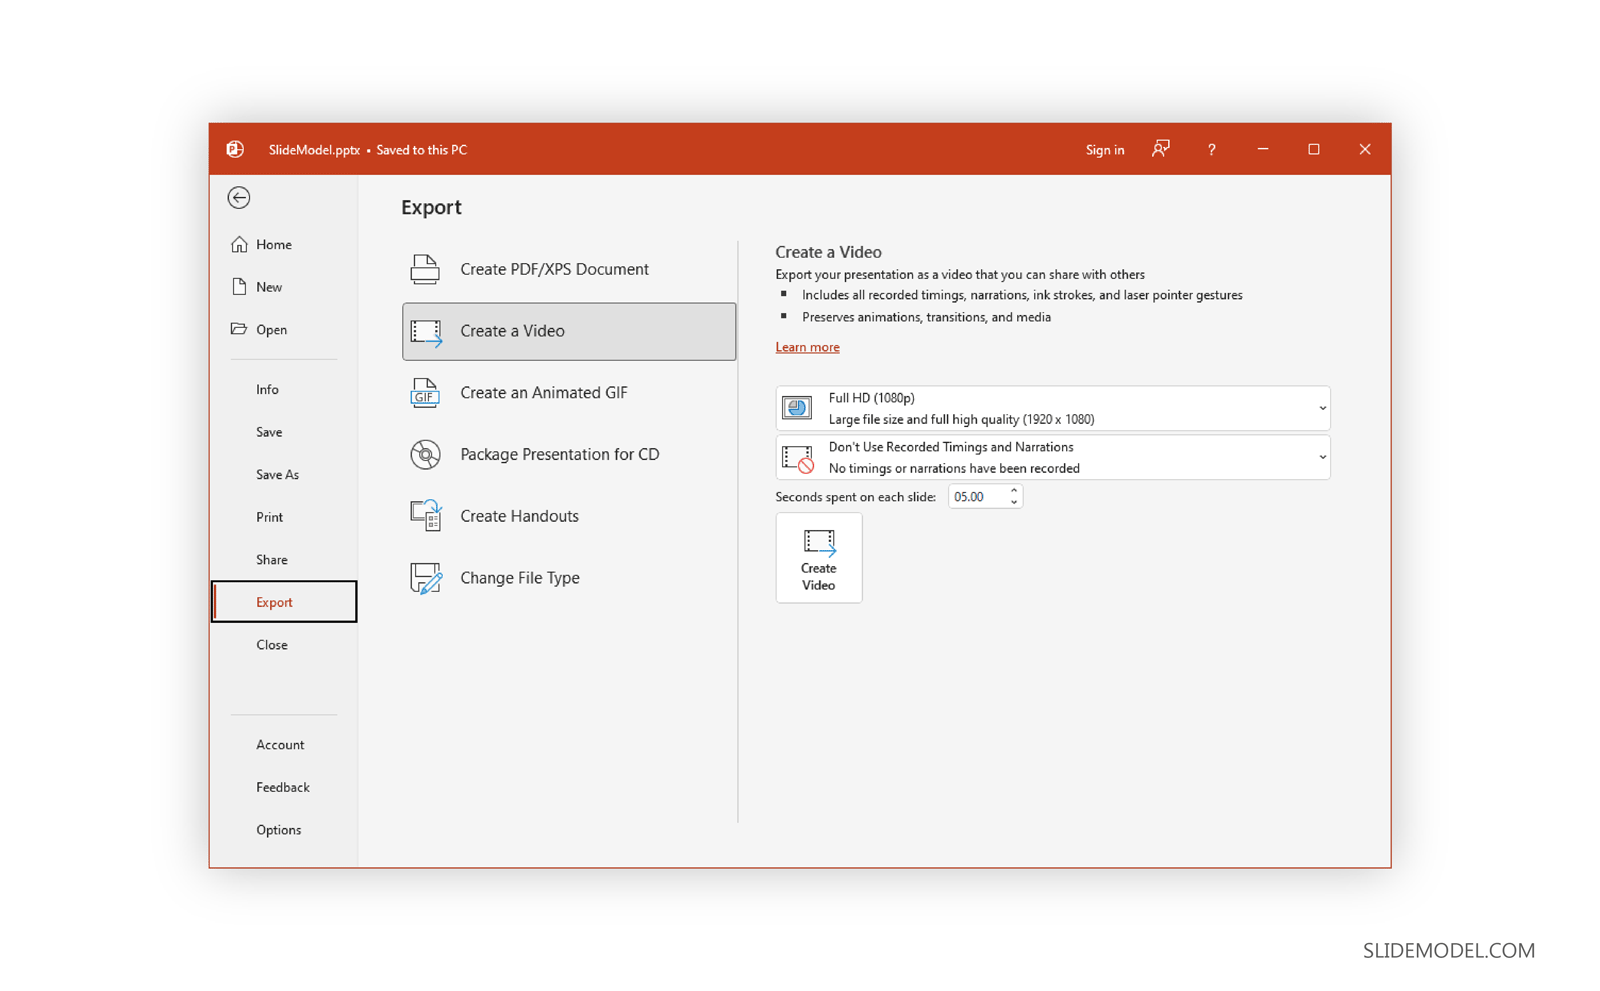
The first step to save a PowerPoint presentation as a HD video go to File -> Export and then click Create a Video button.
Step 2 – Choose Video Resolution
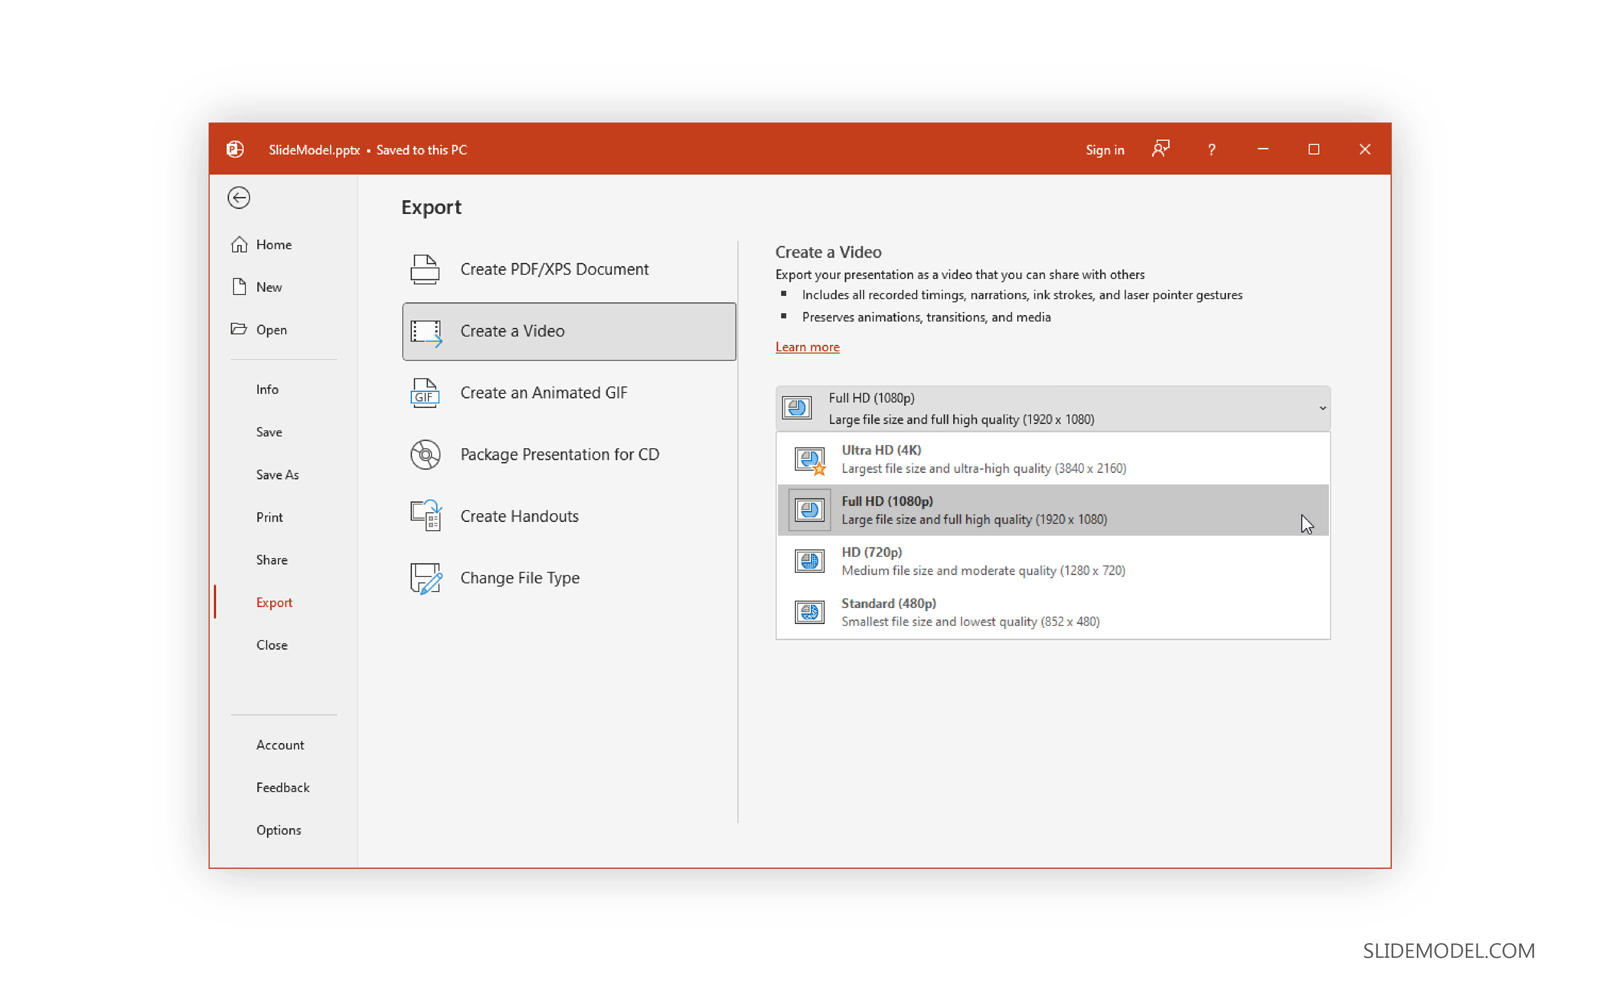
Now, select a resolution to export your video. Other than the Standard (825×480) resolution, the high-definition resolution options include HD (Medium 1280×720), Full HD (Large 1920×1080), or Ultra HD 4K (Largest file size 1920×1080). If you are using an older version of PowerPoint, you might have limited options to select between HD resolutions, since versions older than PowerPoint 2013 only supported HD videos (1280×720).
Optional Step: Save Narrations, Laser Pointer Gestures & Recorded Timings in the Video Exported from PowerPoint
Aside from saving the PowerPoint presentation as an HD video, you can also save a video file that incorporates all the recorded timings during a rehearsal, narrations, and even laser pointer gestures.
In case you have recorded narrations for your slides, you can use them or select Record a Video option to instantly start narrating your slides. The Preview Timings and Narrations option in the same drop-down menu does what it says, it enables you to check and ensure that your narrations are correctly timed with your slides, so you can make necessary edits before finalizing your video.
Optional Step: Select Slide Duration
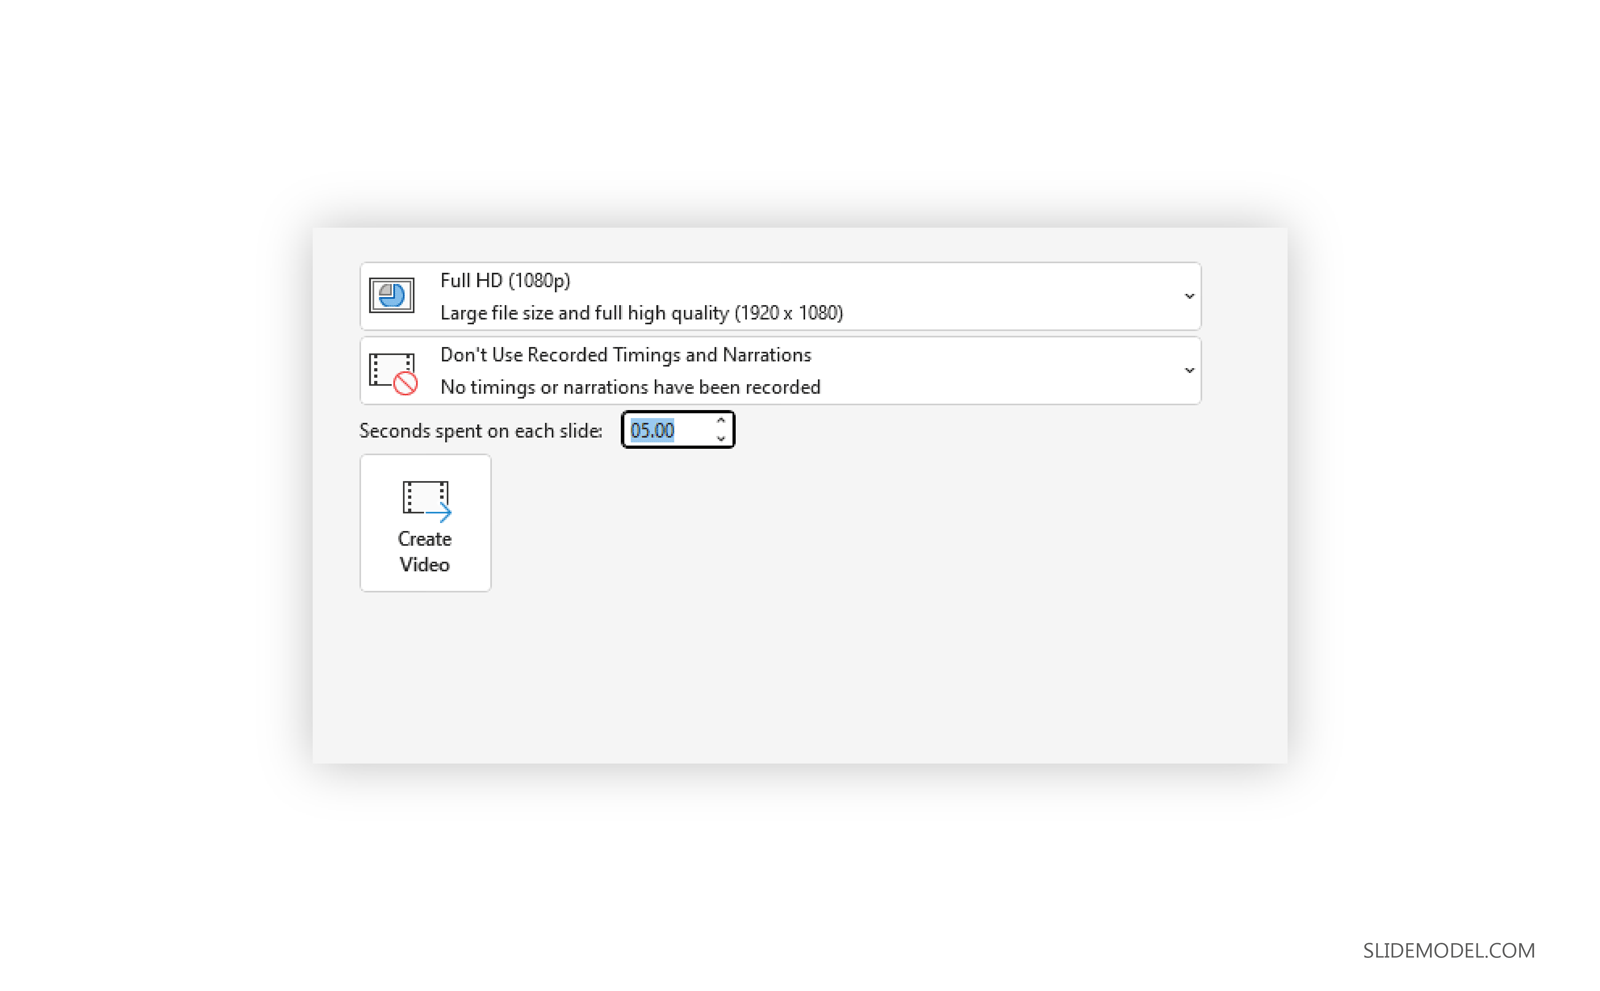
Choose the default time spent on each slide (in seconds) and whether to save the narrations, timings, and gestures. By default, 5.00 seconds are spent on each slide unless you have a different timing recorded for the presentation slideshow.
Step 3 – Select Video Format and Create a Video Presentation
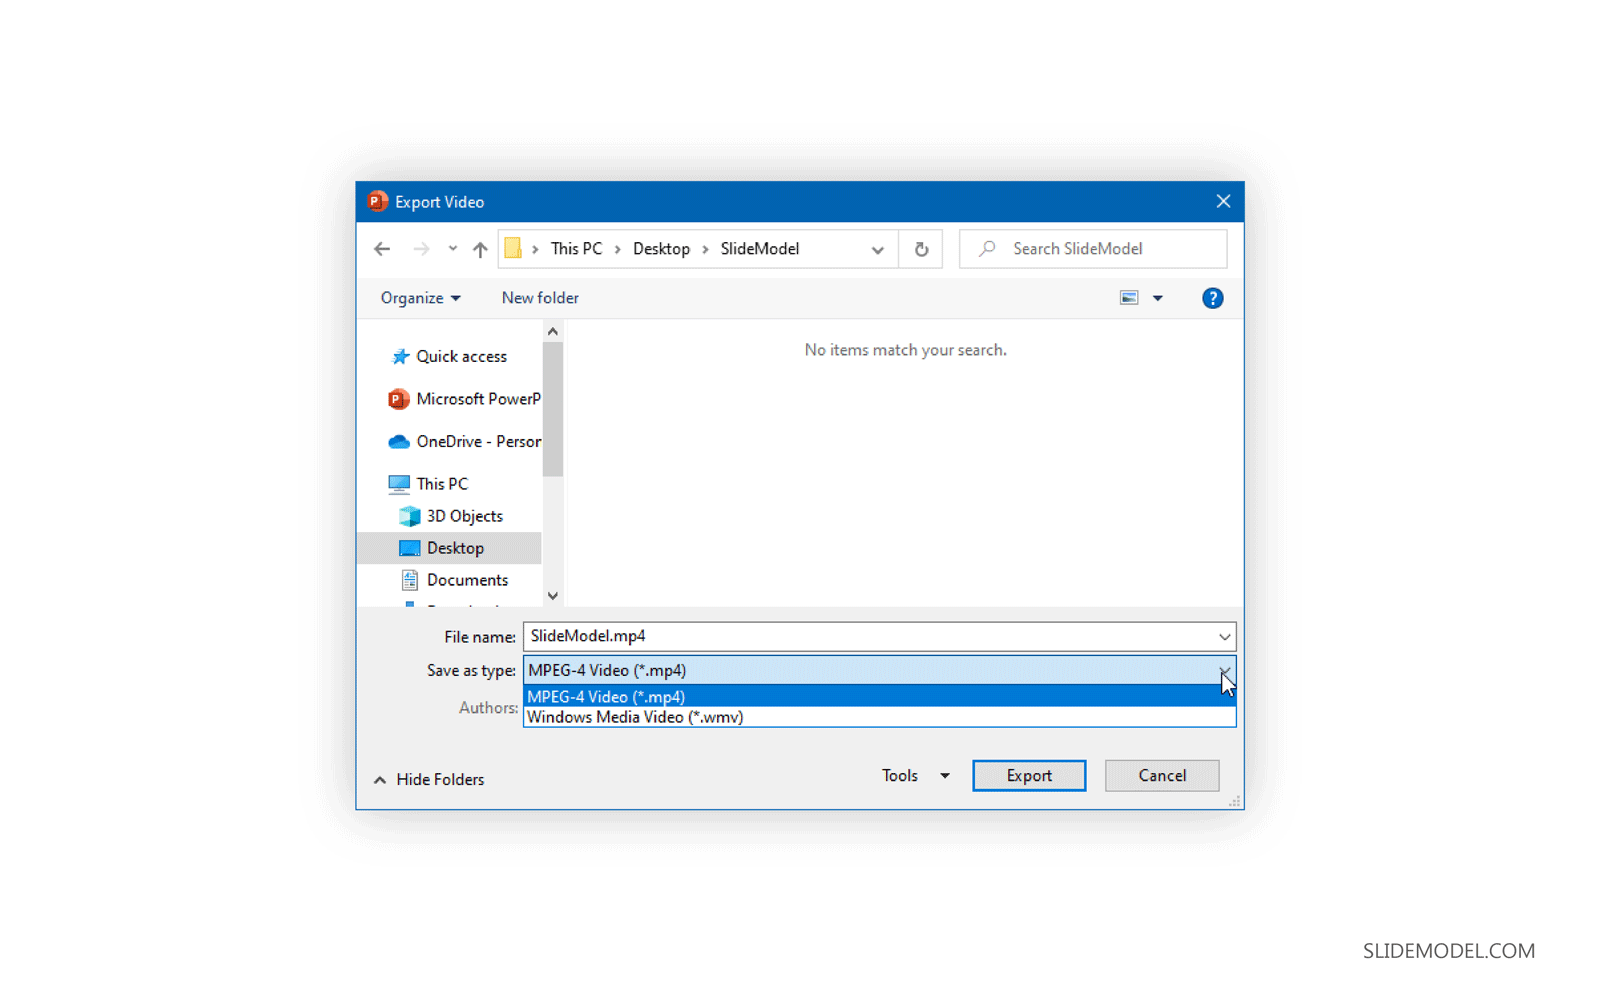
Click Create Video button and choose the destination folder and output file name. For end users wondering how to convert ppt to MP4, this is the step where you can select MP4 as your output format. PowerPoint supports saving slide decks to MP4 or WMV video formats. Once you confirm, wait a few seconds in order for the file is being saved on your hard disk. Presentations with a lot of slides may require a longer wait time.
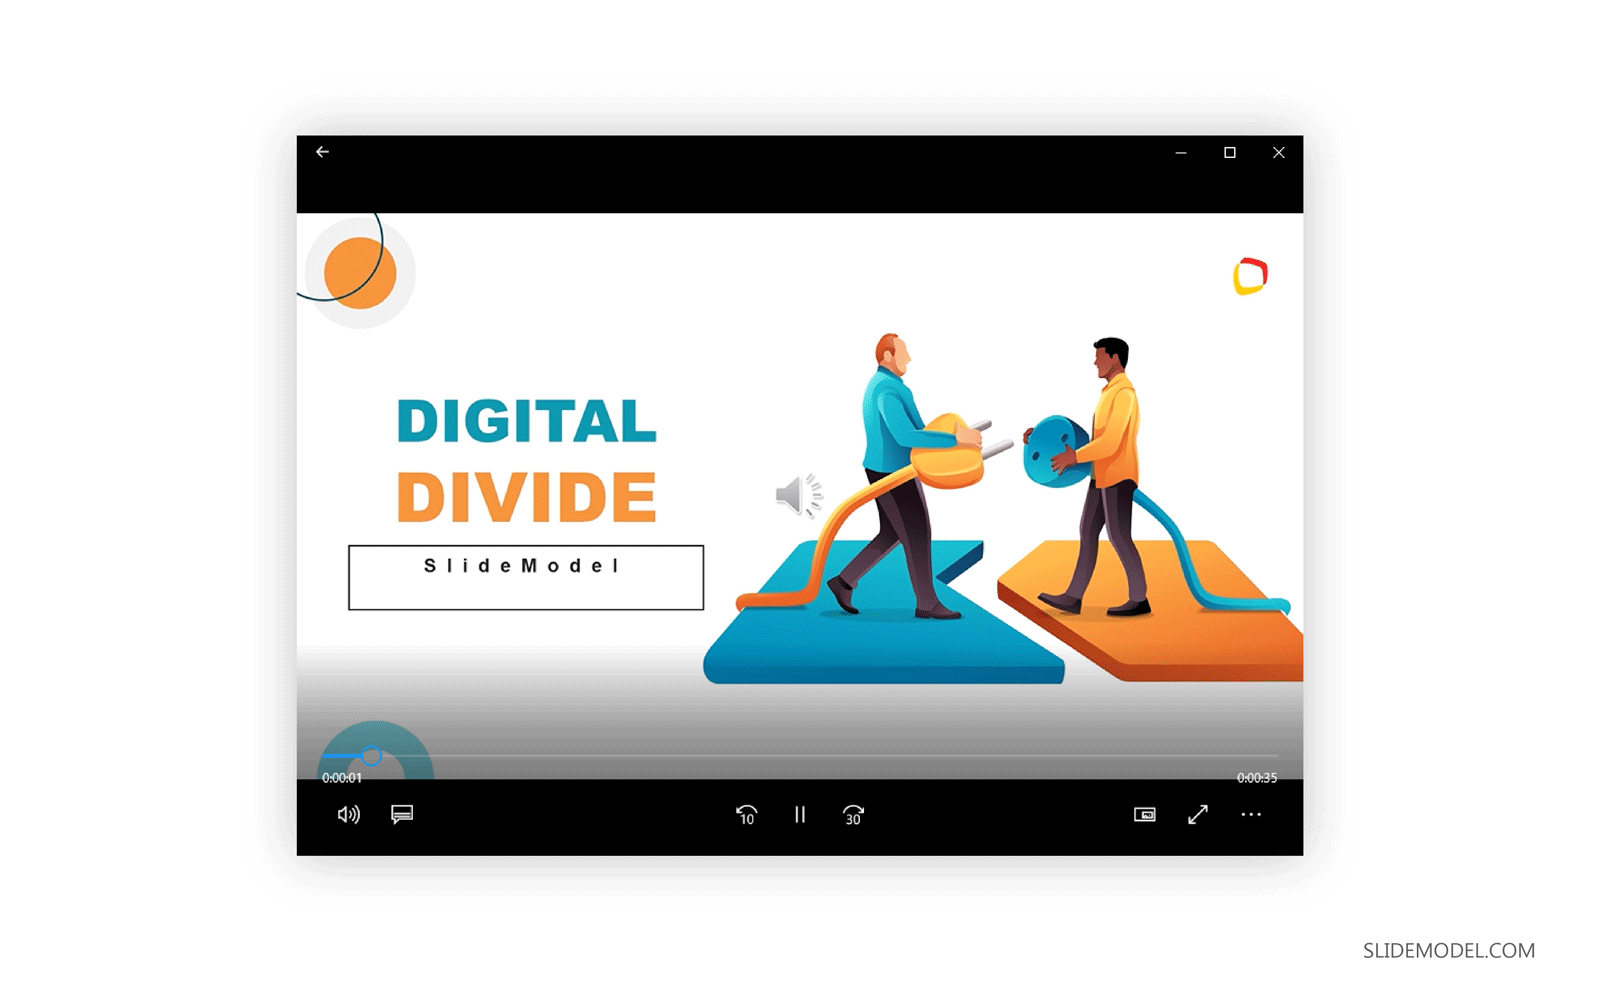
Something good about saving presentations as a video file is that all animations, transitions, and media are preserved.
How to Convert PowerPoint to Video (Mac)
How to Convert PPT to Video in Mac? If you’re wondering how to make a PowerPoint into a video on Mac, the steps are quite similar to how you would export PowerPoint to video on a PC, with a few minor differences.
Step 1 – Go to File > Export
To convert PowerPoint to video on Mac, go to File -> Export.
Step 2 – Choose Video Format
If you have been wondering how to save PowerPoint as MP4 on Mac, this is the step where you can pick a video file format to save your presentation as a video, including MP4 and MOV.
The difference between the PC and Mac during this step is the difference in the availability of video conversion options. The PC version, along with MP4, allows saving a video in the Windows Media Video (WMV) format, unlike Mac, which offers QuickTime video format (MOV) instead.
Step 3 – Select Video Resolution and Create Video
The new version of PowerPoint for Mac allows saving a presentation in HD (Medium 1280×720), Full HD (1920×1080), or Ultra HD 4K (1920×1080) format. The higher the resolution, the higher the file format, so make sure you have enough disk space to save a very heavy file, especially if you opt for Ultra HD 4K resolution.
Save Narrations, Laser Pointer Gestures & Recorded Timings (Optional)
To save narrations, recorded timings, and laser point gestures, select the Use Recorded Timings and Narrations option.
Select Slide Duration (Optional)
To precisely time how long each slide is presented in the video, select the time duration. The default duration is 5.00 seconds, unless you have specified time for each slide separately in the presentation.
Select Export to create your video. Depending on the resolution you have selected, it might take several minutes before the video is converted. Higher resolutions take more time to conversion.
Saving videos from PowerPoint can help you at the time you need to share a presentation slideshow online. Such a video can also be shared privately via digital asset management platforms like ImageKit or file-sharing apps like Box, Dropbox, OneDrive, Google Drive, etc. You can also use this technique to prepare a kiosk presentation, automatically play a slideshow in PowerPoint, make interactive PowerPoint presentations or create a self-running presentation with a PowerPoint loop slideshow.
PowerPoint presentations saved as videos can also be easily run from mobile devices without the need for PowerPoint to be installed on the device. If you wish to save your PowerPoint to video in a format easily accessible, you can opt for PowerPoint save as MP4 instead of using WMV or MOV file formats that are not supported by all types of video players.
Alternatively, check our article about how to insert a video into PowerPoint.
FAQs
Why should I convert my PowerPoint presentation to a video format?
Converting a PowerPoint presentation to a video format can be beneficial for several reasons. It allows for easy sharing on platforms like YouTube or Vimeo, creates self-running presentations, and is ideal for situations where PowerPoint may not be available. Additionally, videos can include voice-over narration, animations, and other enhancements that make them engaging and easy to distribute.
What are the benefits of saving a PowerPoint presentation as a High-Definition (HD) video?
Saving a PowerPoint presentation as an HD video (1280×720, 1920×1080, or Ultra HD 4K) provides better quality, making it more visually appealing for online sharing or display at events. HD videos maintain the presentation’s clarity and impact, especially when viewed on large screens or digital platforms.
How do I convert a PowerPoint presentation to a video on Windows?
To convert a PowerPoint presentation to a video on Windows:
– Go to File -> Export -> Create a Video.
– Choose the desired video resolution (HD, Full HD, or Ultra HD).
– Optionally, adjust slide timings and narration settings.
– Click “Create Video,” select the video format (MP4 or WMV), and save the file.
Can I include narrations, laser pointer gestures, and recorded timings in my video?
Yes, you can include narrations, laser pointer gestures, and recorded timings in your video. When exporting your PowerPoint presentation to a video, select the “Use Recorded Timings and Narrations” option to include these elements. You can also record new narrations or use previously recorded ones.
How can I adjust the duration of each slide in the video?
You can adjust the duration of each slide in the video by setting the default time spent on each slide in the export settings. The default is usually 5 seconds per slide, but you can customize this duration according to your needs.
What video formats can I save my PowerPoint presentation as on Windows?
On Windows, you can save your PowerPoint presentation as either an MP4 or WMV file. MP4 is widely compatible across most devices and platforms, while WMV is a Windows-specific format.
How do I convert a PowerPoint presentation to a video on Mac?
To convert a PowerPoint presentation to a video on Mac:
– Go to File -> Export.
– Choose the desired video format (MP4 or MOV).
– Select the video resolution and other settings.
– Click “Export” to save your presentation as a video.
What are the differences between converting PowerPoint to video on Windows and Mac?
The primary difference is in the video formats supported. On Windows, PowerPoint can save videos in MP4 and WMV formats. On Mac, the available formats are MP4 and MOV. Additionally, the interface may differ slightly between operating systems.


