PowerPoint shapes are very powerful while creating PowerPoint presentations and templates. By working with PowerPoint shapes you have the opportunity to use objects that are very easy to edit.
In this article we will explain how to create a very basic shape from a picture and make it editable so we can easily change the shape properties like color, shadows, 3D styles, etc. A few reasons why working with shapes can help you to make presentations are listed below:
- You can save lot of space by reducing the presentation .pptx file size.
- Resize the objects without losing quality.
- Easily edit the shape properties (using Format Shape) in order to change colors, shadow effects, border styles, etc.
For the example in this article we have used a Moustache picture that was inserted into a blank PowerPoint presentation. Now we will trace the picture and recreate it as a PowerPoint shape.
Step 1 – Add a Rectangular Shape over the Picture
Add a new rectangular shape over the picture and then click Edit Points. By editing points, we will create a different graphic. We will trace the original picture and make a new shape. You can learn more about how to use Edit Point or Anchor Points to edit shapes in Microsoft PowerPoint here.

Step 2 – Edit Points
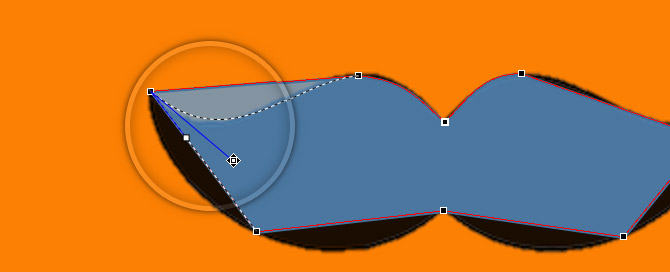
Right click above the shape outline and then add a few additional points to the current shape by clicking Add Points option in the menu. Make sure you click over the black line and not outside, because PowerPoint is very sensitive while working under Edit Points interface. It is very easy to get out from the Edit Point interface.
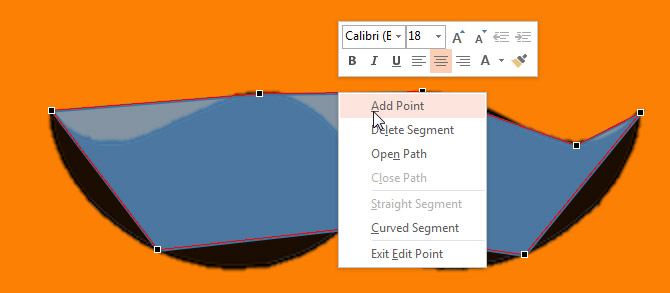
Step 3 – Adjust the Nodes & Corners
Adjust the nodes to the corners of the picture so we can match the original design. Then, right click on each corner and make sure to choose the Corner Point option. If you click with the left button, then two blue lines will appear. These lines let you define the curvature for the corner.
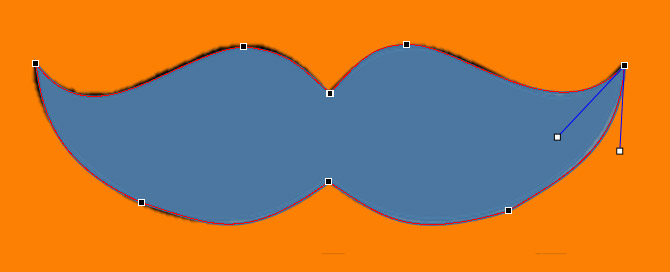
Below you can see how the shape looks after applying all these changes to the graphic.
Did you know? Using an approach like the proposed here while working with presentations in PowerPoint can help you to prepare editable PowerPoint templates that can be customized and edited to fit your presentation needs.
Final Touches – Make Sure the Left Side is Equal to the Right Side
In this case, we’d like to make sure the left side of the moustache is similar to the right side. In our example, there are some minor differences between each side, so in order to fix it we will apply some advanced shape manipulations.
1. Add a new rectangular shape covering the right side of the moustache.
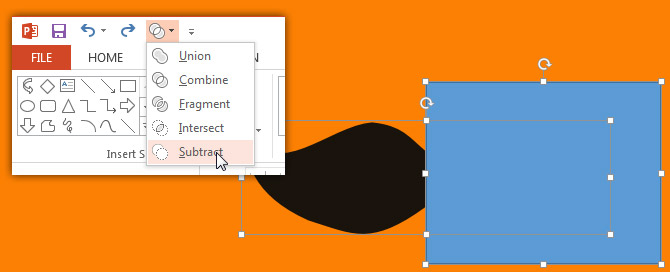
2. Select the moustaches first, and then select the new rectangular shape and now look for Subtract tool in PowerPoint. Subtract tool or Merge Shape tools should be added first to your toolbar in order you can find it easily. Learn how to add the Merge Shapes tool to your ribbon.
3. Now, the new illustration should only contain the left side of the moustache. Here we will apply a set of operations to recreate the right side and then combine all these shapes together. The sequence of steps are: Duplicate the left side of the shape and then flip it horizontally.
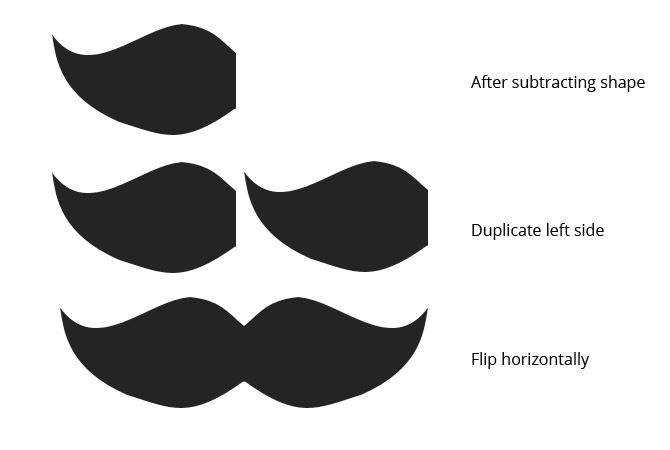
Finally, click the Union shape tool under Merge Shapes menu.
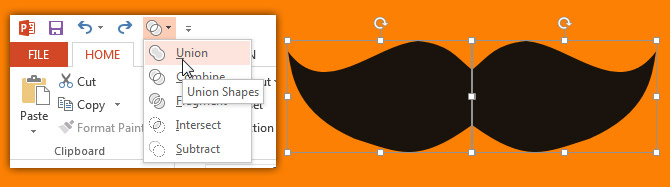
Now the final illustration looks symmetrical and it is combined in one single shape. You can easily copy and paste the shape many times into new slides or other PowerPoint presentations.
Edit Shapes in PowerPoint
The real benefit of using shapes in PowerPoint instead of pictures and illustrations is that you can easily manipulate the shapes and change shape effects under Format Shape properties. This can be very helpful if you need to match the company visual identity while creating a business presentation or apply different colors to the shapes.

Conclusion
PowerPoint shapes are definitely a very powerful feature available in Microsoft Office. For simple objects and illustrations you can save lot of space and if you need to resize the shapes then the illustrations won’t lose picture quality. Moreover, you can easily edit the shape properties and change colors, borders as well as shadows, 2D or 3D options and more, helping you to make awesome & professional PowerPoint presentations.