Introduction to Paths
Every PowerPoint Shape is created with the use of points and lines. Those points are connected with the lines and afterwards the line’s “curvature” is edited in order to give the shape the desired aspect. This kind of digital drawing is called “path drawing” and consists of the definition of starting and ending points connected with lines, that can be straight or curved with a specific “angle”.
We will show you how to use PowerPoint “Edit Points” functionality in order to edit and customize any PowerPoint shape and create your own custom designs. Lets start with presenting the tool.
Edit Points (a.k.a Anchor Points)
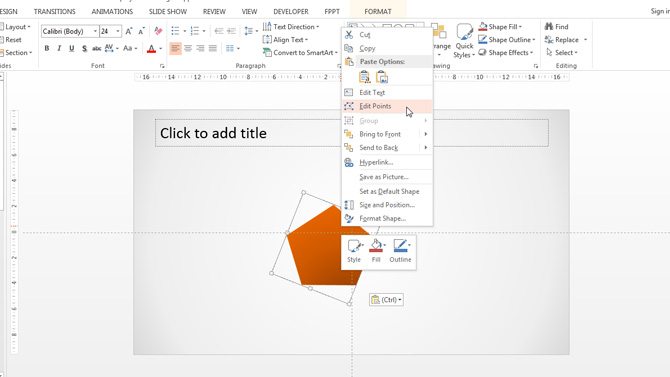
The following figure shows a PowerPoint shape (irregular pentagon) with a gradient fill. We press right button of the mouse over the shape and move into the menu “Edit Points”.
This will trigger the path tool, highlighting the shape path with a red line, and marking the connecting points (a.k.a anchor points) as small black squares (Step 1 of the next figure). Each Point can be edited with the mouse (if the user leaves the left button pressed and drags the point to another position the point will move, and the connecting lines will be edited accordingly (Step 2 of the following figure), but this, even though is an important feature, is not the most powerful. The most relevant tool about the points is the ability to change the “curvature” of the connecting lines through the use of the arc curvature angles. Each point has two white “squares” connected with a blue line. This line and the corresponding square will edit the arc curvature of the two lines connected to the shape point (Step 3 of the following figure).
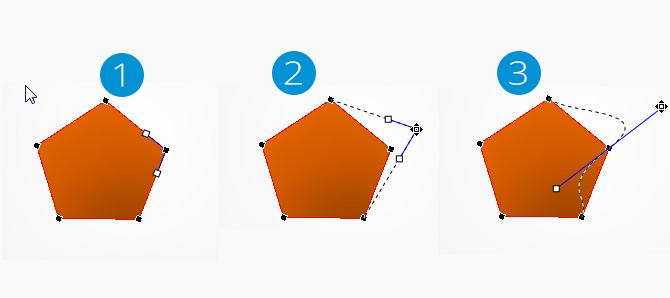
Make the exercise of inserting any PowerPoint shape, and edit its point to practice the effect. Drawing shapes, or editing existing ones, using the path tool is not a simple task and requires the user to master the tool before getting professional outputs.
The power of editing the PowerPoint shape path is such that after several editions, you can end up with a completelly different shape. We will present here 2 examples that we worked with our users at SlideModel.com
Example 1 – Create a Heart PowerPoint Shape
This example is a simple exercise to get to know the tool, and how the combination of simple steps can achieve powerful results. We will try to create a “Heart” PowerPoint shape. This kind of shapes are not part of PowerPoint standard shapes, so it is very useful to work this example as it is a situation that generally the users face when creating a presentation.
Step 1 – Create a Simple Triangle
We will use a simple technique for image creation (and drawing in general) that consists of creating an image that can be seen as a composite of two symmetrical shapes. In this case, a heart, can be vertically divided in two. If we imagine geometrical shapes that will create a heart, we can think of two rectangle triangles pointing down. Said this we will start the example with the creation of a PowerPoint rectangle triangle. Just go to Insert>Shapes and select the triangle creating shape.
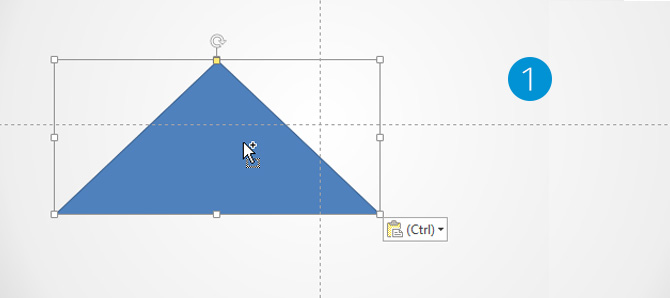
Step 2 – Edit the triangle shape to have three different sides
The triangle creation tool of PowerPoint creates isosceles triangles. Said this, we will update the shape to have a smaller side:
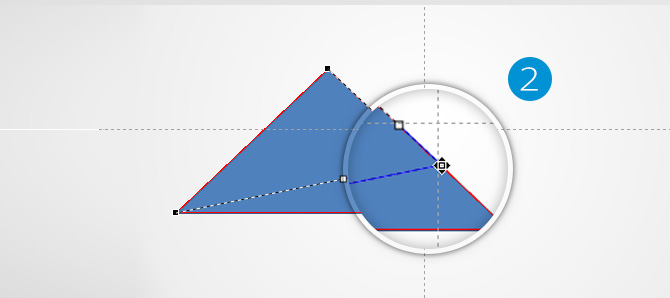
Step 3 – Rotate Triangle and Select The Point to Edit
This step consist on rotating the edited triangle to point south (down) with the rectangular angle to the left (it will be the center of the heart shape). Once rotated we select the “Edit Points” tool again and select the rightmost point:

Step 4 – Edit the Top of the Heart
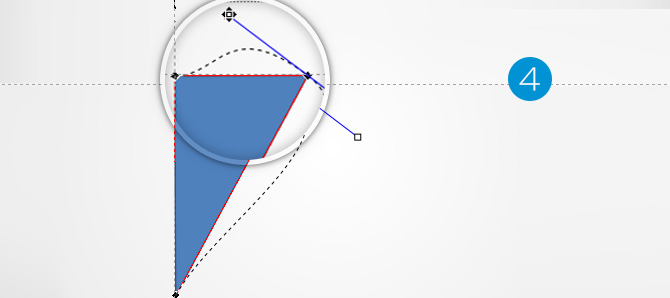
At this step is where the heart starts to appear from the triangle path. With the Point selected, we will take the leftmost angle edit tool (the white rectangle near the base of the triangle) and drag it slowly up-left. This will start curving the base of the triangle, forming a soft “bell like” curved line. Be careful to drag the angular editor to form a uniform bell (same size from the middle to both corners) as the image shows. After reaching the bell you think will make a soft heart, stop dragging.
Step 5 – Edit the Side of the Heart
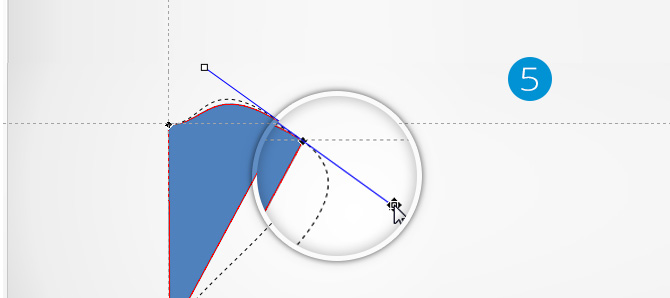
This step will repeat the previous one, but selecting the remaining angular editor. Drag and drop the white square in order to generate a smooth continuous curve between the 2 lines connected with the Point. Generally a approach is to align the angular editors and make the white squares, equidistant from the point, that will generate a smooth curve. After completing this step, you will have the vertical half of a PowerPoint Heart Shape.
Step 6 – Complete the Heart Shape
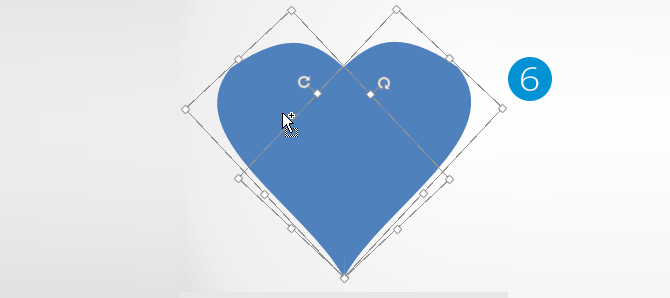
Copy and paste the created shape, you will have to identical shapes. Select the new one, and using the Menu Drawing Tools>Format>Rotate Select “Flip Horizontal”. Move the new shape to match symmetrically the initial shape. Voilà ! You have created a PowerPoint Heart Shape with the help of PowerPoint Triangles and the “Edit Point” Tool.
Example 2 – Create a Complex 3D Polyhedron
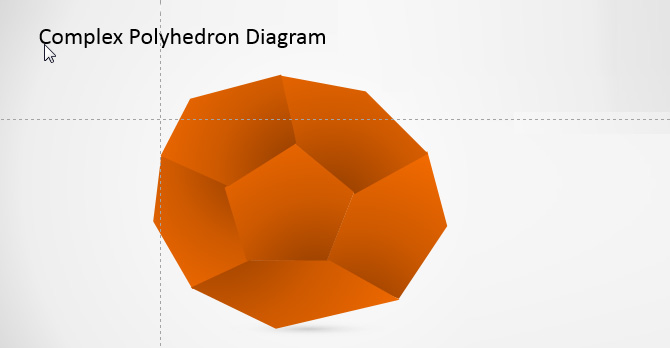
In this example we will show how just updating anchor points of PowerPoint shape can generate the effect of constructing a 3D PowerPoint Shape.
Step 1 – Start with the Pentagon Base.
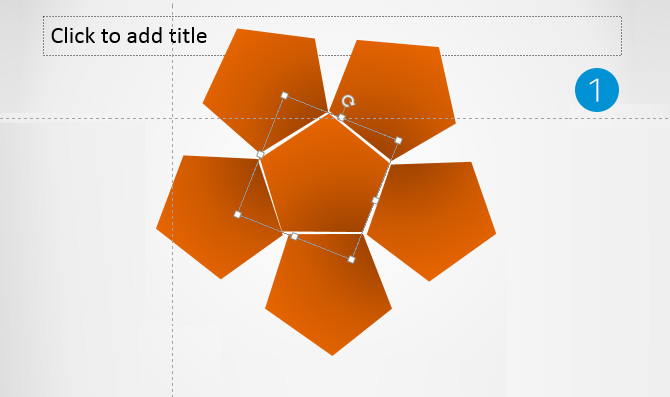
The objective of this example is to create a complex 3D Polyhedron of pentagonal irregular shapes. So we will start with a simple pentagon (with a gradient fill). We will copy, paste and rotate this shape 5 times, 1 for each side of the pentagon. The idea is to form a “flower” like shape. Here we are just using the copy/paste function and the rotate feature used with the mouse over the shape.
Step 2 – Start Editing the External Pentagons
In order to create the effect of a 3D shape, we will need to bend the external pentagons in order to touch each other. Imagine that you try to create a sphere with pentagonal petals. You need to paste each side of each pentagon together and bend the pentagon. To simulate this effect, we will edit the outside pentagons with the PowerPoint “Edit Points” tool. Considering that we will not get a regular shape, we just recommend as a guideline, to have acute angles in the outside of the shape. That provides a sphere like effect.
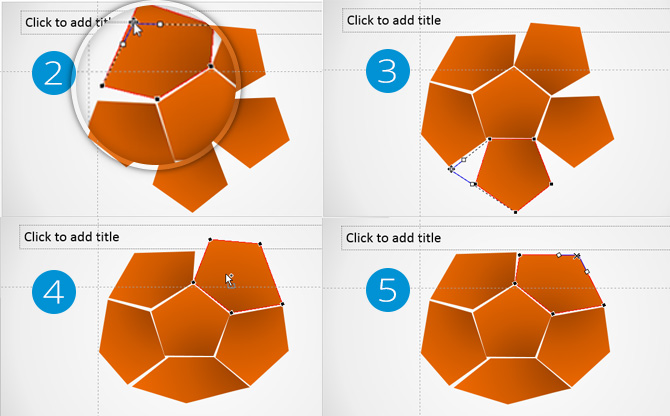
Step 3 – Finalize the Shape
Finally, you will overlap the shapes to clear the spaces and generate the effect of a solid 3D Shape.
Conclusion
In this post we have reviewed the tool “Edit Points” for PowerPoint Shapes. Now that the user understands the concept of Shape Path, and how is edited in PowerPoint, will be able to edit any PowerPoint Shape and customize not only the effects and properties but the shape itself. This tool is very powerful and brings the world of Path drawing from traditional graphic design tools to PowerPoint presentations. Check our article on how to change shapes in PowerPoint for more information about this topic.