In presentations, adding a subtle blur can soften the background, draw attention to important content, or hide sensitive information without removing the image altogether. If you’re wondering how to blur an image in Canva, the platform includes built-in tools to apply blur to an entire image or to selected areas, all without leaving the editor. In this tutorial, we will look at how to blur Canva images and discuss how Canva’s editing capabilities differ from those of advanced image editing software such as Adobe Photoshop.
Why Blur Images in Canva
Instead of competing with the message, a softened image becomes a supporting design element that helps viewers focus on what matters most. You might also need to blur a face, location-specific information, or branding before sharing a presentation publicly. Presentation designers also use blur effects to reduce distractions behind titles or text, create depth between foreground and background elements, and draw attention to a specific object or person.
For example, imagine a full-slide photograph behind a title slide. If the image contains detailed textures or busy scenery, the title can become difficult to read. Applying a moderate blur keeps the image recognizable while allowing the headline to stand out more clearly. Blur effects can also improve posters, social media graphics, infographics, and marketing materials created in Canva.
How to Add Blur Effect to an Image in Canva
Canva includes a built-in Blur tool that can be applied to an entire image or selectively, using a brush tool.
Step 1: Open your Canva design and insert the photo you want to edit. You can upload an image, choose from the Canva library, pick an image from a connected cloud account, or use an existing image. Once added to Canva, click the image to make it active.
Step 2: With the image selected, click Edit from the toolbar above the canvas. The editing panel opens with several enhancement tools, effects, and adjustments. Locate the Blur effect under the Enhance menu. You might need to follow the following sequence: Edit -> See All -> Blur (Enhance).
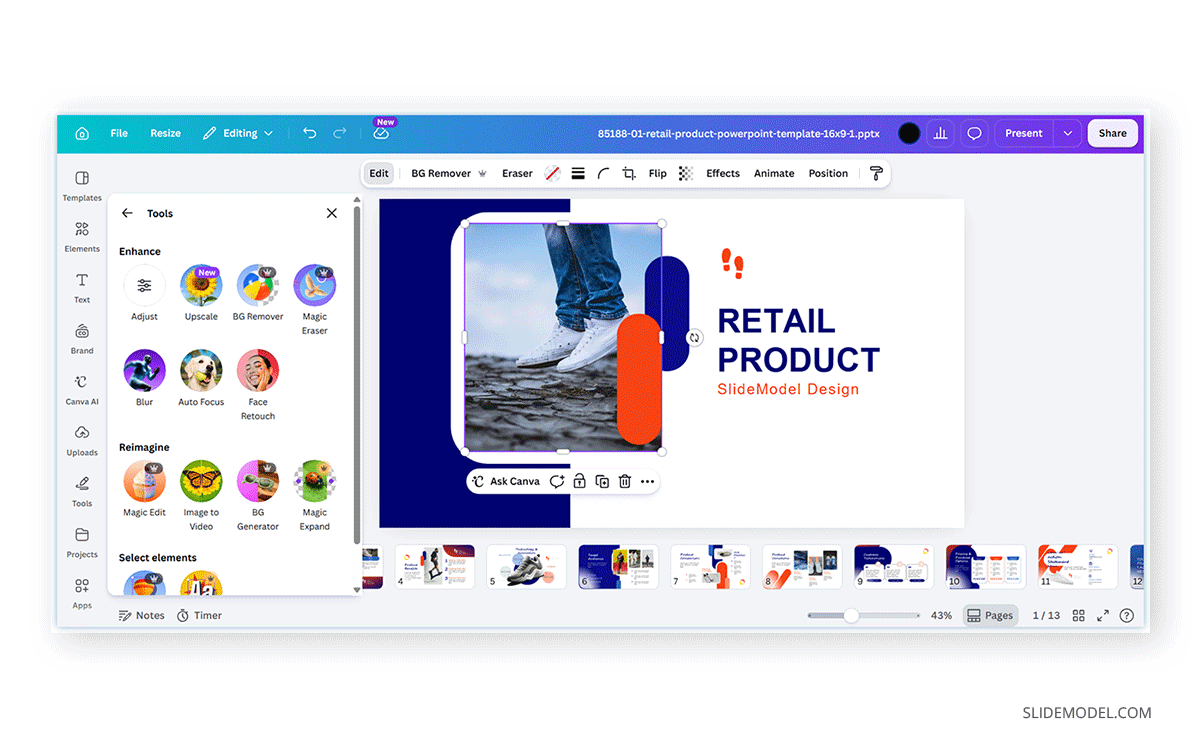
Step 3: You can now blur specific selected areas or the whole image.
How to Blur Part of an Image in Canva
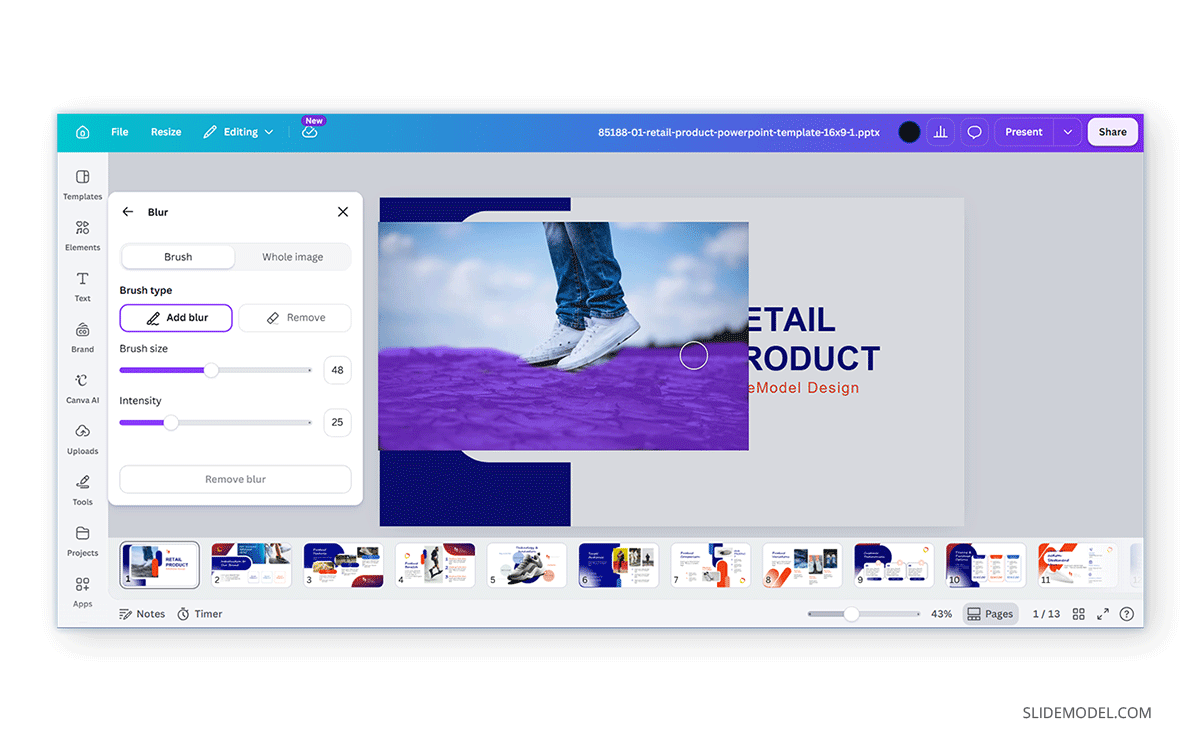
There are many situations where blurring the entire image isn’t the best solution. You may want to hide a person’s face, obscure sensitive information, or reduce distractions in one section while keeping the rest of the image sharp. Canva lets you blur part of an image with its brush-based Blur tool. You can select the Brush size and intensity to use on the image to blur areas as needed.
How to Blur Whole Image in Canva
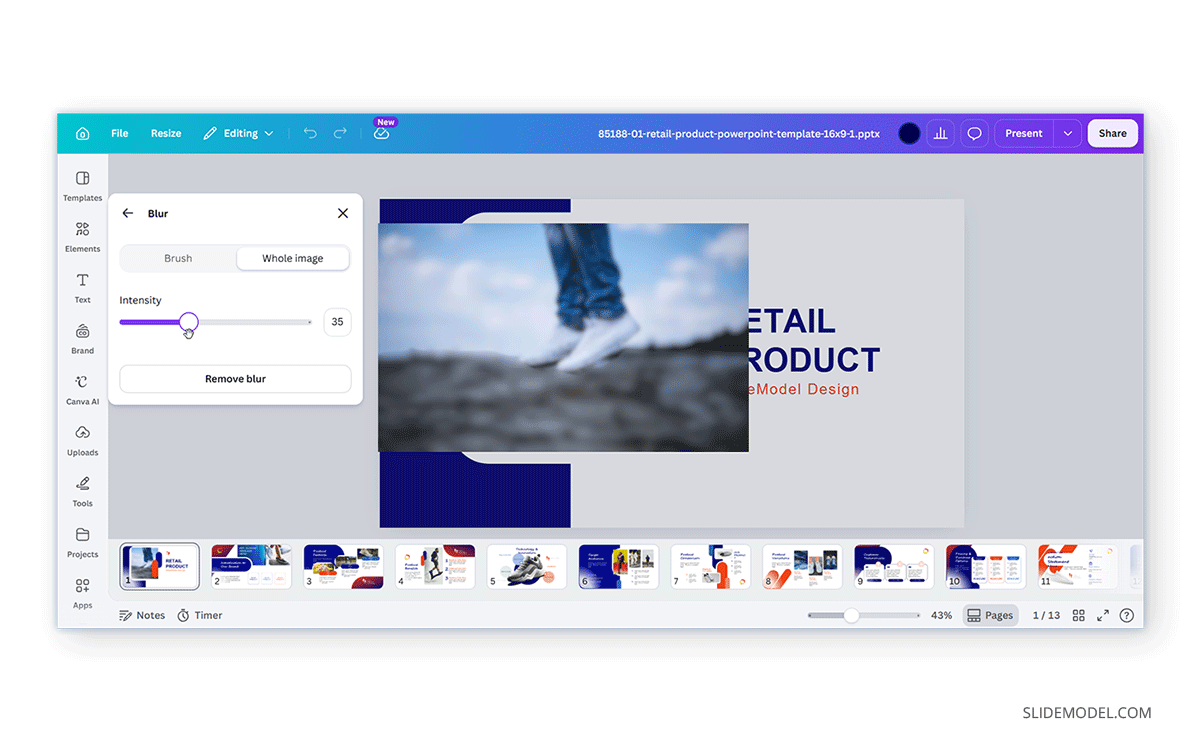
Selecting the Whole Image in the Blur menu opens the Intensity slider, which can be used to apply the blur effect to the entire image as needed.
How to Remove Blur in Canva
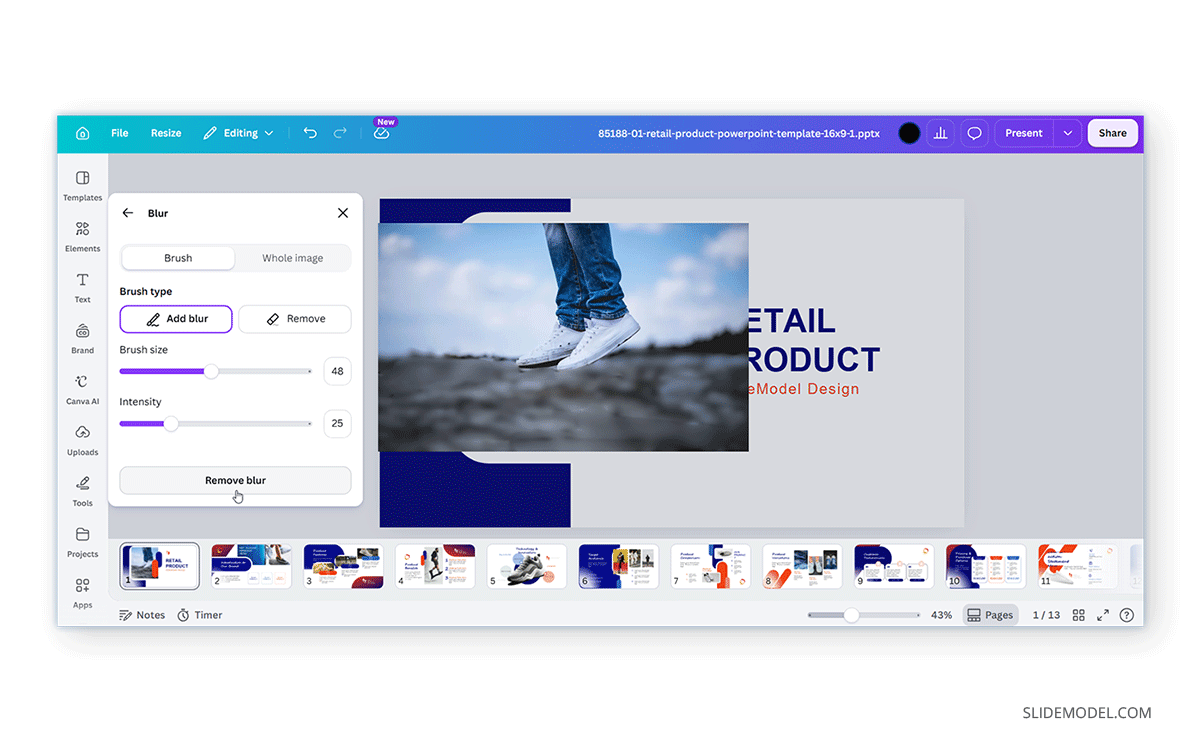
To remove the Blur effect in Canva, open the Blur menu under Edit and use the Remove eraser tool to deselect parts of the blurred image or select Remove blur to undo all changes. The latter applies to both the Brush and Whole Image menus, where selecting the option removes the blur effect entirely.
How to Use Auto Focus to Blur Images in Canva
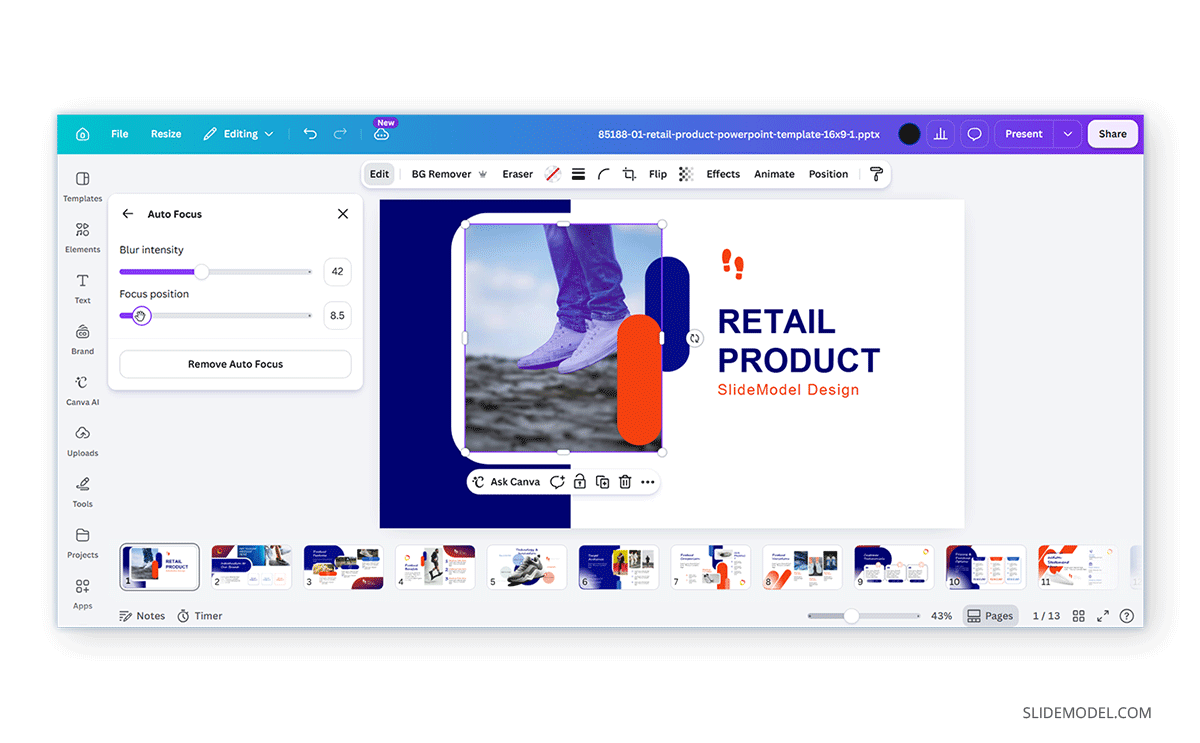
In addition to manually blurring an image, Canva also includes an Auto Focus feature that automatically blurs the background while keeping the main subject sharp. You can find this option under the Edit menu for a selected image. The tool automatically adjusts focus based on user-defined Blur Intensity and Focus Position. You can remove the added effect by selecting Remove Auto Focus.
Auto Focus is particularly useful for portrait photographs, profile pictures, and product images where the subject is clearly separated from the background. Although Auto Focus can produce impressive results with minimal effort, it isn’t suitable for every image. Photos containing multiple subjects, busy backgrounds, or overlapping objects may require manual adjustments to achieve the desired effect.
Using Canva Blur Effectively in Presentation Design
Learning how to add blur to an image in Canva is only part of the process. The blur effect should support your content rather than become the design’s distracting focus.
Improve Text Readability
One of the most common uses of blur in presentations is softening a background image behind a title or block of text. Instead of placing a solid-colored rectangle over a detailed photograph, a subtle blur reduces visual noise while preserving the image’s overall appearance. This creates a cleaner layout without completely hiding the background. For example, if you’re introducing a new product, you can use a blurred lifestyle image behind the title while keeping the product photo on subsequent slides sharp and detailed.
Draw Attention to the Main Subject
Not every element on a slide deserves equal emphasis. Applying blur to secondary objects naturally directs viewers toward the primary subject. Suppose a slide contains a team photograph highlighting a keynote speaker. Slightly blurring the background while keeping the speaker in focus helps the audience immediately identify where to focus their attention. This technique is commonly used in presentations, marketing materials, and promotional graphics because it creates a stronger focal point without requiring additional design elements.
Protect Confidential Information
Blur is also useful when sharing screenshots, reports, or documents that contain confidential information. Rather than cropping important parts of an image, you can selectively blur items such as an email, phone number, customer name, photo, project details, account number, etc.
Canva vs. Photoshop: Which Tool is Better for Blur Effects
Canva and Adobe Photoshop serve different purposes. Canva is designed for fast, straightforward editing, while Photoshop offers advanced image manipulation for professional design work. Choosing the right tool depends on the level of control your project requires.
When Canva is the Better Choice
For most presentation designers, marketers, and business professionals, Canva’s built-in blur tools are more than sufficient. They are ideal for quickly softening a background, blurring part of an image to hide sensitive information, or creating a subtle focus effect without leaving the design editor.
As the editing tools are integrated into Canva’s workflow, you can apply blur and continue designing your presentation without switching between multiple applications. This makes Canva an excellent choice for everyday presentations, marketing, and social media projects.
When Photoshop or Similar Tools Make More Sense
Professional image editing software such as Adobe Photoshop provides a much higher level of precision for complex editing tasks. It is a better option when you need advanced masking, detailed selections, or complete control over how blur is applied.
Photoshop also includes specialized blur filters, such as Gaussian Blur, Lens Blur, and Field Blur, along with features like layer masks, Smart Objects, and non-destructive editing workflows. These capabilities make it more suitable for professional photography, advertising, print production, and detailed image retouching.
For most Canva users, however, these advanced features are unnecessary. If your goal is to enhance a presentation or create simple marketing graphics, Canva’s blur tools offer a straightforward, efficient solution with a shorter learning curve.
Common Mistakes to Avoid
Canva’s blur tools are easy to use, but applying them effectively requires some restraint. Overusing blur or using it in the wrong situations can reduce readability and make a presentation appear less polished. Here are some of the most common mistakes to avoid.
Applying Too Much Blur
A heavy blur can make an image look low-quality or unfinished, especially when used as a slide background. In most cases, a subtle blur is enough to reduce distractions while preserving the overall appearance of the image.
Blurring Instead of Improving Contrast
Blur is often used to make text stand out, but it is not always the best solution. Sometimes, increasing the contrast between the text and background, or adding a subtle overlay, produces a cleaner, more readable design than applying blur alone.
Not Reviewing Selective Blur Closely
When blurring only part of an image, zoom in and inspect the final result. Uneven edges or partially blurred objects can make edits look obvious and unprofessional. This is especially important when concealing personal or confidential information.
Hiding Important Visual Details
Blur should direct attention, not remove essential information. Avoid blurring charts, diagrams, product images, or other visual elements that your audience needs to understand the slide.
Overusing Blur Throughout a Presentation
Using blur on every slide reduces its effectiveness. Instead, reserve the effect for situations where it improves readability, creates focus, or protects sensitive information. Applying blur selectively gives it greater visual impact and helps maintain a consistent presentation style.
Final Words
Canva’s built-in blur tools make it easy to soften backgrounds, highlight key subjects, or protect sensitive information without requiring advanced editing skills. While Canva doesn’t offer the same level of precision or the extensive range of blur filters available in Adobe Photoshop or similar advanced image editing tools, its built-in tools are more than capable of handling most presentation, marketing, and business design needs. For users who want to make quick image adjustments without leaving the Canva editor, the Blur tool offers a simple, effective solution.