Adding audio to a Canva design can transform a static presentation or video into a more engaging experience. This could include a business presentation, a product demonstration, a training video, a social media post, or an educational lesson, plus music, narration, and sound effects.
If you’re looking for ideas on how to add audio to Canva, you can choose music and sound effects from Canva’s built-in library, upload your own audio files, or record a voiceover directly within the editor. Canva also includes tools to trim audio, adjust volume, and combine multiple tracks to suit your project. This guide explains each method, outlines the supported audio formats, and compares Canva’s audio features across the free and premium plans.
Why Add Audio to a Canva Design
Audio can enhance both the visual appeal and effectiveness of a presentation or video. Instead of relying solely on text and graphics, you can use background music to establish the right mood, narration to explain complex ideas, or sound effects to emphasize key moments. Some common uses include marketing videos, business presentations, product demos, employee onboarding, online courses, and event presentations. For example, a company introducing a new product might use background music to increase engagement, while a voiceover explains key features. Similarly, an instructor can narrate each section of a lesson to create a more engaging learning experience.
Supported Audio Formats in Canva
Before uploading your own files, check the Canva audio formats supported for your file type. Commonly supported audio formats include MP3, M4A, WAV, OGG, and WEBM. If your recording software exports audio in another format, converting it before uploading can help avoid compatibility issues. You can upload an audio file up to 250 MB.
How to Add Audio in Canva
Before adding sound to your project, it’s helpful to understand how Canva handles audio. Unlike dedicated audio editing software, Canva is designed primarily as a visual content creation platform. Its audio tools focus on enhancing presentations and videos rather than providing advanced sound production features. Depending on your project, you can add music from Canva’s audio library, upload your own audio recordings, or record narration directly in Canva. Other options include trimming audio clips, adjusting playback volume, and combining multiple audio tracks within the same design.
How to Add Music from Canva’s Audio Library
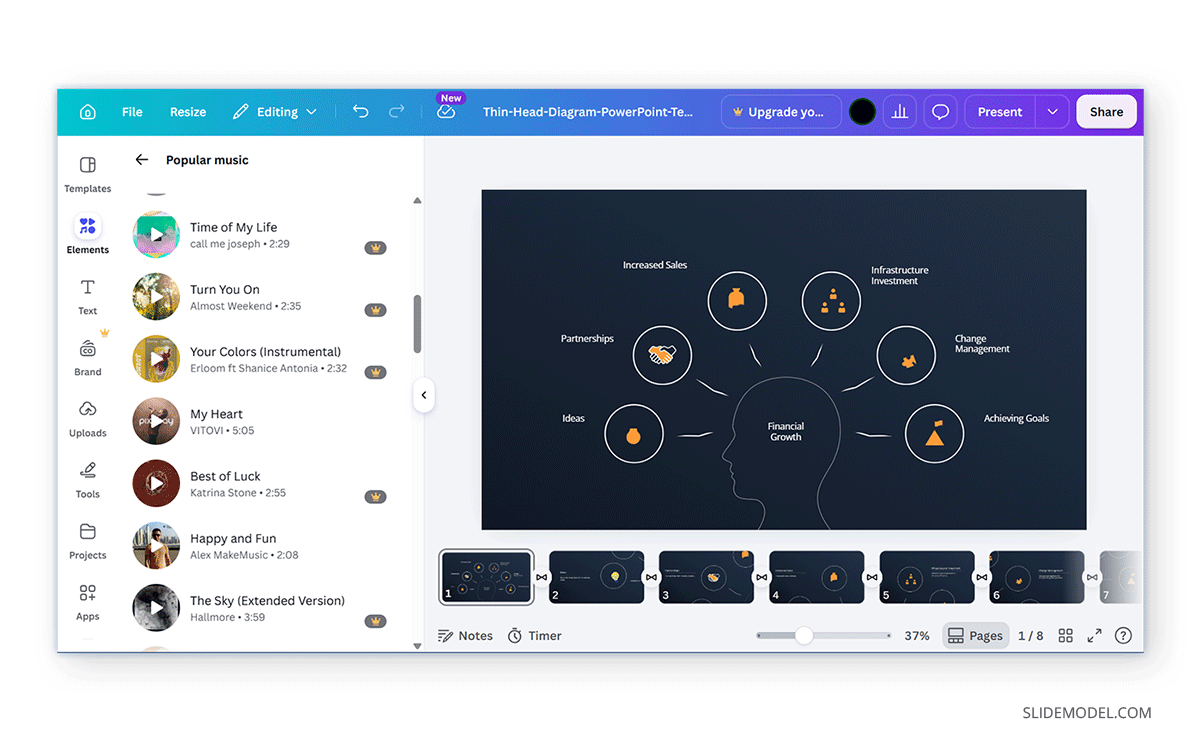
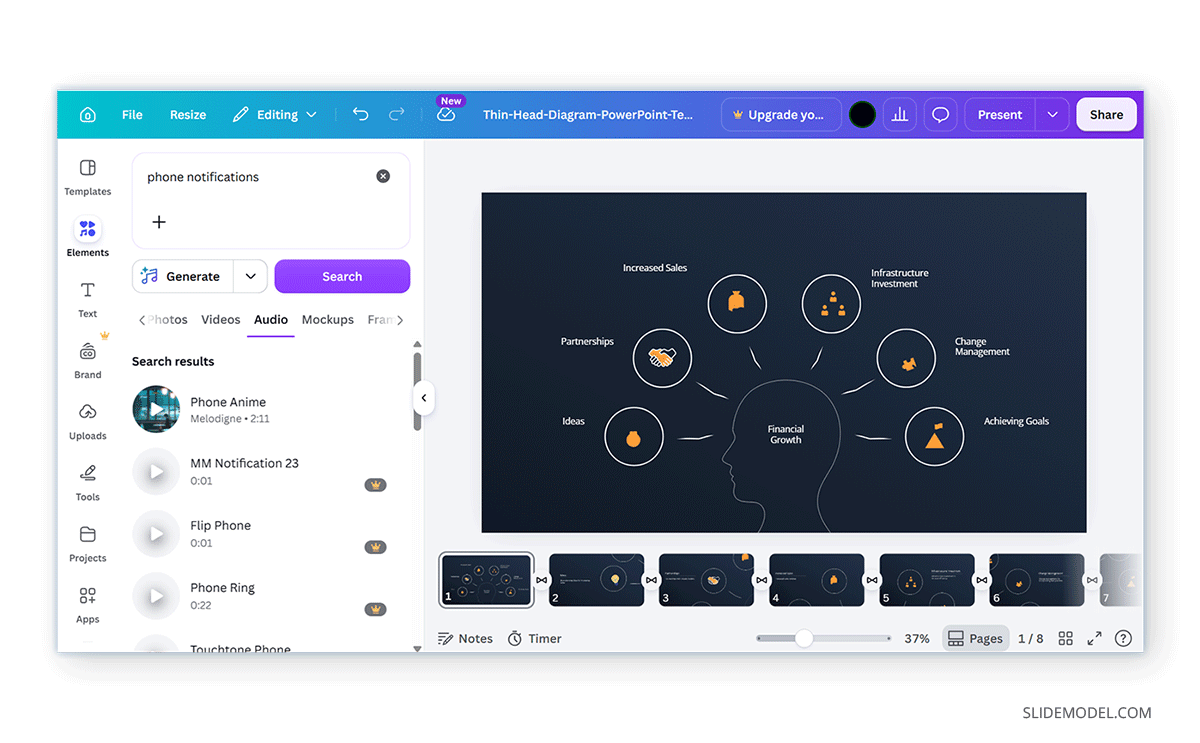
One common question is how to add music to Canva. The easiest way to add music to a Canva presentation or standalone design is by using the platform’s built-in audio library. Canva includes a collection of licensed music tracks and sound effects covering a wide range of styles and moods.
Step 1: Open your Canva design and browse the available media and audio resources. You can either search for music by keywords via Elements or go to Elements -> Audio.
Step 2: Search for music by genre, mood, instrument, or keyword.
Step 3: Select a track to preview it.
Step 4: Add the desired track to your design. Some tracks are available for free, whereas others require a premium account.
Once inserted, the audio appears on the project timeline, where you can reposition and edit it alongside your visual content.
How to Add Sound Effects in Canva
Music isn’t the only type of audio available, as Canva’s library also includes sound effects that can make presentations and videos feel more dynamic. For example, you might use notification sounds, applause, nature sounds, camera shutter, etc.
Step 1: Similar to adding music, open your Canva design, go to Elements, and look for the Audio app.
Step 2: Search for sound effects by keyword.
Step 3: Play and preview the sound effect to check if it meets your requirements.
Step 4: Add the selected sound effect to Canva.
After you add the effect, you can edit it with your Canva design. Used thoughtfully, you can add sound to Canva to draw attention to important moments without distracting from your main message.
How to Upload Your Own Audio
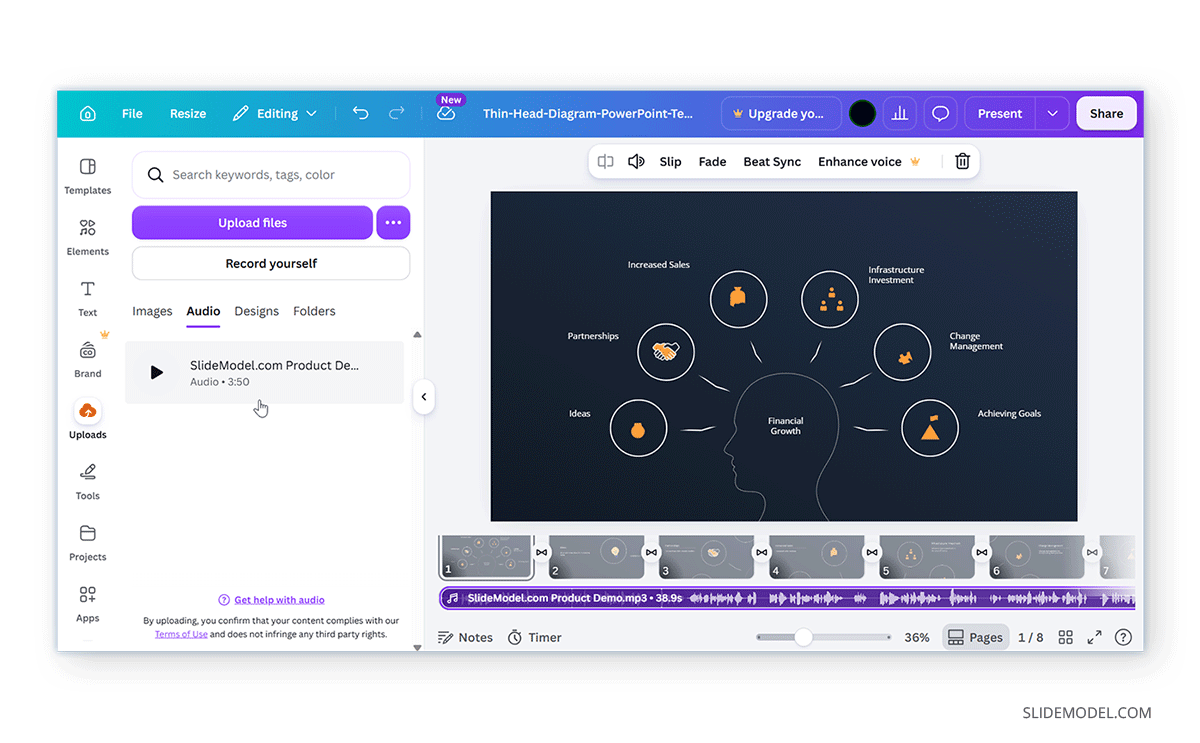
If you already have music, narration, or branded audio, Canva allows you to upload it directly into your project. This Canva audio upload option is particularly useful for recorded voiceovers, podcast clips, company jingles, music, interview recordings, and custom sound effects.
Step 1: Open your Canva design, then go to Uploads.
Step 2: Upload a file from your device or select an online source, such as Google Drive.
Step 3: Select and insert the uploaded file into Canva.
After uploading the file, you can add it to your project timeline and edit it like audio from Canva’s library. Using your own recordings also gives you greater creative control, particularly when producing branded content or presentations with customized narration.
How to Record Audio in Canva
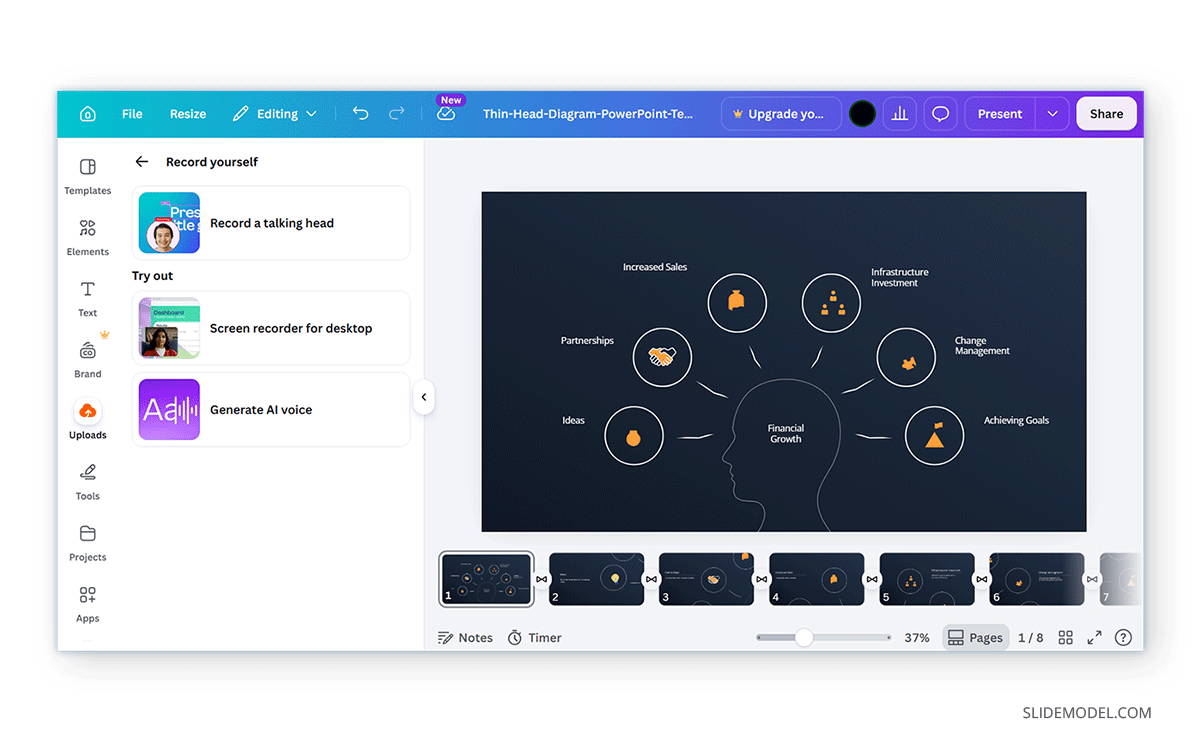
Canva offers several recording-related tools under the Record Yourself option, including recording with your camera and microphone, recording your screen with narration, and generating AI voiceovers.
Step 1: Open your Canva design, go to Uploads in Canva, and look for Record Yourself.
Step 2: From here, you can use one of three options, including recording a talking head, opening the screen recorder from your desktop, or generating AI audio.
- Record a Talking Head: This option records your camera and audio, allowing you to add on-screen narration to your project.
- Screen Recorder for Desktop: This premium feature lets you record your desktop with audio narration to create a screencast.
- Generate AI Audio: You can enter text and select a voice to generate audio based on your input.
Step 3: Once done, select and add voiceover to Canva.
Like other audio options, you can adjust and edit added audio recordings.
How to Edit Audio in Canva
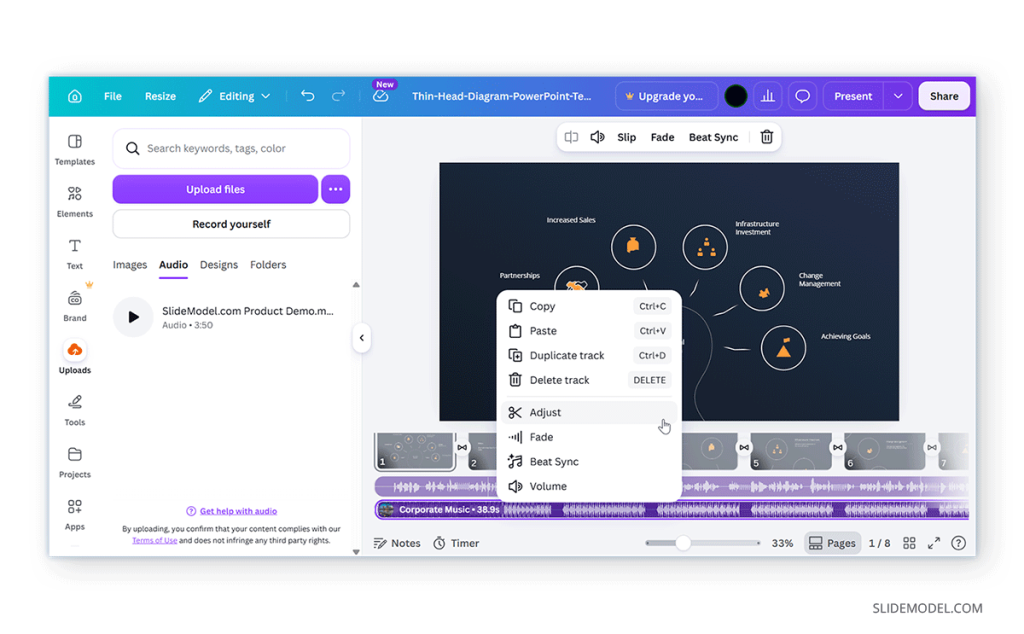
After adding audio to your design, Canva provides several editing tools that help you fine-tune playback and better synchronize sound with your visuals.
Trim Audio Clips
You rarely need an entire song or recording in your final design. Canva lets you trim audio so that only the portion you need plays during your presentation or video. Select an audio track on the timeline and drag the trim handles to shorten or extend the clip. This makes it easy to remove a long musical introduction, cut silence from a narration, or shorten Canva background music to match the timing of your presentation.
You can also reposition the clip to play a different section of the recording without modifying the original audio file. For smoother transitions, Canva also supports fade-in and fade-out effects, helping audio blend naturally between scenes.
Adjust Audio Volume
Canva allows you to adjust the volume of individual audio tracks directly from the timeline. If your project contains multiple audio or video clips, you can also use the Balance all option to automatically even out volume levels across the entire design. For example, if you’re combining narration with background music, lowering the music volume helps keep your voice easy to understand while maintaining the desired atmosphere.
Layer Multiple Audio Tracks
Canva supports layering multiple audio elements within a single design, allowing you to combine background music, narration, and sound effects to create richer multimedia presentations and videos. However, Canva limits each project to 50 audio tracks or sound elements. If your design exceeds this limit, you’ll need to split the project into separate designs or remove unnecessary audio clips.
Canva Free vs. Premium Audio Features
Both free and premium Canva packages let users add audio to their projects, but the available content differs.
Canva Free Users
For many presentations and educational projects, the free library provides enough options to create engaging content. Free users can:
- Upload their own audio files.
- Record voiceovers in supported projects.
- Access a selection of free music and sound effects, including 141M+ photos, videos, graphics, and audio.
- 5GB cloud storage.
Canva Premium Users
Canva Pro expands the available media library by providing access to a much larger collection of licensed music tracks and sound effects. Premium users can:
- Upload their own audio files.
- Record voiceovers in supported projects.
- Access a selection of free music and sound effects, including 141M+ premium photos, videos, graphics, and audio.
- Get 100GB, 500GB, or 1TB of cloud storage (depending on the package).
The expanded library makes it easier to find audio that matches a particular mood, industry, or visual style.
Considering Audio Export Limitations According to File Type
One important limitation to understand is how Canva handles audio during export. Audio is preserved when exporting supported video formats and when presenting directly through Canva. However, if you export your design as a static format such as a PDF or image, the audio is not included because these formats cannot store playback information.
If your presentation depends on narration or music, choose an export format that supports audio before sharing. The audio file will not work with the exported file or saved separately.
Canva vs. PowerPoint for Audio
Both Canva and Microsoft PowerPoint allow you to create presentations with audio, but they approach the task differently.
When Canva Is the Better Choice
Canva is particularly well suited to visually rich presentations, marketing content, and social media videos where music and simple narration enhance the overall experience. Its integrated media library, browser-based editor, and straightforward audio controls make it easy to produce multimedia content without specialized editing software.
When PowerPoint Is the Better Choice
In addition to inserting audio files, PowerPoint includes built-in tools for recording narration, managing playback across slides, embedding audio within presentations, screen recording, and exporting narrated presentations as videos. These capabilities make it a stronger choice for academic lectures, corporate training, conference presentations, self-paced learning modules, and long-form business presentations. For presentations where narration is central to the content, PowerPoint generally offers greater control over audio playback and presentation delivery.
Final Words
Knowing how to add audio to Canva can help you create presentations and videos that are more engaging, informative, and memorable. Whether you use Canva’s built-in music library, upload your own recordings, or record a voiceover directly in the editor, adding sound can reinforce your message and improve the overall viewing experience.
For best results, choose audio that complements your content, balance music and narration carefully, and export your project in a format that supports audio playback. Canva’s intuitive editing tools make it easy to produce polished multimedia content for business, education, and marketing. However, if your project requires advanced audio controls, detailed narration across multiple slides, or embedded audio for offline presentations, PowerPoint remains the more capable option.