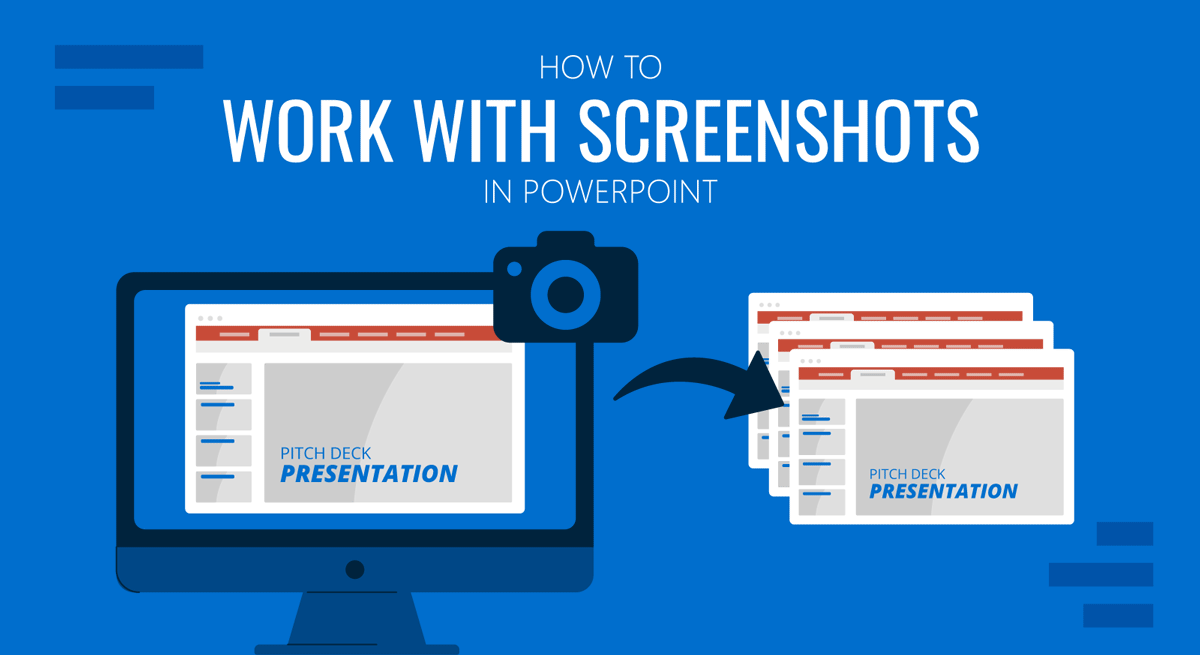
Over the years, PowerPoint has been supercharged with integrations that make it more than just a presentation app. You can now use PowerPoint for making screencasts, designing content using AI, converting free PowerPoint templates to multimedia content, and even capturing screenshots. Still, people are unfamiliar with the different alternatives to implementing screenshots in presentation slides.
In this article, we will guide you through the process of using screenshots in your PowerPoint presentations. From software to use to suggestions on how to format the captured screenshots, let’s dive into a must-read guide for educational presentation design.
Table of Contents
- Why Should You Use Screenshots in PowerPoint Slides?
- Software Options for Taking Screenshots
- Using Built-in PowerPoint Screenshot Tool
- Importing External Screenshots into PowerPoint
- Editing and Enhancing Screenshots
- Troubleshooting Common Screenshot Issues
- Saving and Sharing PowerPoint Presentations with Screenshots
- FAQs
- Conclusion
Why Should You Use Screenshots in PowerPoint Slides?
Let’s picture the scenario of being an instructor offering an in-house training session about a newly released tool. This out-of-the-box solution signifies a 30% time-saving by automating processes. But how do you teach the different applications, real-case troubleshooting, installation process, etc.? Some of you may relate to video presentations, which is, indeed, a powerful resource.
However, unless you manage to create a piece of content that invites the viewer to recheck it as often as required to grasp the knowledge, it will most probably go neglected. Therefore, instructors need to create a sort of manual in the format of presentation slides that serve two purposes: the educative talk and reference material for further reading. How do we manage that? We can use screenshots of the processes done inside the software and paste them into our presentation slides.
Besides this hypothetical use-case scenario, there are several advantages of using screenshots in PowerPoint slides:
- Social Proof: Sharing internet data, like customer reviews, for sales and marketing presentations.
- Clarity in Slide Design: Screenshots provide a clear and exact representation of the content you are discussing, making it easier for the audience to understand the context or details of the subject matter.
- Increasing Engagement: As a visual element, screenshots make the presentation less tedious, and you can avoid placing huge text walls in your slides.
- Simplifying Processes: Demonstrating a process or website live during a presentation can be time-consuming and risky due to potential technical issues. Screenshots eliminate these problems.
- Showing Evidence: Using actual screenshots of data, analytics, or website interfaces can increase the credibility of your presentation by showing real evidence or examples. Not to mention, it is way faster than exporting a report and embedding it inside your slides.
Software Options for Taking Screenshots
Depending on your OS, there are plenty of tools for taking screenshots. In this section, we’ll suggest some of the most popular options among our users.
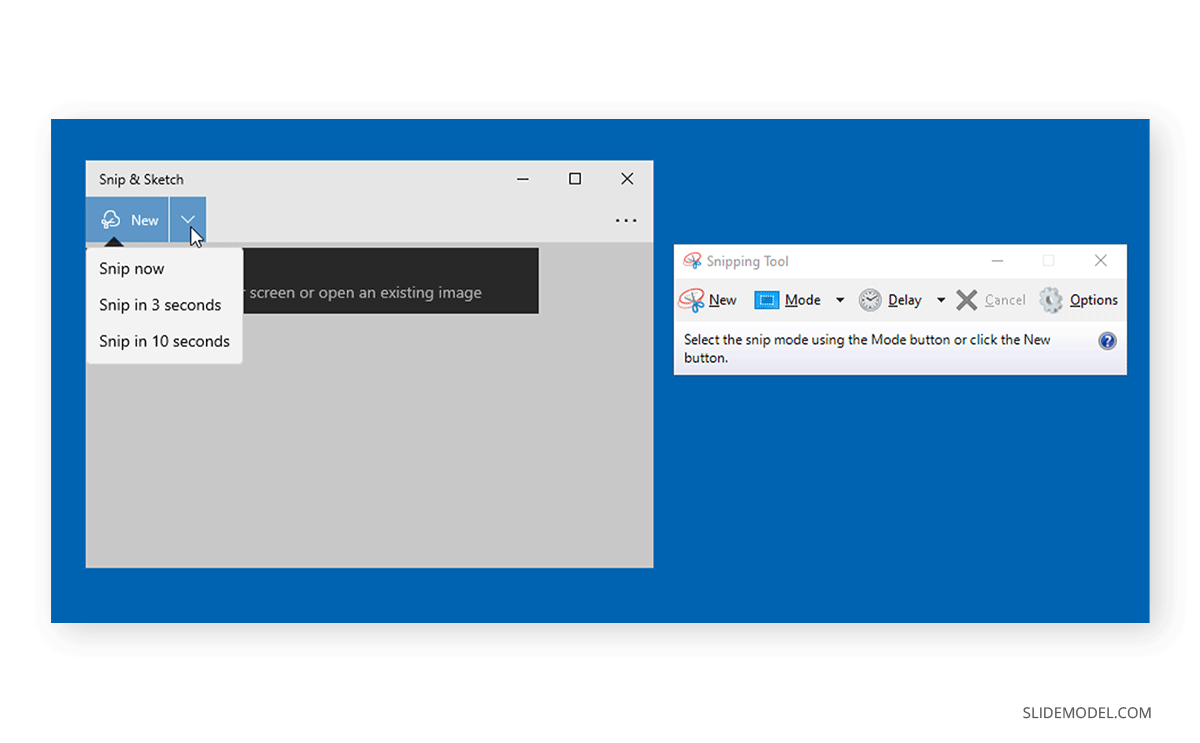
Microsoft Windows 11 Snipping Tool
This tool came as a novelty for Windows 11 users. Its UI resembles MS Paint (and there’s even an integration), with some tablet-intended options like using highlights, a pen, or an eraser. The same ruler used in PowerPoint is available for this tool. Users can add text notes, crop screenshots, or work with video screenshots.
Legacy Microsoft Windows Screenshot Capture
By pressing the PrtScn button on any Windows computer, you get an instant screenshot of your entire screen. Users can then paste that screenshot into any design software or text processor of their choice and email apps. There’s no option to crop the contents to just a screen section.
Mac OS Screenshot App
Accessed via the Launchpad or by hitting the keystroke combo Shift + Command + 5, this tool allows us to select a region or the entire screen, much like the Microsoft Snipping Tool.
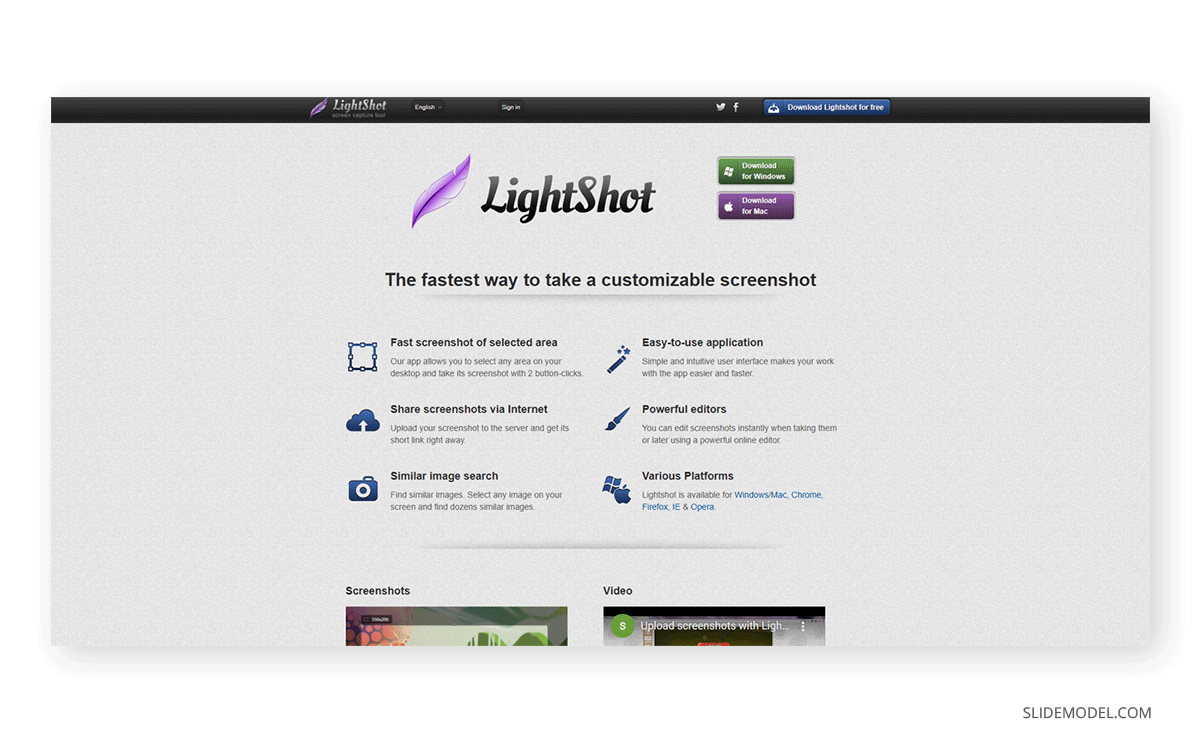
Lightshot
A long-time favorite of many, this simple-to-use app is compatible with Windows and Mac. One of its main advantages is uploading the screenshots to the cloud and getting a link to share them.
Using Built-in PowerPoint Screenshot Tool
Now that we have seen the generalist options for screenshot capture, there’s another tool worth considering: PowerPoint’s own screenshot tool.
Taking Screenshots
If you’re wondering how to screenshot on PowerPoint, simply head to the Insert tab and select Screenshot. As you expand this menu, it will provide you with the option to instantly grab a screen clipping.
1. Grab a Screenshot of Active Window: If an active window is maximized, the window will show up in the dropdown menu. Select the whole window of a maximized app from the dropdown menu to instantly add it.
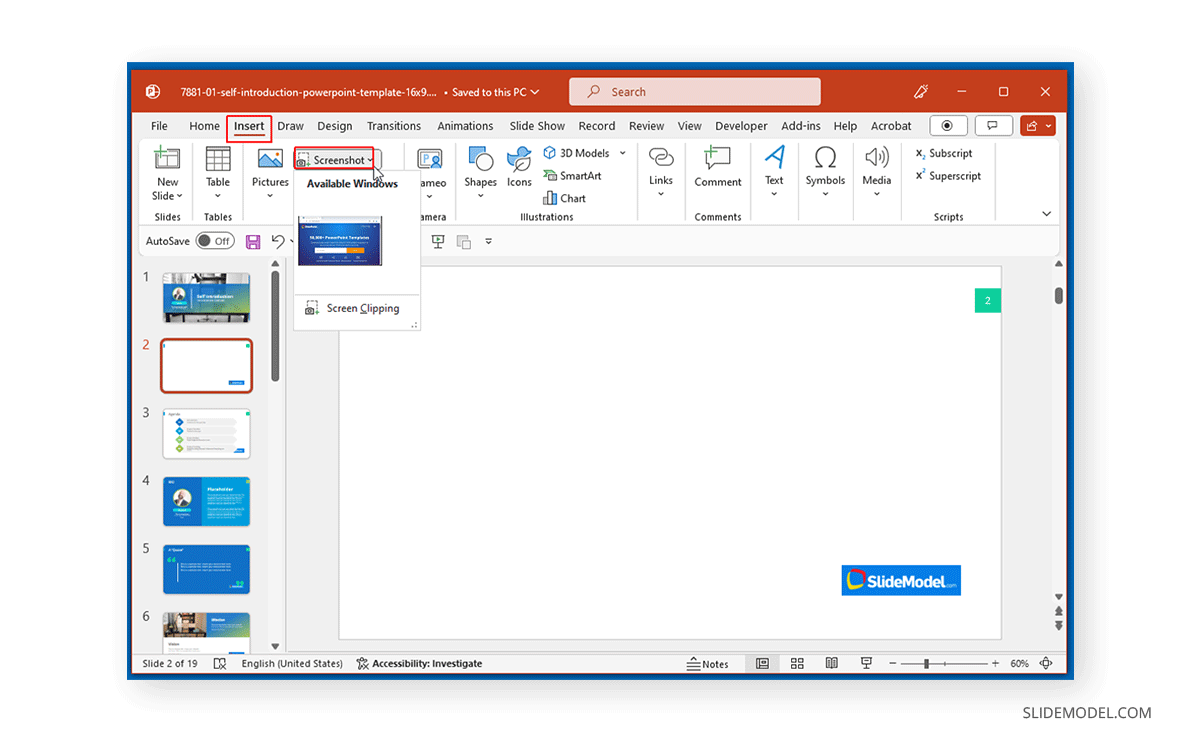
2. Choose to Grab Screenshot from Multiple Active Windows: If more than one window is maximized, you can choose between the window you wish to capture instantly.
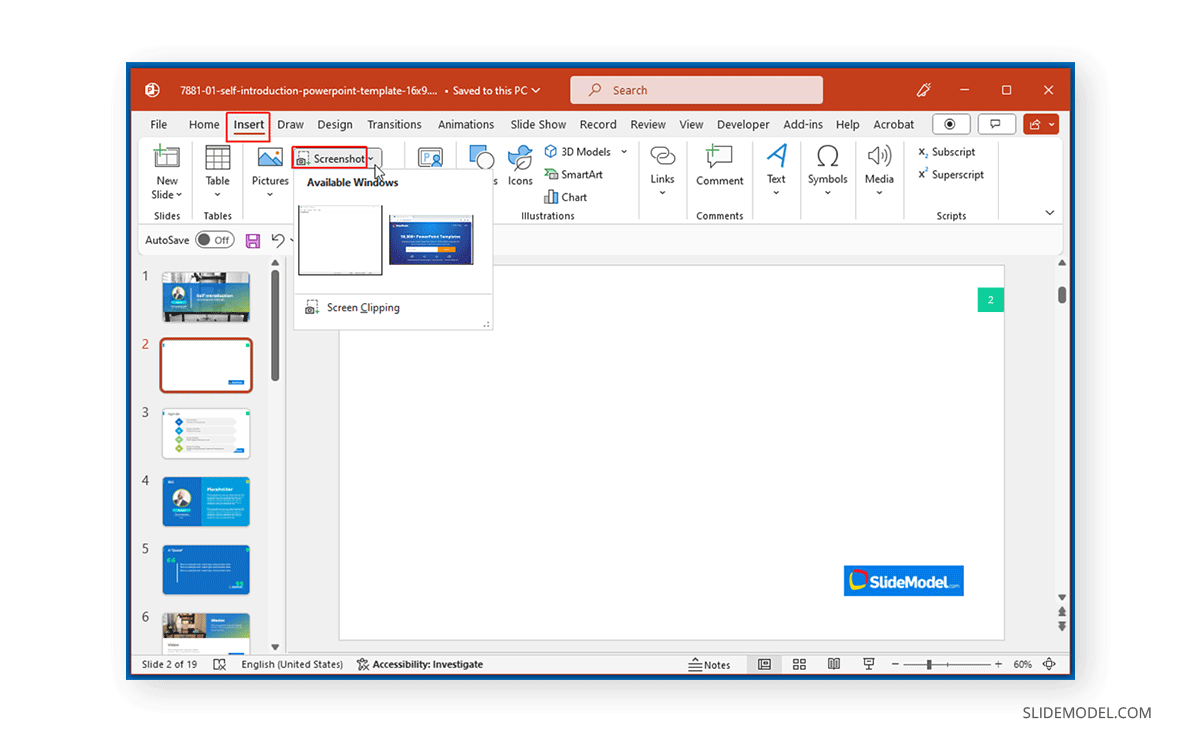
3. Select Area to Grab Screenshot: Alternatively, select Screen Clipping to grab a part of the screen to save as a screenshot.
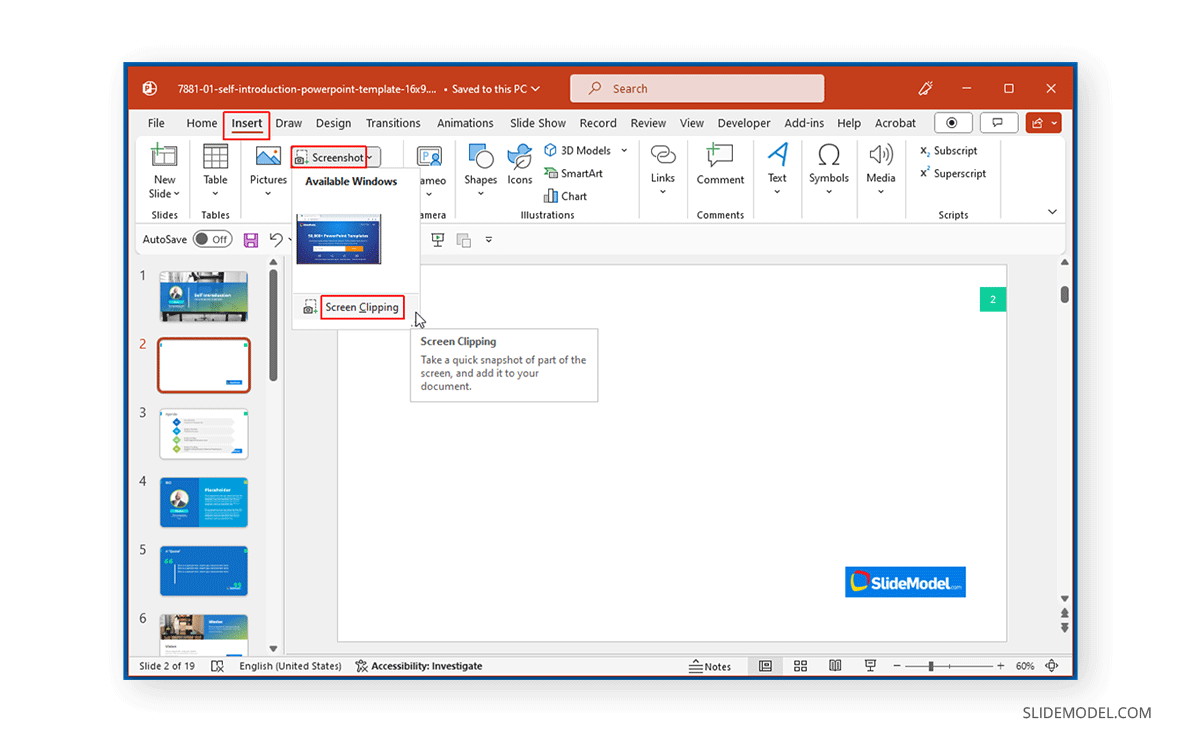
To grab screenshots from a selected area, drag the mouse over the space from which you wish to save a screenshot.

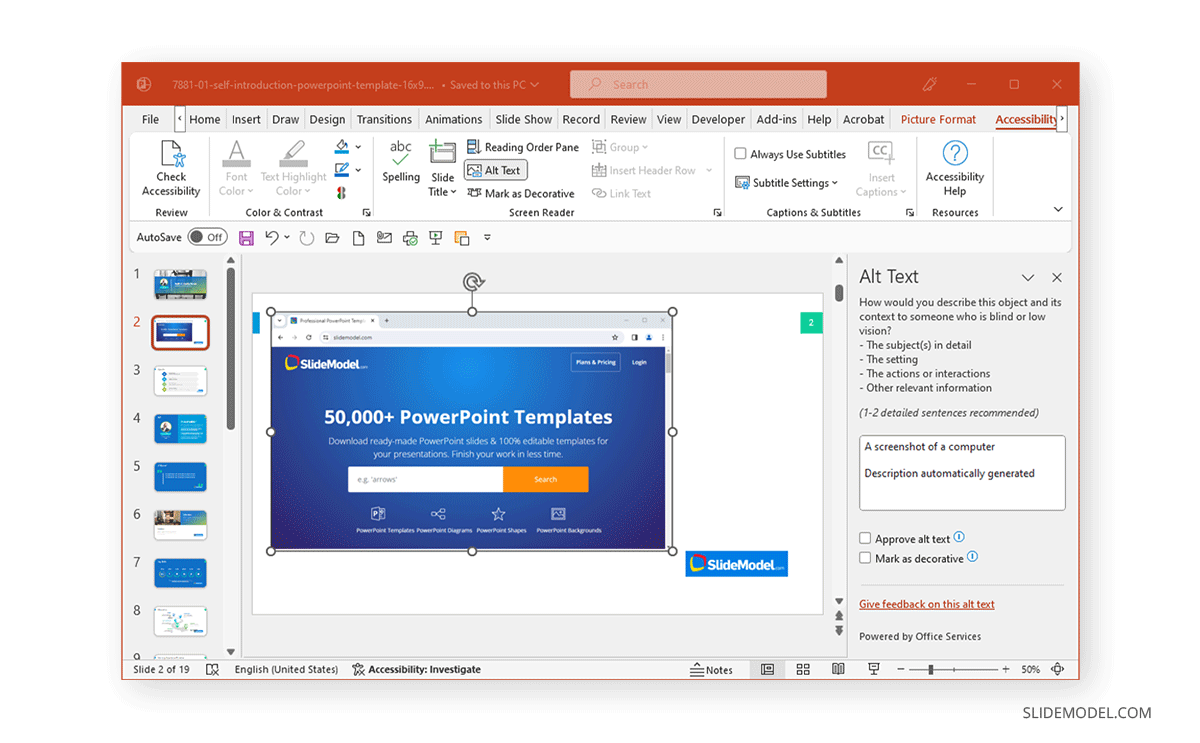
Adding Captions
Adding Alt Text
Screenshots captured using PowerPoint show two options: the Approve option to finalize and add the screenshot to the slide with a suggested Alt text and the Edit option, where you can add Alt text.
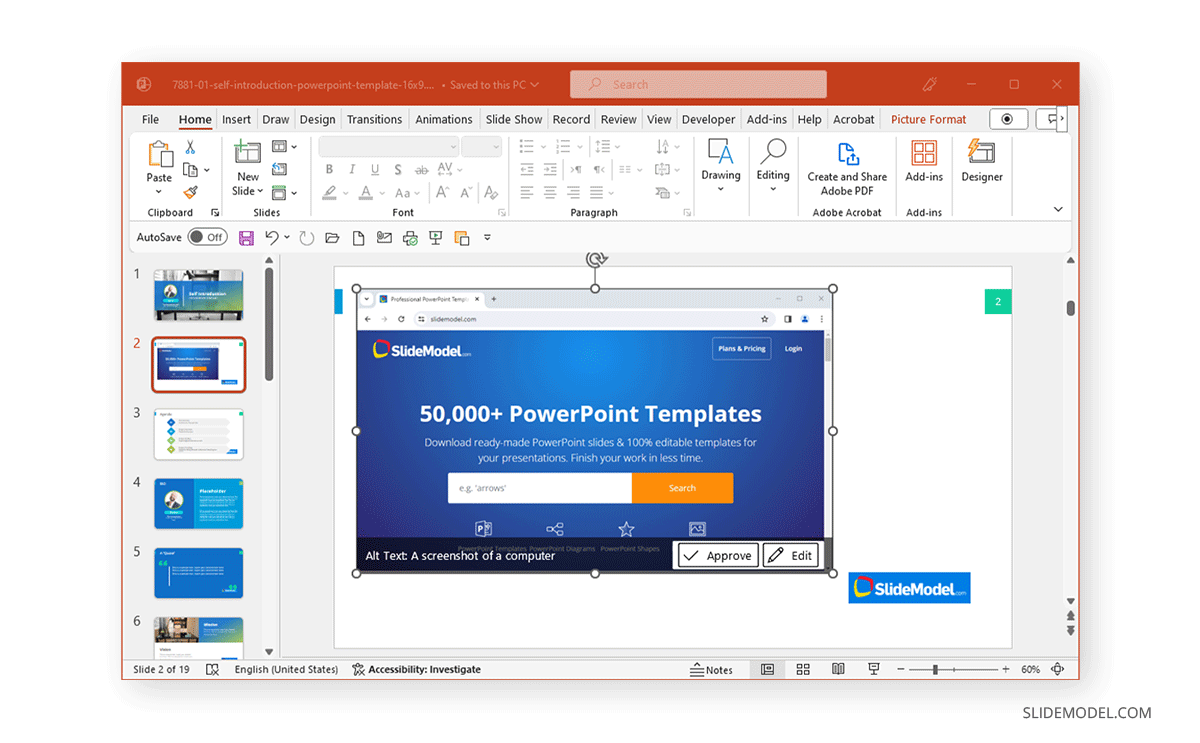
By going to Edit, you can add a custom Alt text to describe the screenshot.
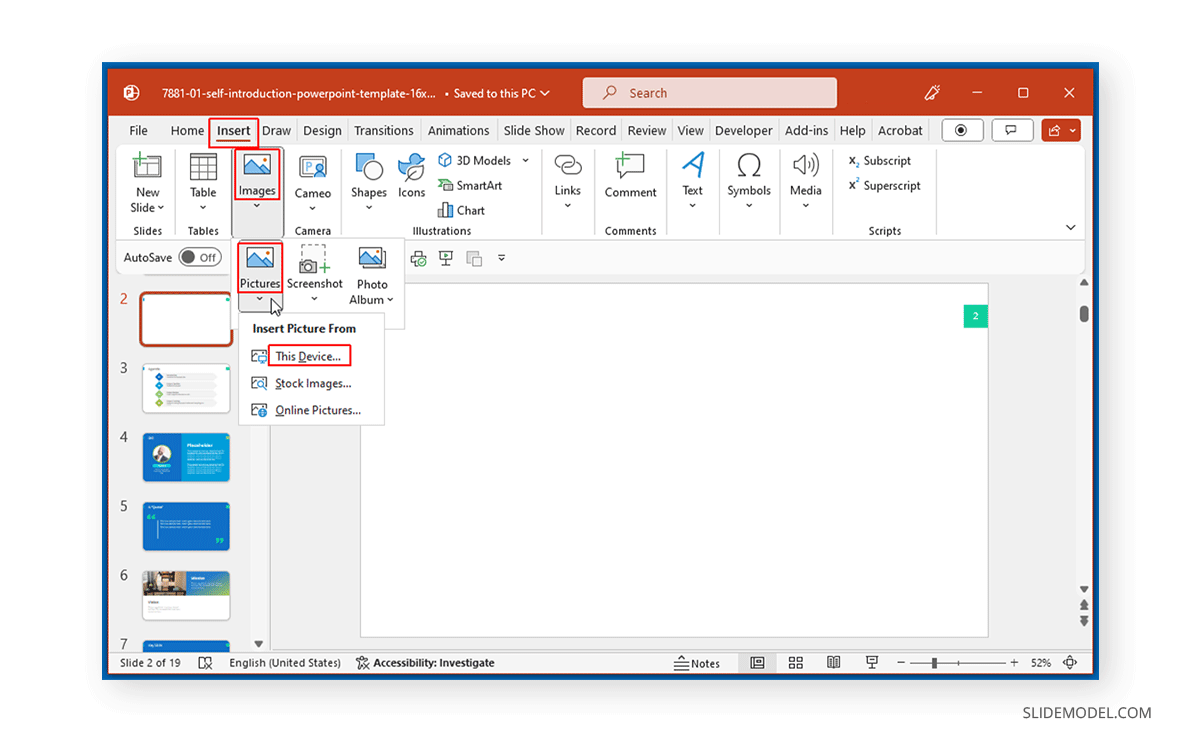
Importing External Screenshots into PowerPoint
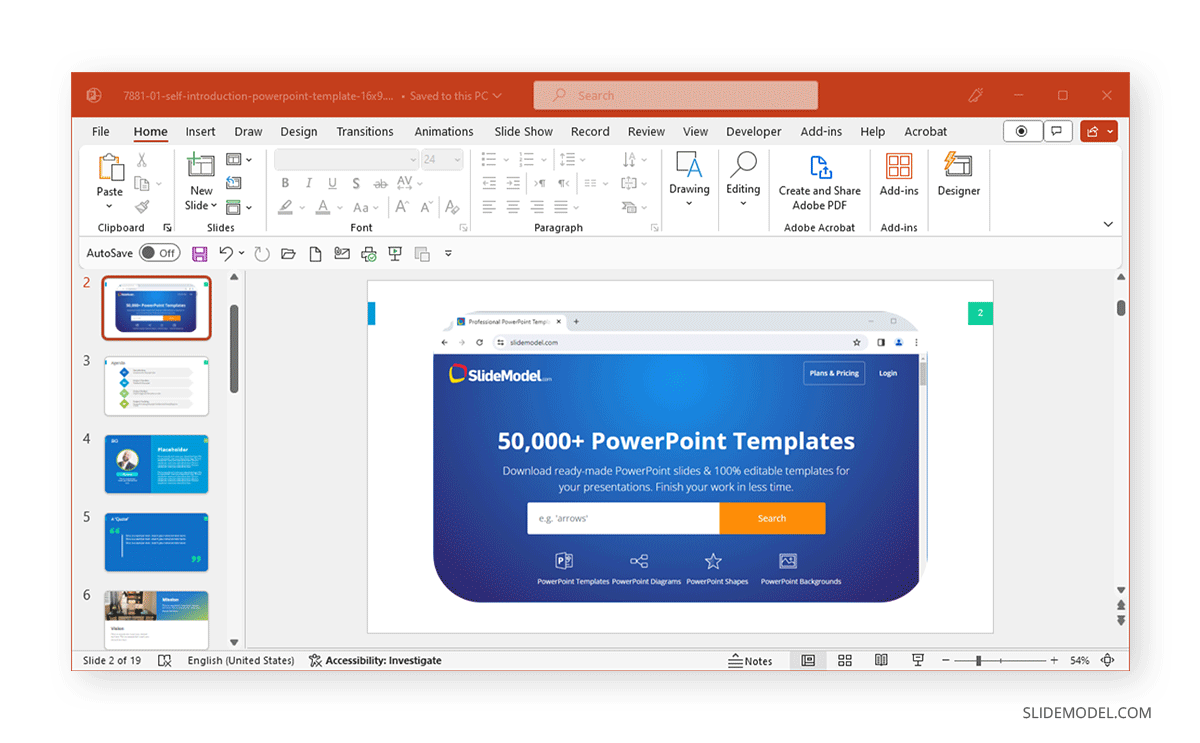
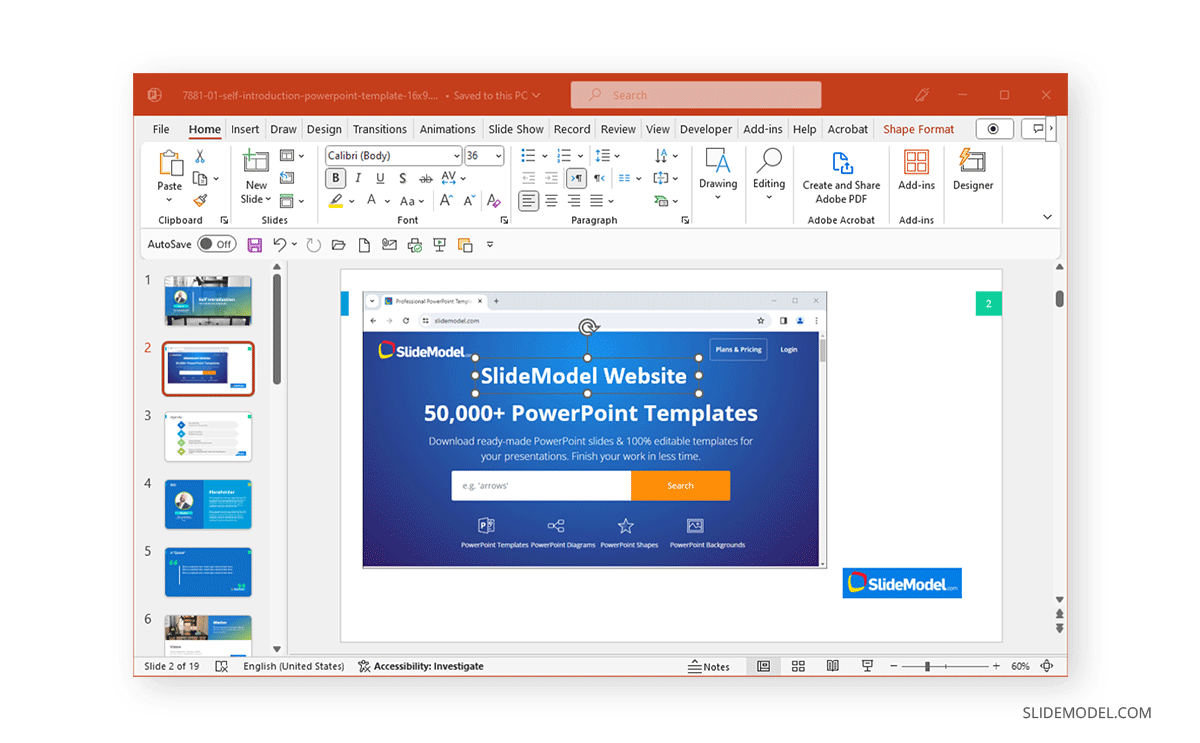
To import external screenshots in PowerPoint, go to Insert -> Images -> Pictures -> This Device or drag and drop a screenshot from your device to a PowerPoint slide.
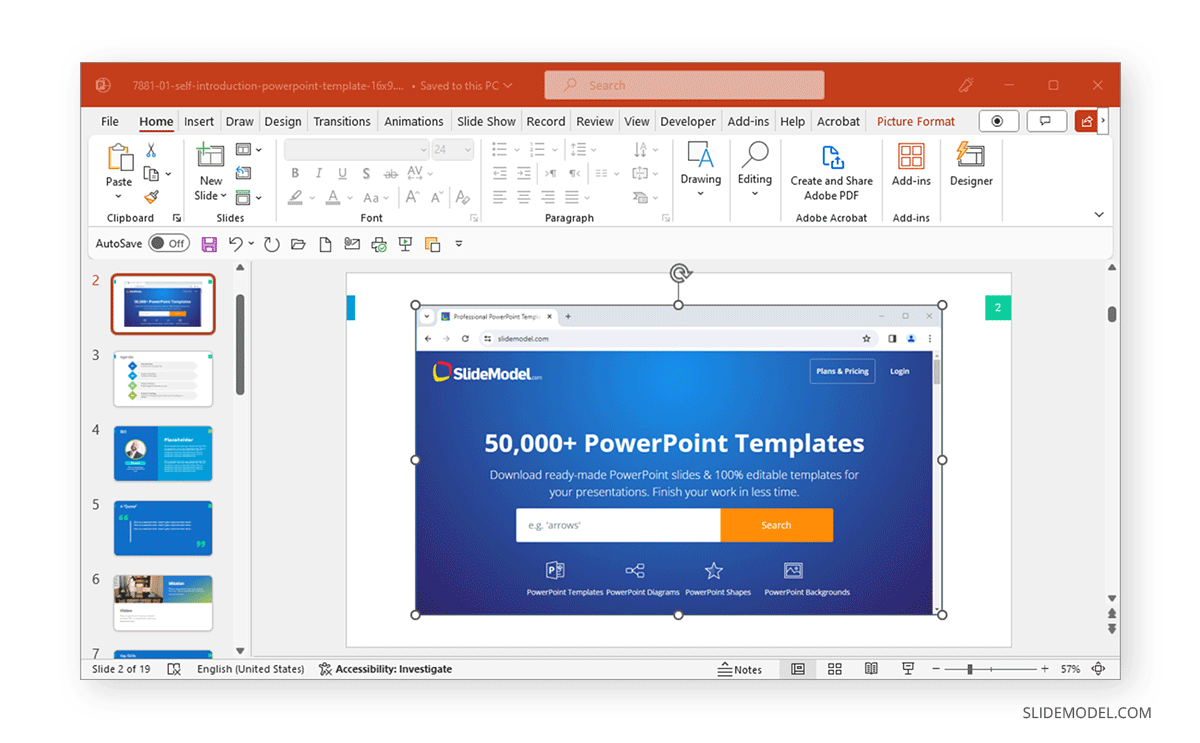
This will add the screenshot to the selected slide. You can then annotate, crop, and resize your screenshot to adjust it in the slide.
Editing and Enhancing Screenshots
Cropping and Resizing
Cropping and resizing screenshots in PPT is quite simple. To explore cropping options, click Picture Format -> Crop from the PowerPoint Ribbon menu.
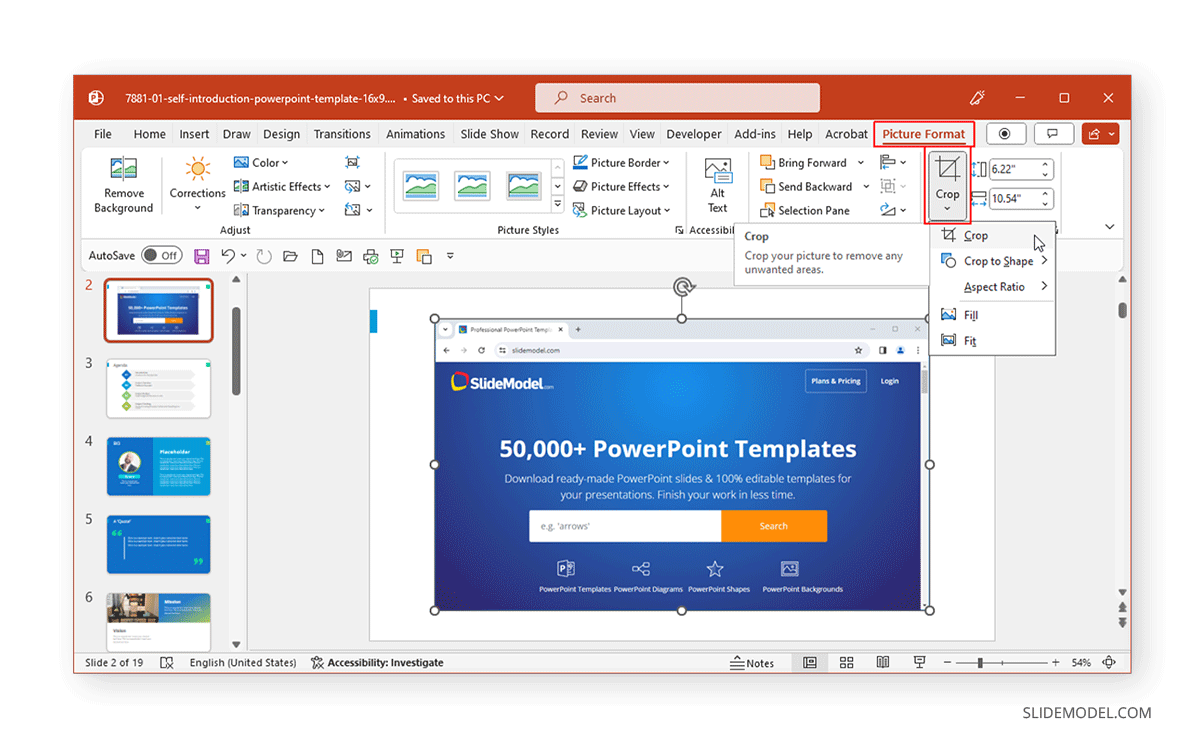
How to Crop a Screenshot in PowerPoint
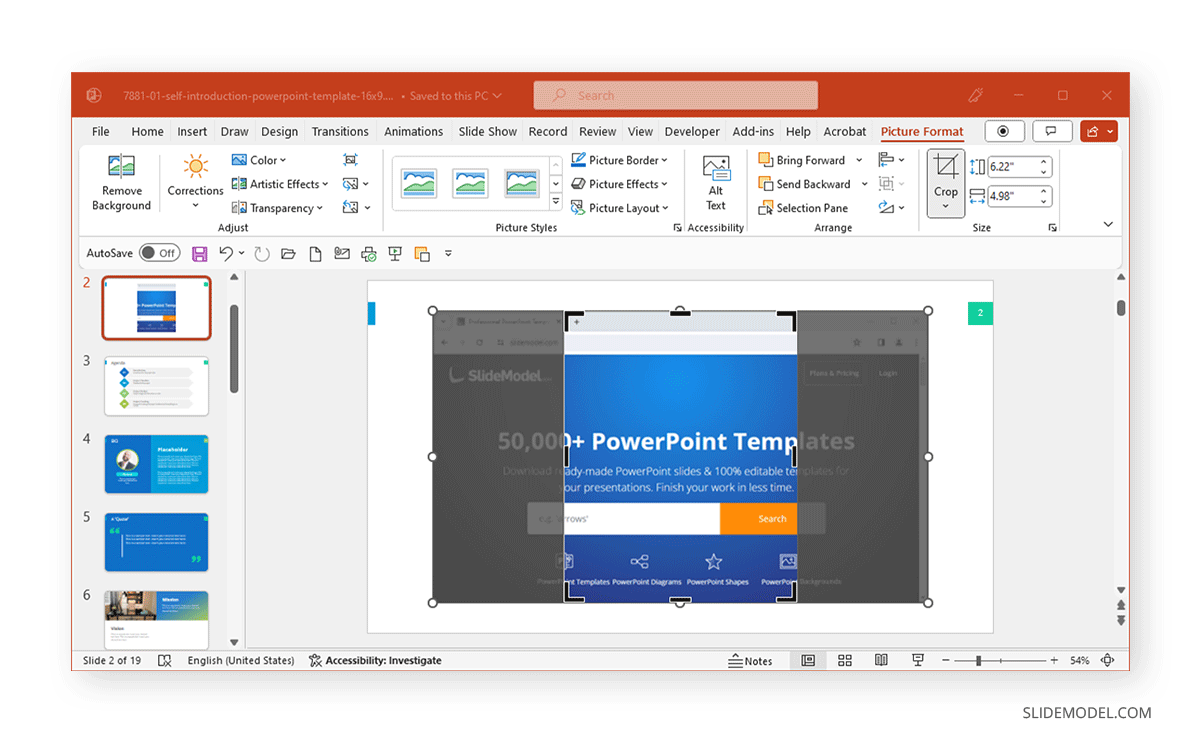
From Picture Format -> Crop -> Crop, you can customize the screenshot by dragging the cropping outline that will appear on the screenshot.

How to a Crop Screenshot by Shape in PowerPoint
To crop the screenshot according to a specific shape, go to Crop to Shape from the Crop dropdown menu and select the required shape.
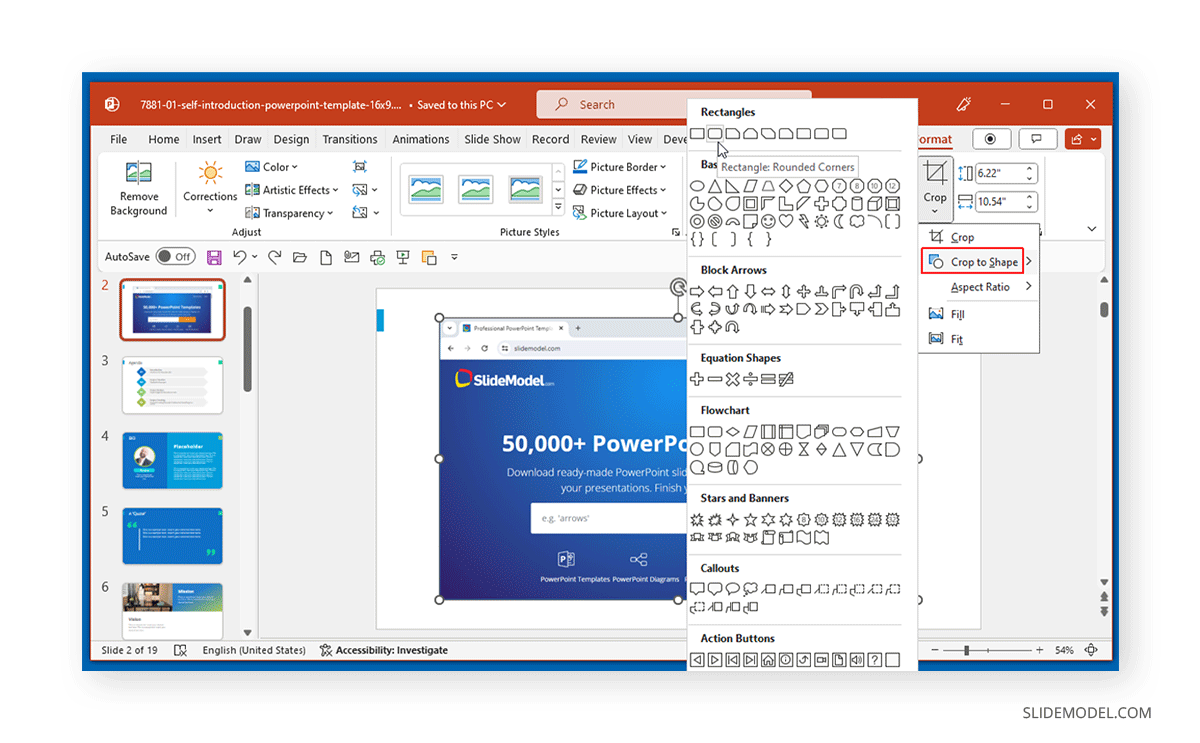
The PPT screenshot will be cropped to your selected shape.
How to Crop a Screenshot in PowerPoint According to Aspect Ratio
Another cropping option in the Crop dropdown menu is meant for cropping the selected image according to aspect ratio. You can use this option to crop your screenshot according to Square (1:1), Portrait (2:3, 3:4, 3:5, and 4:5), and Landscape (3:2, 4:3, 5:3, 5:4. 16:9, and 16:10) aspect ratio.
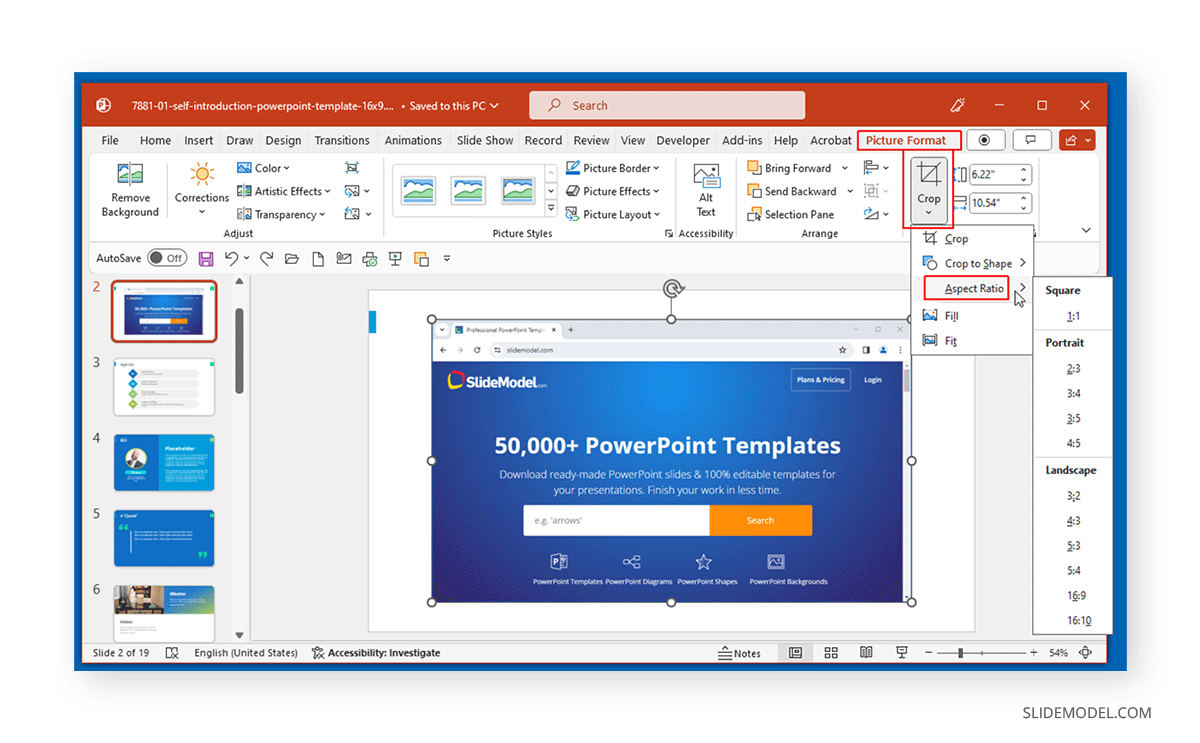
The image below shows how aspect ratio-based cropping works in PowerPoint.
Other options within the Crop dropdown menu include cropping the image to fit or filling it to a shape.
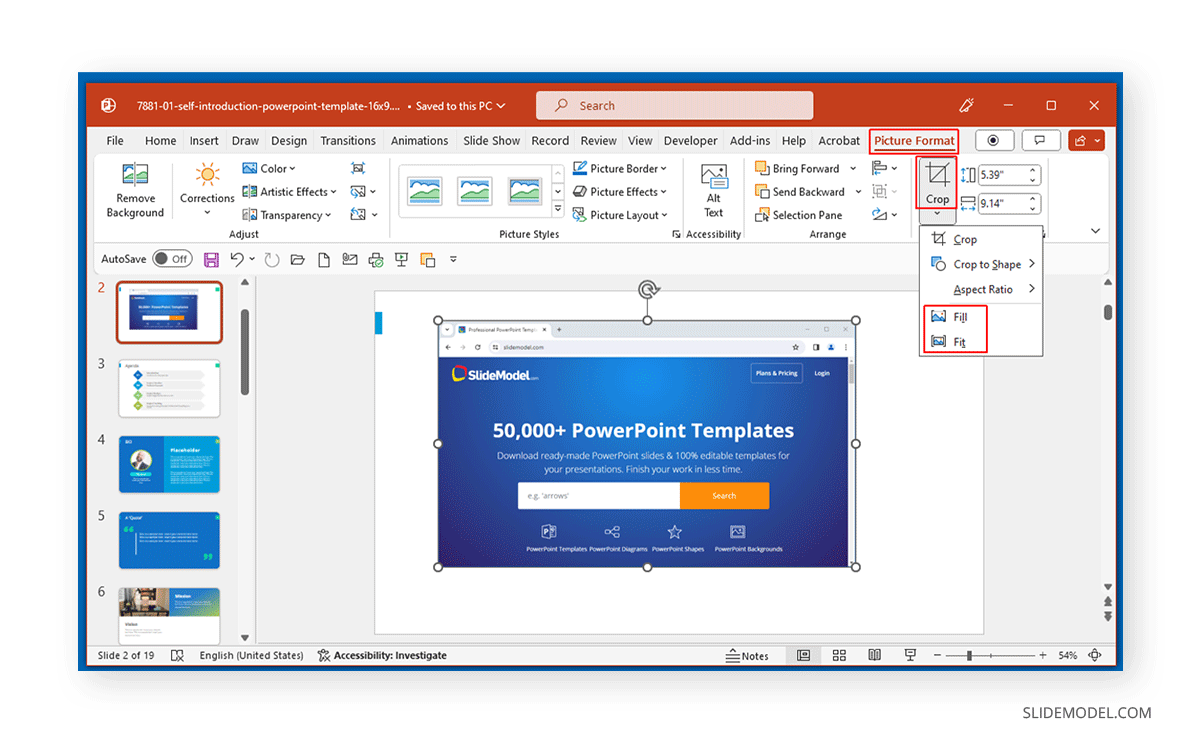
These cropping options can be used to fit or fill shapes with screenshots.
Resizing a Screenshot in PowerPoint
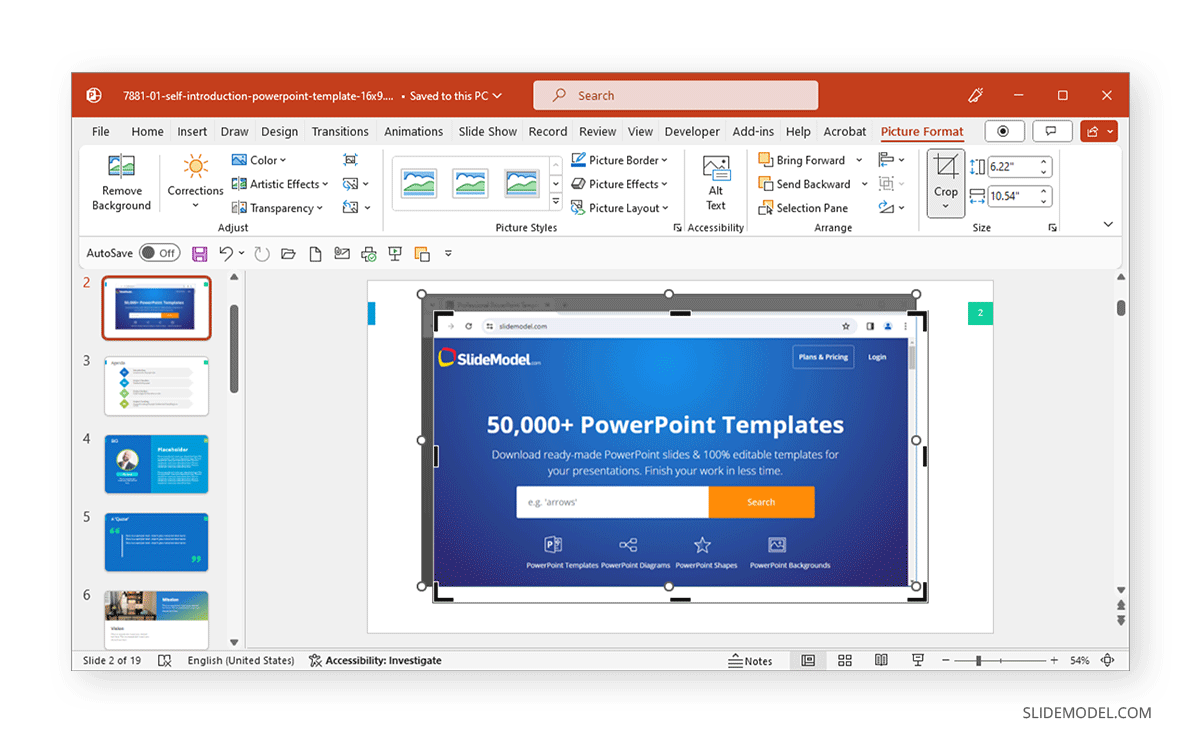
Other than cropping a screenshot, you can directly resize it via Picture Format -> Size. From here, you can specify a width and height for a selected image, such as a screenshot.
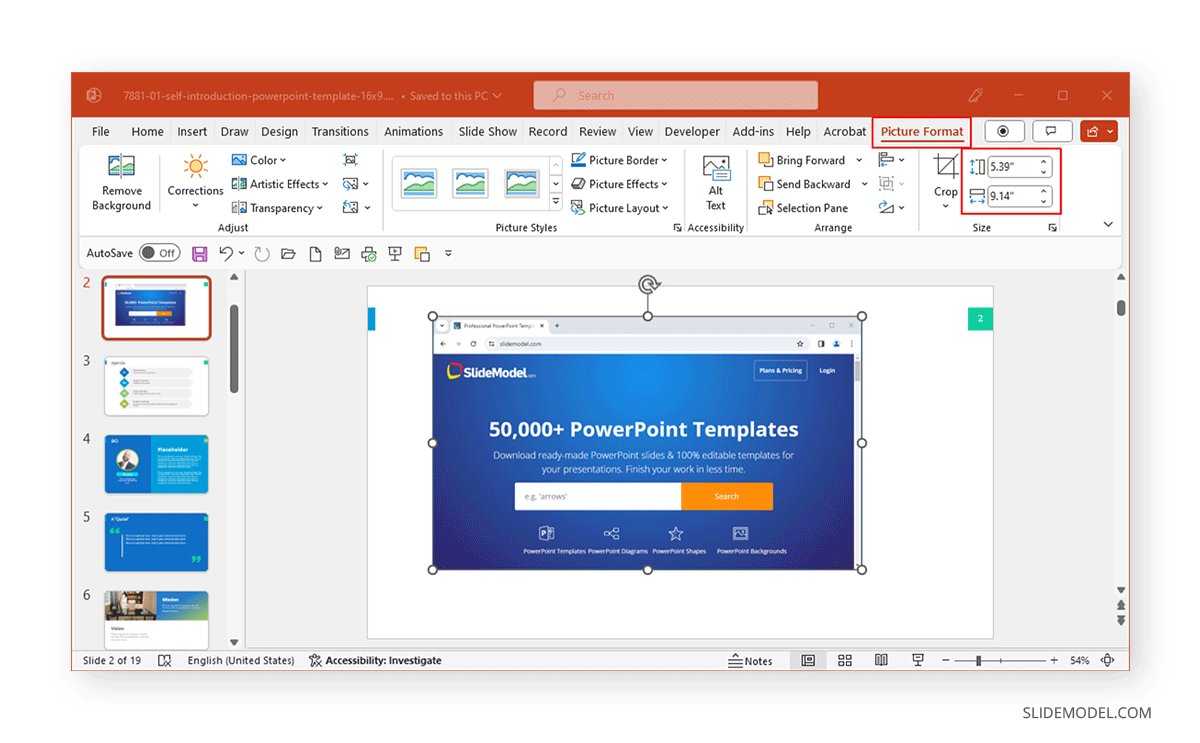
Alternatively, drag and drop to resize the screenshot by holding the cursor from one of the corner dots appearing after selecting the image and dragging it.
Annotating and Highlighting
To add a caption to the screenshot with overlay text, go to Insert -> Text -> Text Box.
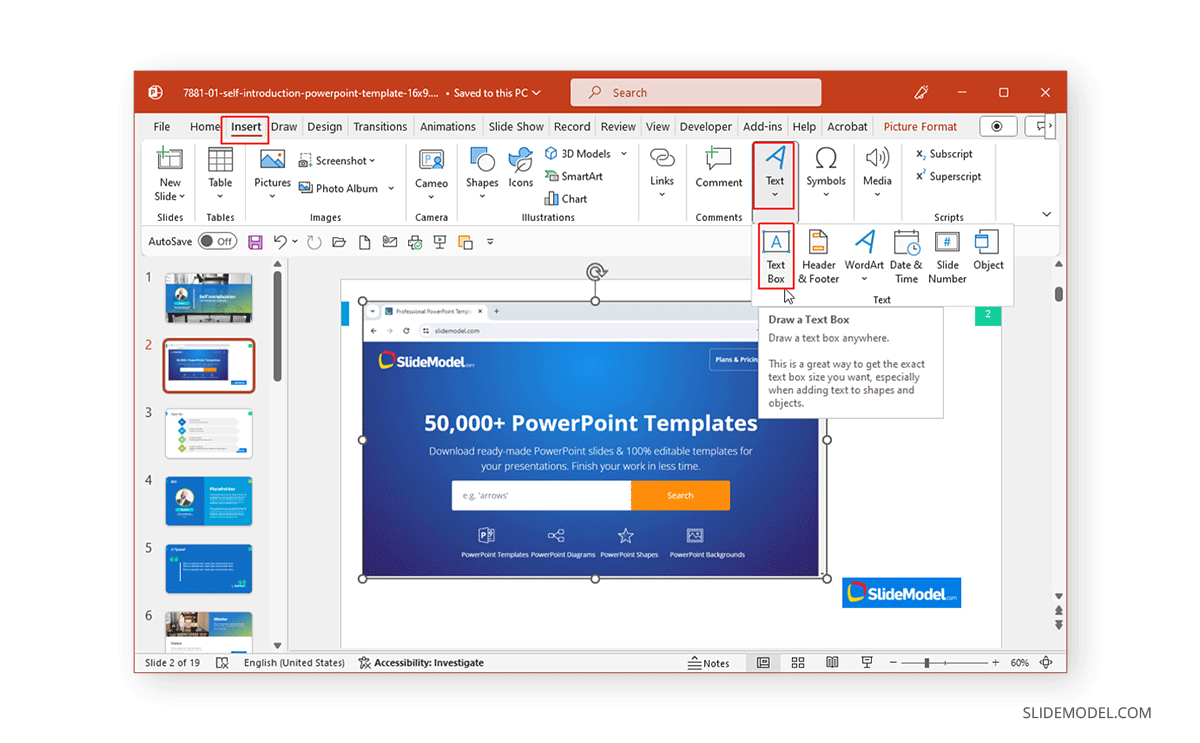
Add text to the text box and place it anywhere on top of the screenshot.
By using Ribbon menu tools such as Font options and Shape Format options, you can customize the text’s look.
Troubleshooting Common Screenshot Issues
Taking screenshots can sometimes be tricky. You might fail to grab a screenshot without knowing what might have caused the failure to grab the image. Below are a few suggestions for troubleshooting common screenshot issues:
Hotkey Conflict: Some apps can cause a conflict with the screenshot hotkey designated for capturing screenshots. This can include default keys like the Print Screen key in Windows or a custom hotkey you might have designated to a third-party app.
Change in Destination File Settings: You might be grabbing screenshots without realizing they are being saved to a different location. This can happen when the screenshot app changes the default location for saving the screenshots. This can commonly happen after reinstalling a screenshot app or if it is reset to default settings.
Insufficient Disk Space: It is possible that you might not be able to save screenshots if your disk space is insufficient. Check your disk space and clear up some files to see if your issue is resolved.
Issue with the Graphics Driver: if your screenshots appear distorted, you might need to check if your graphics driver is correctly installed or if the device screen is damaged, showing a distorted image of the screenshot.
Security Software Restrictions: Some security apps, such as anti-virus apps, can cause a conflict or limit the use of certain functions or apps. This might result in preventing screenshots from being taken. You can disable your security software or review its settings to resolve this issue.
Saving and Sharing PowerPoint Presentations with Screenshots
Saving in Different Formats
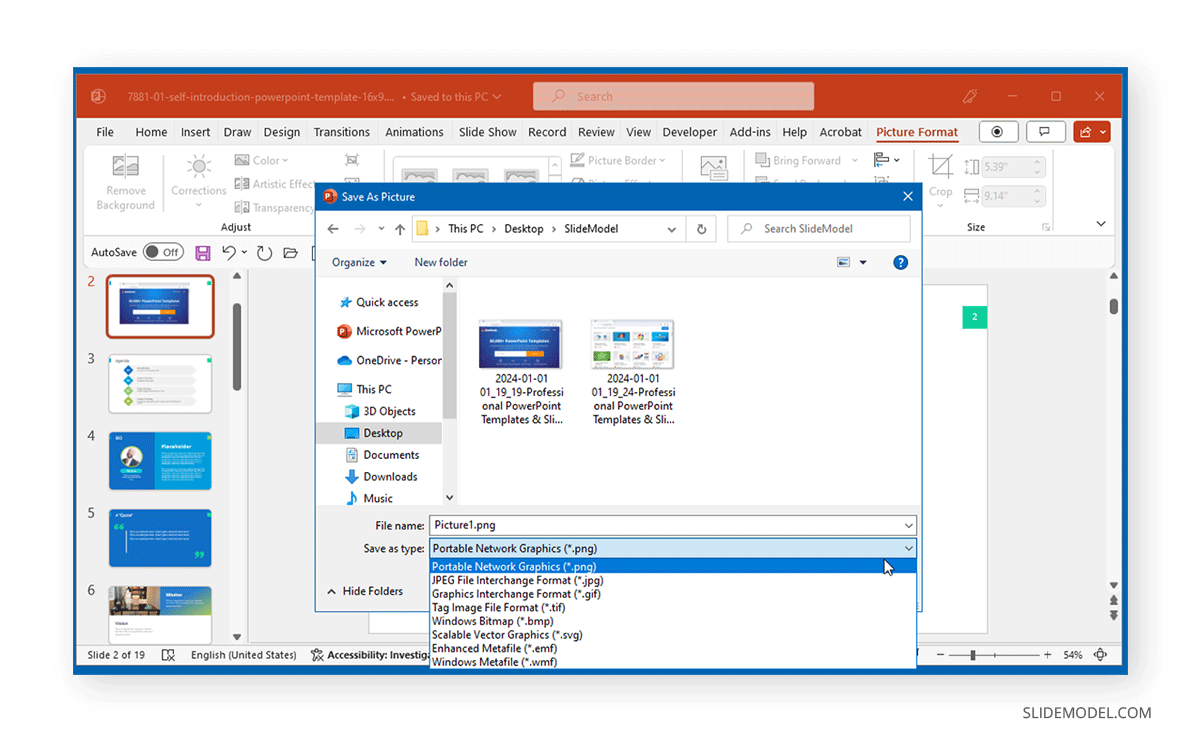
One method of directly saving a screenshot from a PowerPoint slide is to save it as a picture via the right-click context menu.
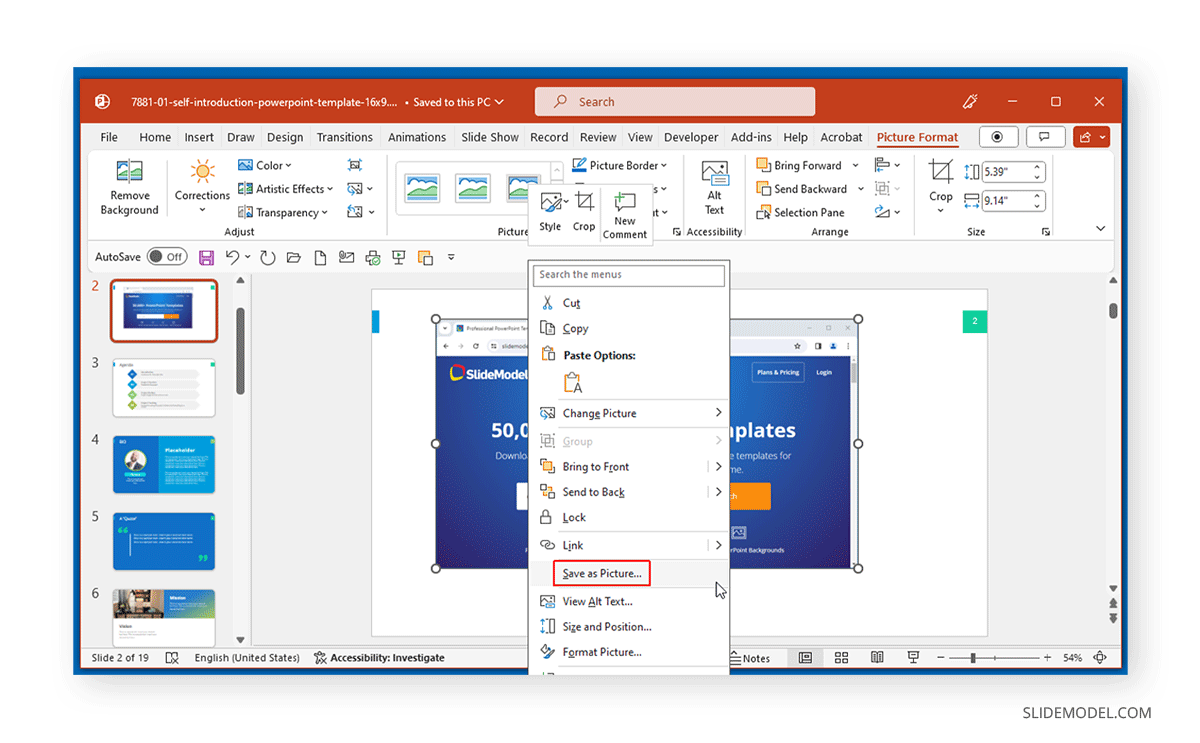
This will allow you to pick a destination to save the file in an image format such as PNG, JPEG, GIF, TIF, BMP, and SVG.
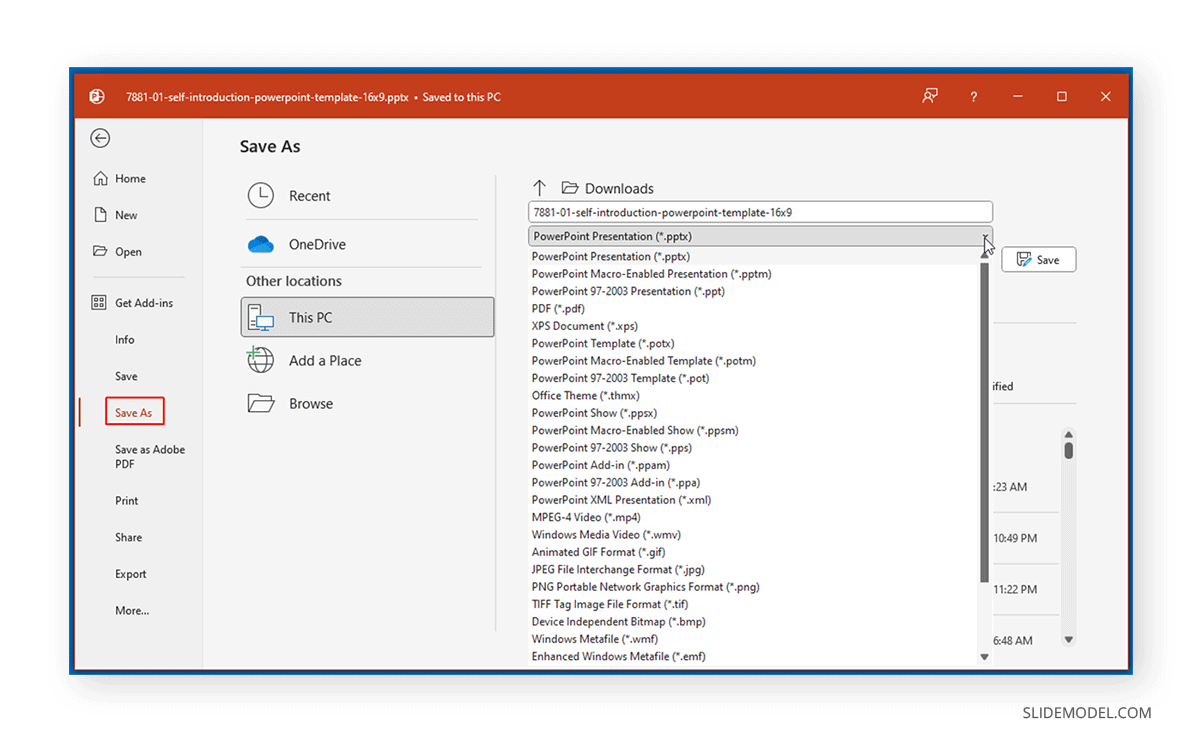
To save your presentation file with one or more screenshots in a specific format, go to File -> Save, select a destination to save the file, and select a PowerPoint, image, or video format to save the file or save it as an XPS, PDF, OpenOffice, or RTF file.
Sharing the Presentation File
You can share the presentation file by going to the Share button in PowerPoint.
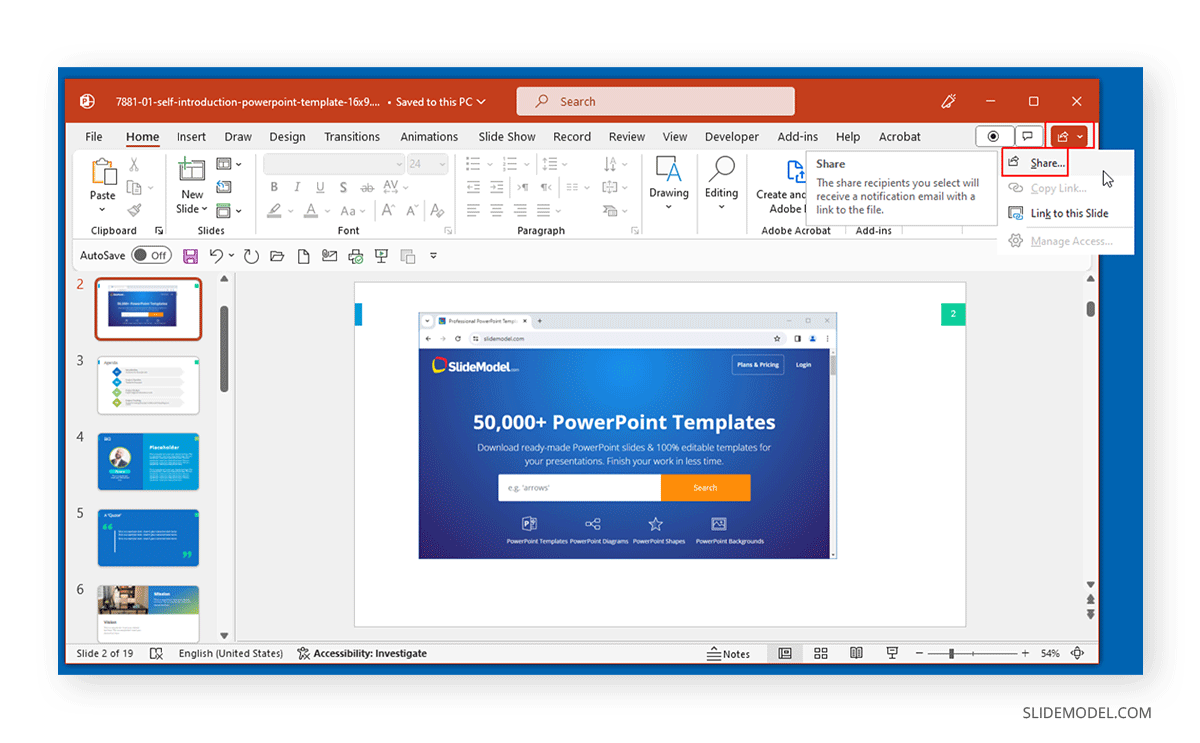
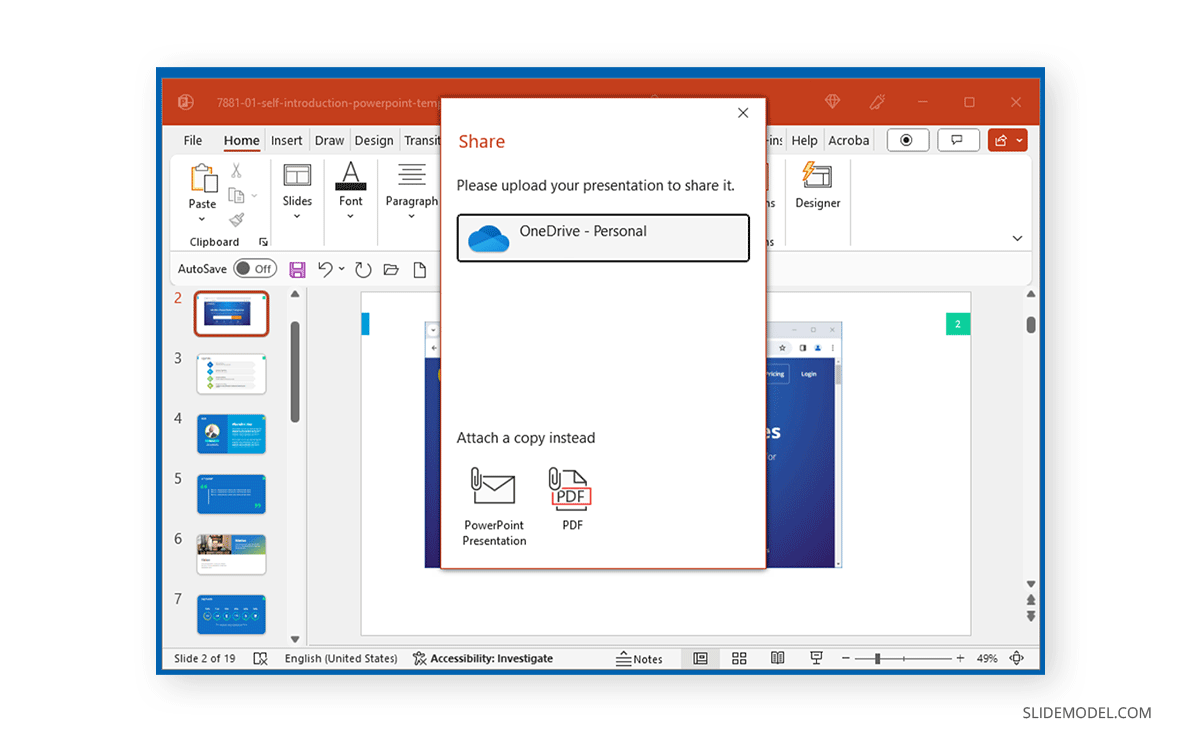
The file can be shared as an attachment within a mail client as a PowerPoint or PDF file, or you can upload it to OneDrive for instant sharing.
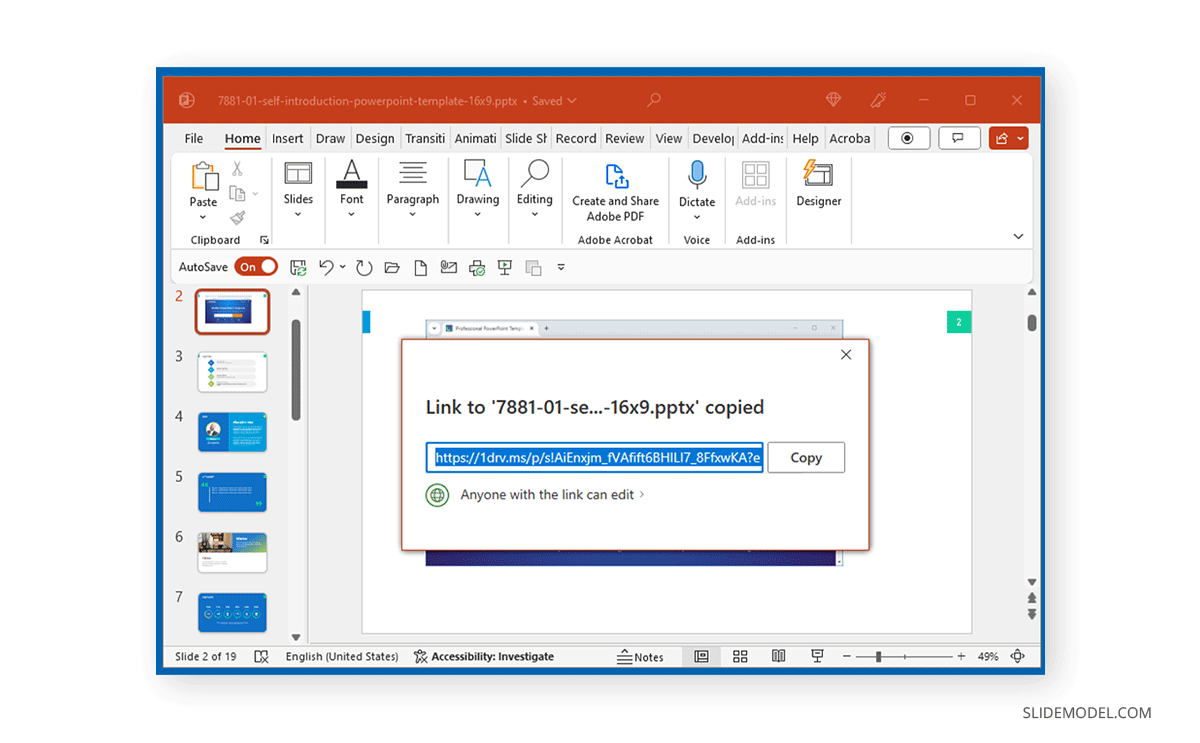
Files uploaded to OneDrive can be shared with specific people or with a publicly accessible link with view-only or editing privileges. The recipient will receive the link with respective access privileges if an email address is added.
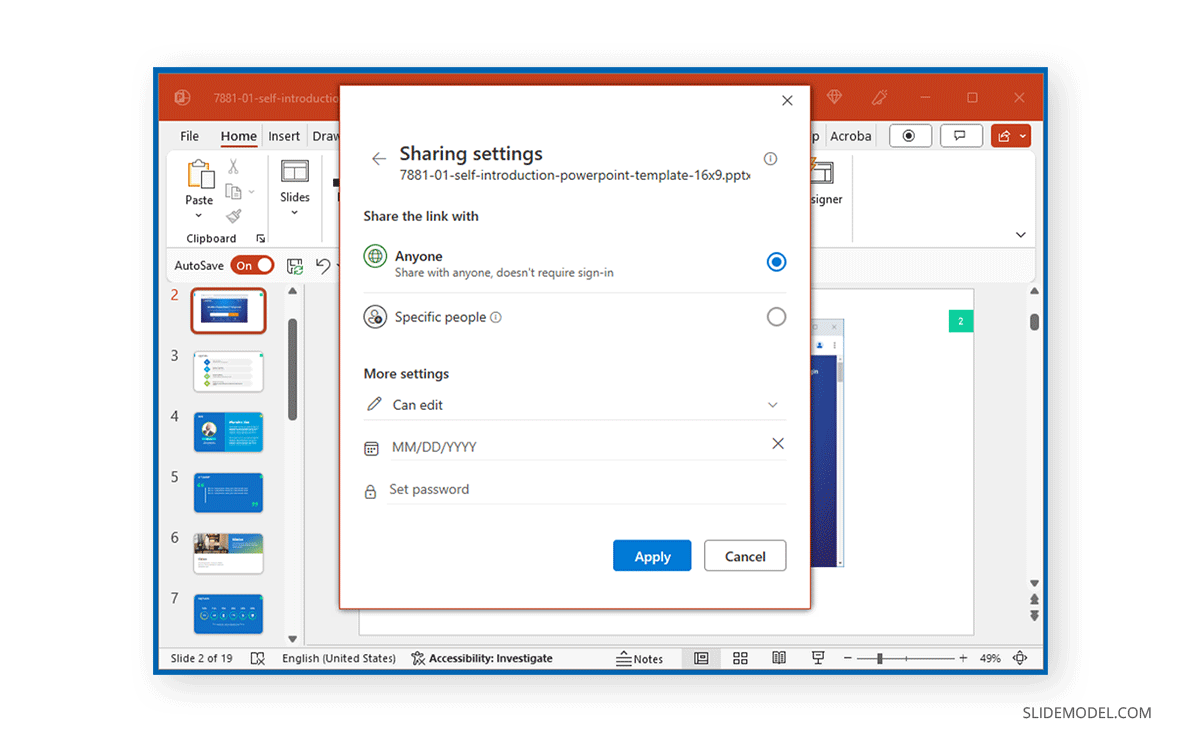
You can also generate a link with access privileges and share it with recipients separately.
Compressing Images
To compress a screenshot in PowerPoint, go to Picture Format -> Compress Pictures.
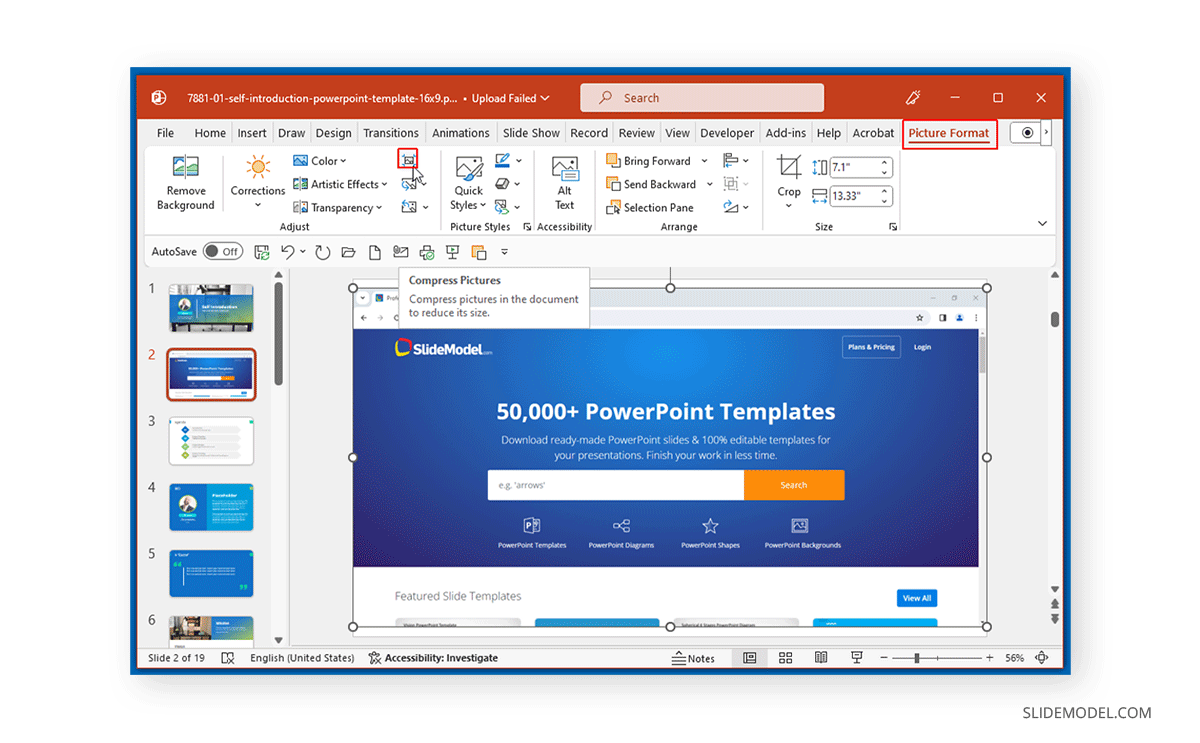
The image compression dialog box will appear. From here, you can choose to compress the current or all images in the PowerPoint presentation and enable the deletion of cropped areas. Furthermore, you can select a resolution for the compressed file(s).
Depending on the resolution of your screenshot, you will be provided with compression options for high fidelity, HD quality (330 PPI), print quality (220 PPI), web quality (150 PPI), and email (96 PPI) resolution. For the average resolution of a computer monitor screen, you might only be able to compress the image for a handful of resolutions such as web or email.

If you want to compress the entire presentation, you can learn how to compress a PPT file in PowerPoint, which not only compress the images but all the media inside.
FAQs
1. How do I take a screenshot in PowerPoint?
To take a PowerPoint screenshot, go to Insert -> Screenshot and either select an active window thumbnail to instantly capture the window or select the screen clipping tool to select an area from the screen to save as a screenshot in PowerPoint.
2. Can I take a screenshot from a specific program or window?
Yes, you can take a screenshot of a specific program other than PowerPoint by using the screen clipping tool in PowerPoint. This tool is available via the Insert tab.
3. How do I add annotations or edit a screenshot in PowerPoint?
To edit a screenshot in PowerPoint, go to Format Picture via the right-click context menu or Picture Format via the Ribbon menu. This will allow you to edit the size, picture style, and adjust the screenshot in a PowerPoint slide. To annotate a screenshot in PowerPoint, you can use a text box, shape, or draw over the screenshot.
4. Can I resize or crop a screenshot within PowerPoint?
Yes, you can resize and crop screenshots in PowerPoint by selecting the screenshot image and going to the Size menu in the Picture Format tab.
5. What file formats are supported for screenshots in PowerPoint?
Once a screenshot is taken in PowerPoint, it is embedded in a slide using an image format. The supported format for screenshots in PowerPoint includes various image formats such as PNG, BMP, JPEG, GIF, etc.
6. How can I ensure high-quality screenshots in my PowerPoint presentation?
For optimum image quality, take screenshots at a high resolution. Ensure your monitor is set to a high resolution (HD, FHD, or above). Also, avoid compressing images to avoid quality degradation.
7. Is it possible to take screenshots during a PowerPoint presentation?
You can take screenshots during a presentation using your operating system’s default screen-capturing tool, hotkey, or a third-party tool to grab a screenshot.
8. Why does my PowerPoint screenshot appear blurry?
Your screenshot can appear blurry or pixelated if the content window has too many details, such as small pieces of text, or when your monitor might not be set at a high resolution. Other issues can include a conflict with an app, resulting in the malfunctioning of the screenshot tool, or an issue with your graphics driver. Sometimes, screenshots can appear blurry or pixelated in Normal view, whereas they can appear fine in Slideshow mode. You might want to preview your slide as a slideshow to see if this is true.
9. Why can’t I take a Screenshot?
If you followed the steps mentioned here and, for some reason, the screenshot you intend to take shows as black, then it’s due to some code on the website you intend to screenshot blocking that function. That’s commonly done in entertainment streaming services to avoid sharing high-quality pictures of their licensed shows.
10. How many Screenshots should I use in my presentation slides?
The general rule says 1 screenshot per slide, as otherwise you would be downsizing and affecting the readability of the content inside that screenshot. If you don’t capture a full screen but rather a graphic or a chart, then you can use multiple screenshots (but no more than 3 per slide). You can create as many slides as required, as you can go through each step if the procedure is too complex to be explained.
Conclusion
There can be many benefits of including screenshots in PowerPoint, either directly by using the default screenshot tool in PowerPoint or by using a third-party tool. Saved screenshots in PowerPoint can also be separately saved, shared, and compressed according to need. When taking screenshots, ensure that your monitor is set to a high resolution.
As your resolution increases, so does the size of the screenshot. This might mean that you may need to compress the screenshot to reduce the file size of your your presentation. This might especially be important if you want to share your presentation file as an attachment, as many mail servers do not support files higher than 25 MB. Alternatively, you can share your PowerPoint file via a OneDrive link if it is too heavy to be sent as an attachment.