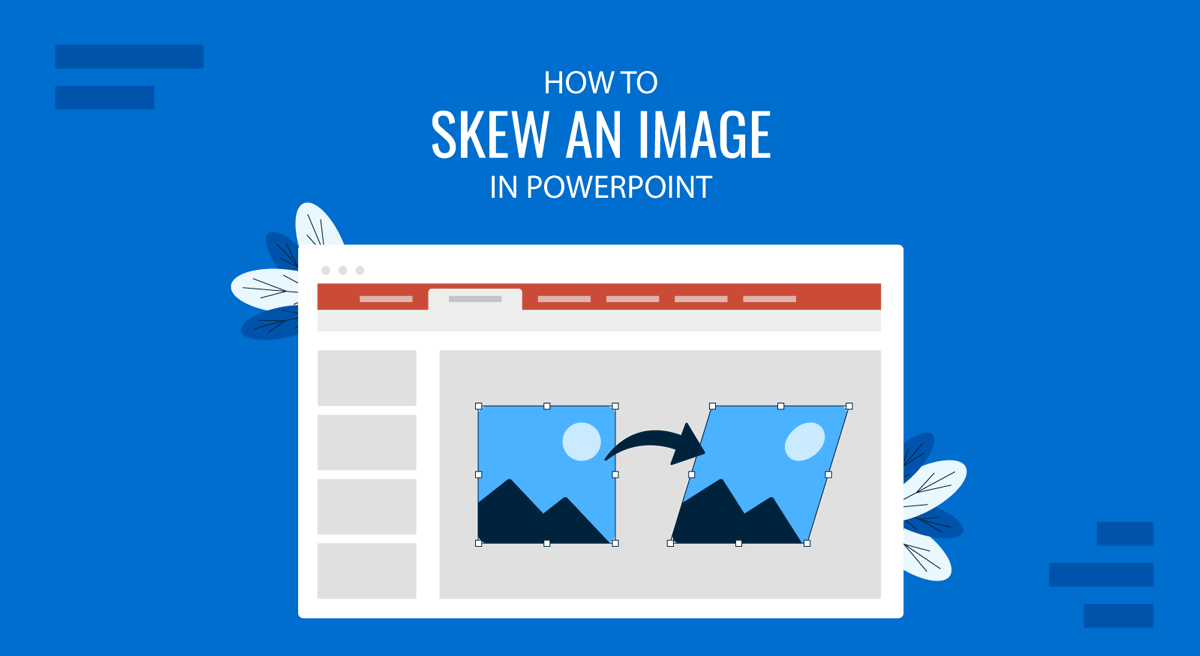
When looking to add visual appeal to PowerPoint slides, one useful but often overlooked technique is to skew or distort images to create dynamic perspectives, 3D effects, or custom layouts. Learning how to skew an image can be a good skill for remodeling PowerPoint templates, whether for design purposes or to fit a specific visual theme.
This guide will explore different methods to skew an image in PowerPoint, how to use perspective and warp effects, and best practices for making your presentations more visually compelling.
Why Skew an Image in PowerPoint?
Skewing an image can be useful for a variety of reasons, including the following:
Enhancing Design Aesthetics
Skewing images can improve your presentation’s overall look and feel, making it more engaging. Such visuals are likely to be attention-grabbing, making the audience more attentive due to a change in visual perspective rather than using plain slides.
Emphasizing Certain Elements
By skewing an image, you can direct the audience’s attention to a particular section of your slide to emphasize a key element. This might be a diagram, photo, branding, etc. This might be handy for making slide designs that can stand out, such as for about me slides, staff intros, business diagrams, roadmaps, presenting architectural designs, showcasing product images from different angles, and creating realistic mockups.
Creating a 3D Effect
Skewing an image can make it appear three-dimensional, adding depth to your slide. This effect can be helpful not only in making slides more aesthetically pleasing but also in creating models and diagrams where such an effect might be needed to explain a concept or process. You can also export these slides to include in Google Slides templates to benefit from the effects created with PowerPoint tools in Google Slides and export unique designs to other presentation platforms.
Adjusting Perspective
You can change the angle of an image to fit the perspective of other slide elements. This technique can show the audience different perspectives related to your presentation topic.
How to Skew Image in PowerPoint
To skew an image in PowerPoint, you can use 3D rotation, edit image points, use the Perspective tool in PowerPoint, or create a mix of images and shapes. Let’s look at different ways to skew an image in PowerPoint.
Method 1: Skew an Image in PowerPoint Using the 3D Rotation
PowerPoint does not have a direct “skew” function, but you can achieve a similar effect using the 3D Rotation feature.
Step 1: Go to the Insert tab and select Pictures to insert an image from your device or an online source.
Step 2: Select the Image, click on it to activate the Picture Format tab, click on Picture Effects, and Navigate to 3D Rotation. Now, select a preset that skews the image.

Step 3: If you want to customize the 3D Effect further, go to the Format Picture pane via the right-click menu to make various adjustments:
- Rotation Values: You can customize your skewed image in PowerPoint by adjusting the X, Y, and Z rotation values via the Format Picture pane.
- Perspective: You can adjust perspective to increase or decrease the level of skewing, mainly by adjusting the shadows, soft edges, and glow to enhance the effect.
- Artistic Effects: You can also use Artistic Effects to change the look of your image using various filters from the Format Picture pane.

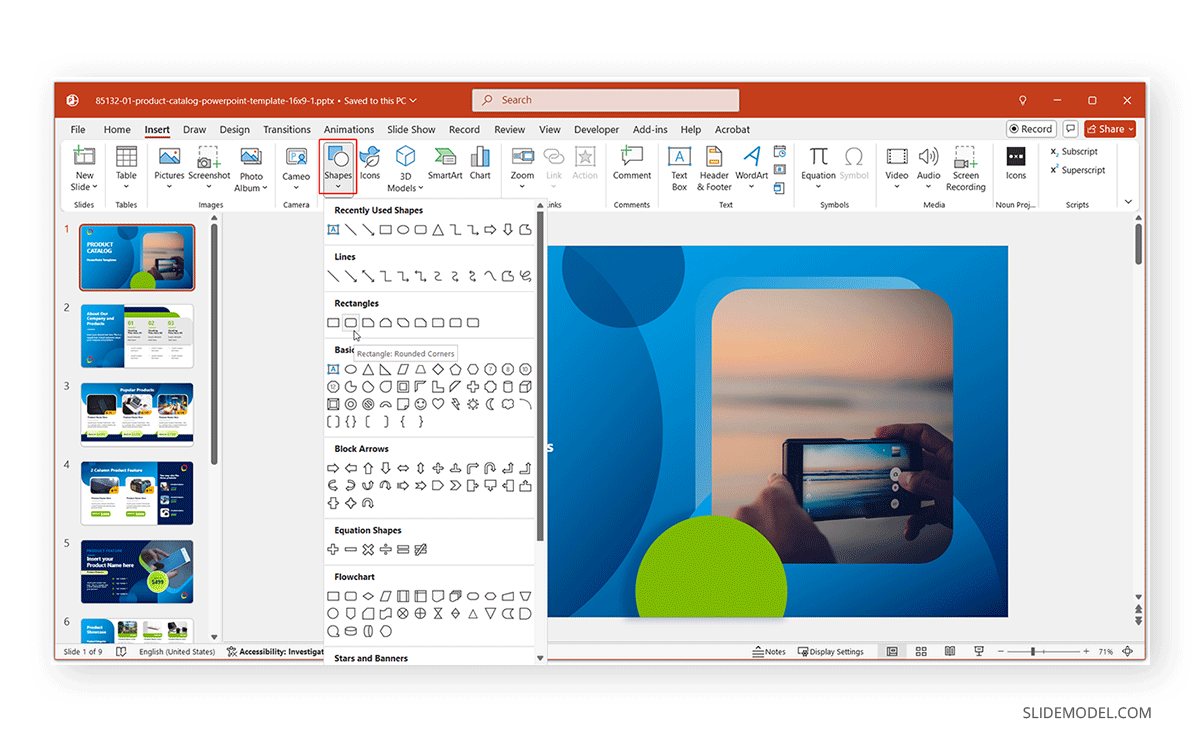
Method 2: Skew an Image in PowerPoint Using Shapes
Another method to skew an image in PowerPoint is to use shapes.
Step 1: Go to Shapes via the Insert tab and select a shape to insert in your PowerPoint slide.
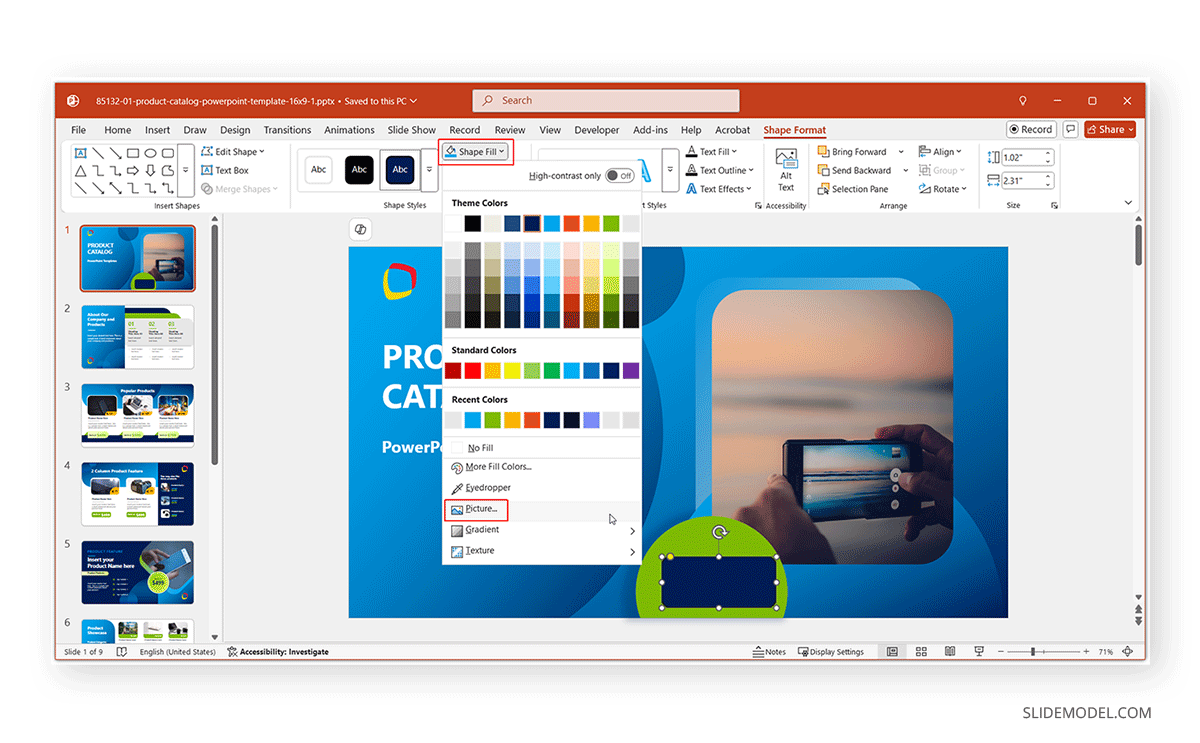
Step 2: Insert a picture in the shape added to your slide via Shape Fill from the Shape Format tab.
Step 3: Right-click the shape with the image and select Edit Points. This will allow you to edit the various points within the shape with the image to create a skewed image.

Step 4: Use drag and drop to select the points of the shape to skew the image within the shape. Using this method, you can have greater freedom regarding the type of PowerPoint warp image effect you intend to create.

How to Distort an Image in PowerPoint
If you are considering options for distorting an image in PowerPoint, the Artistic Effects feature can help you do that.
Step 1: Insert an image via the Insert tab and place it in the slide according to need.
Step 2: Go to Picture Format -> Artistic Effects and select an effect to distort the image.
Step 3: Go to Picture Effects and select a 3D Rotation style.
Step 4: Add additional effects, such as a Glow effect, to give your image a unique perspective. By giving the image a unique perspective, you can answer the question that many presenters struggle with, i.e., how to make a presentation different from conventional design styles that an audience can easily overlook due to monotony.
By experimenting with different Artistic Effects and Picture Effects, you can not only skew a picture in PowerPoint but also create engaging presentations by giving your slides a unique perspective.
How to Change the Perspective of an Image in PowerPoint
With some creativity, you can change the perspective of an image added to PowerPoint slides by merging them with PowerPoint Shapes. To skew an image using shapes, you should select a shape that can give a unique perspective to your slide designs, such as a cube or cylindrical shape.
Step 1: Insert a 3D shape in PowerPoint, such as the Cube shape, via Insert -> Shapes.
Step 2: Insert an image via Insert -> Pictures and place it over the Cube shape.
Step 3: Ensure the image appears within the shape. If the shape appears on top, use Send to Back or select the image, followed by Bring to Front via right-click context menu or the Shape Format tab.
Step 4: Adjust the look of the cube shape using Shape Fill to make it more eye-catching. Use a background fill that complements the image placed within the shape, such as neutral colors, gradients, or textures.
Using that method, you can create a PowerPoint image perspective that is refreshingly unique and easy to see. You can also give the illusion of a 3D perspective by placing the image in the shape, appearing skewed.
Common Mistakes in Skewing Images and How to Avoid Them
While skewing an image might work in your favor, much can go wrong. Below is a list of common mistakes you should avoid when skewing an image in PowerPoint.
Over-Skewing the Image
Excessive distortion can make images look unnatural and difficult to interpret. Keep adjustments subtle and ensure that the image remains recognizable. In such a case, maintaining the size and Aspect Ratio of the image is essential. Skewing an image without maintaining its proportions can result in stretched or compressed visuals. Always use the Lock Aspect Ratio option when resizing to avoid this issue.
Misalignment with Other Slide Elements
Ensure that skewed images align with text, icons, and other graphics. Use PowerPoint’s Align tools to maintain consistency and symmetry. Proportionate slide elements will likely positively impact the audience and make your slides look professional.
Using Low-Resolution Images
Distorting an image can reduce its quality, especially at low resolution. Therefore, it is essential to use high-quality images to maintain clarity for skewed images.
Overlapping Layers Poorly
If using multiple skewed images or layering text, ensure that elements do not obscure each other. Transparency and proper layering techniques can maintain a clean-looking slide.
Overcomplicating the Slide Design
While skewing images adds creativity, overusing this effect can clutter your presentation. Use skewed images strategically and sparingly to highlight key points without cluttering the slide.
Final Words
Skewing an image in PowerPoint helps enhance presentation visuals, create a sense of depth, and adjust image perspectives to fit your design needs. While PowerPoint does not have a dedicated skew function, you can achieve the effect through 3D Rotation, using Edit Points with PowerPoint Shapes, distorting images with Artistic Effects and Picture Effects, and perspective adjustments. By mastering these techniques, you can transform standard images into dynamic elements that capture your audience’s attention with unique perspectives.
PowerPoint effects, shapes, and images have no set rules, and the combinations you can create are endless. However, it’s best to consider the audience’s needs when making such skewed images. You should aim to avoid visual clutter, making your designs easy to grasp. Even if such a technique is used for depicting complex diagrams, you might want to emphasize different parts of the diagram by dividing it into multiple slides and connecting a main slide using the Zoom effect in PowerPoint. Such a measure can help you highlight key parts of a complex image by focusing on various sections individually. This can be much easier for the audience than a large, skewed diagram as a single image.
There are also many other methods to add unique perspectives to your slides. If you’re exploring ideas regarding how to start a presentation or end a presentation, you can consider gamification for slides such as this spin the wheel template for PowerPoint.