To design PowerPoint slides that stand out, one of the most commonly used elements is the use of shapes. In addition to using conventional shapes, you can also merge shapes in PowerPoint to create custom graphics, diagrams, and layouts. The shape merge tools can be used to intersect, subtract, combine, and customize shapes to suit your design needs.
Why Merge Shapes in PowerPoint?
Merging shapes allows you to break away from PowerPoint’s default layouts and create visual content that conveys your message more effectively. Instead of stacking generic shapes side by side, merging lets you define the exact form and structure your slide requires.
1. Building Custom Icons: With shapes combined or altered using various options within the Merge Shapes menu (e.g., Subtract, Intersect, Union, Fragment, or Combine), you can craft something specific to your topic or brand identity.
2. Designing Unique Diagrams: Visualizing processes or relationships often requires more than the visuals that SmartArt can offer. Merged shapes give you the flexibility to create layered, meaningful diagrams.
3. Creating Advanced Infographics: By layering and combining shapes, you can build infographic elements that are aligned with your data and stylistic preferences, without relying on advanced tools like Photoshop or CorelDRAW.
4. Customizing Backgrounds and Patterns: Repeating or merging shapes into decorative motifs helps add depth to slides without visual clutter. This works well for title slides, section breaks, or branded templates.
5. Shaping Placeholders and Image Masks: Merged shapes can be used as clipping paths or masks for images, allowing you to control how content is revealed or emphasized.
Beyond the design freedom, merging shapes also saves time and ensures consistency across multiple slides. Once you’ve created a custom shape, you can copy, reuse, and adapt it without needing to redraw or manually align elements. It’s a technique for anyone looking to move past basic formatting and create professional, polished visuals directly inside PowerPoint. This not only works for advanced PowerPoint users but also for those new to PowerPoint who want to make presentations while learning how to design professional-looking slides.
Getting Started with Merging Shapes in PowerPoint
The Merge Shapes tool is available in recent versions of PowerPoint, including Microsoft Office 2013 and later editions. You can access the tool by selecting multiple shapes and going to the Shape Format tab.
Step 1: Insert shapes in PowerPoint via Insert -> Shapes.
Step 2: Select two or more shapes on your slide by holding down the Shift key.
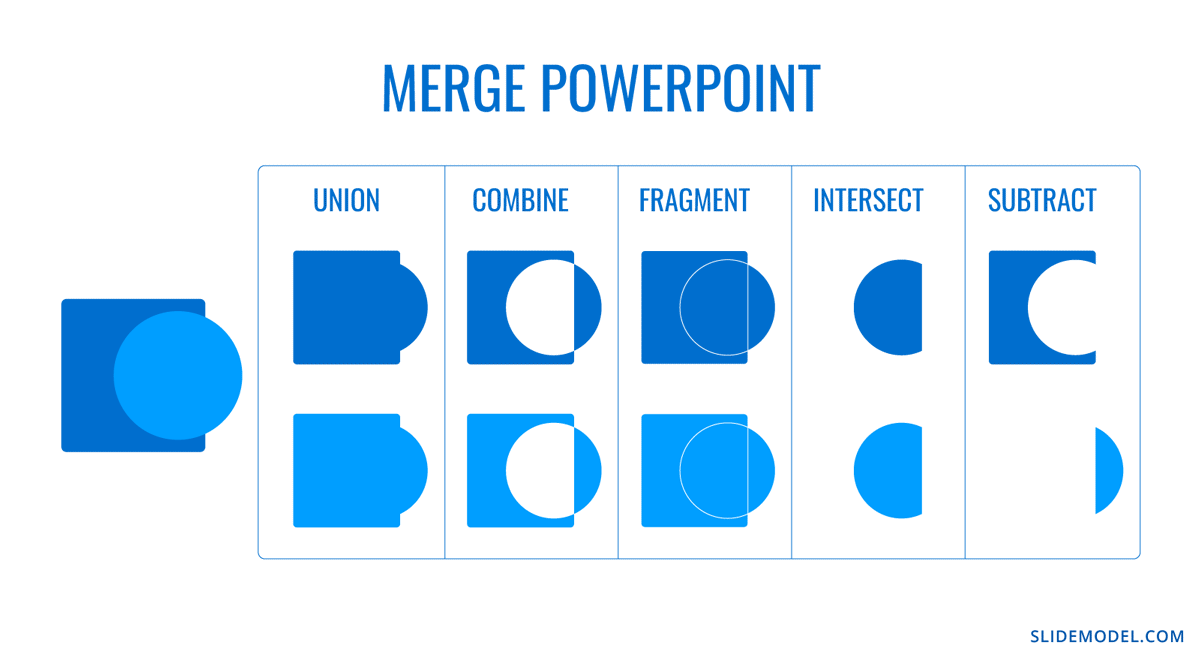
Step 3: Go to the Shape Format tab and select the Merge Shapes dropdown menu from the Insert Shapes group. Once the Merge Shapes menu is selected, you will see five main options for merging shapes via a drop-down menu, including Union, Combine, Fragment, Intersect, and Subtract.
Union Shapes in PowerPoint
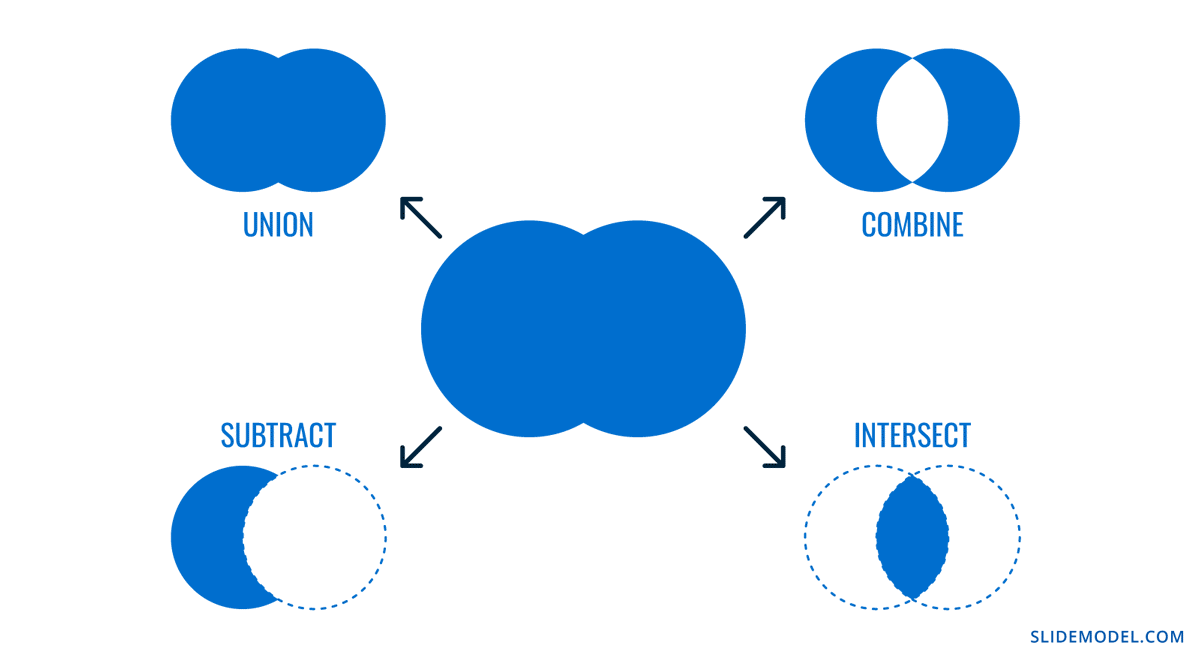
The Union option in Merge Shapes combines all selected shapes into a single shape that takes on the outline of the outermost edges of all combined shapes. This option can be used by selecting two or more shapes in PowerPoint and going to Shape Format -> Merge Shapes -> Union. The result of the union shapes in PowerPoint is as follows:
- All overlapping and non-overlapping areas are combined into a single unified shape.
- The resulting shape inherits the fill and outline of the selected shape.
Using the Union feature in PowerPoint to merge two or more shapes can be used to create complex icons and design combined elements or text callouts. You can also use this option to generate custom background designs.
Combine Shapes in PowerPoint
The Combine option in Merge Shapes removes any overlapping areas between shapes, keeping only the non-overlapping parts. To combine selected shapes, go to Shape Format -> Merge Shapes -> Combine. You can combine shapes in PowerPoint if you want to achieve the following:
- Shapes overlap, and the space is subtracted.
- Non-overlapping parts remain and are grouped as a single shape.
Using this option can be helpful in creating intricate patterns, and for generating window or frame visuals for your slides.
Fragment Shapes in PowerPoint
If you’re looking to split all shapes into multiple pieces wherever their edges intersect, the Fragment option is useful for making such slide elements in PowerPoint. By going to Shape Format -> Merge Shapes -> Fragment, you can edit selected shapes by making the following changes:
- Every intersecting area becomes its own separate shape.
- All fragments will become fully editable.
Fragmented shapes in PowerPoint can have various uses, including building layered infographics, designing multi-part diagrams, and creating stylized patterns or visual effects.
Intersect Shapes in PowerPoint
The Intersect option keeps only the overlapping portions of the selected shapes and removes everything else. You can intersect shapes in PowerPoint to create unique designs by merging shapes via Shape Format -> Merge Shapes -> Intersect, resulting in the following changes to selected shapes:
- The resulting shape represents only the shared area of the original shapes.
- The final shape adopts the fill and outline of the first shape selected.
Intersecting shapes can have various uses, including designing logos or icons, highlighting intersections in diagrams, and creating masks or crop effects. In the example below, we used two overlapping oval shapes to create a warped, intersecting shape for making an unusual design. We also used an underlay blue shape to emphasize the change in the shapes after interaction.
Subtract Shapes in PowerPoint
The Subtract (also called Subtract or Subtract Front) option removes the topmost selected shape(s) from the bottom shape. Available via Shape Format -> Merge Shapes -> Subtract, the selected shapes result in the following:
- The overlapping area is cut out from the base shape.
- The remaining shape adopts the fill and outline of the base shape.
Subtracted shapes can be used to create placeholders or windows, cutouts, and design visuals, such as shaping masks or effects like crescent moons. To demonstrate this, we used two oval shapes by subtracting one from another to create a crescent. In this case, we removed the text from both shapes to create the final shape, as it did not require a label.
Customizing Merged Shapes
Once you merge shapes, they behave like standard vector objects, but with the added benefit of being entirely unique. PowerPoint provides various options to help you refine and integrate the new shape into your design.
- Recolor Shapes: You can use Shape Fill and Outline to apply your brand colors or presentation theme colors, ensuring consistency. Merged shapes accept the same formatting tools as any native object.
- Apply Shape Effects: By using shadows, glows, and reflections, you can add effects to emphasize a shape. These effects can help create depth or draw attention to key elements in diagrams or headers.
- Add Gradient Fills: To add more depth, adding gradients to merged shapes can help make the shapes stand out. You can use linear or radial gradients to reflect directional flow in processes or charts.
- Animate Shapes: Using the Animations tab, you can animate merged shapes just like any other object, whether fading them in, making them appear with a click, or using motion paths to guide attention.
- Resize and Rotate Shapes: After merging, you can scale or rotate the shape without losing quality. Holding Shift during resizing ensures the shape maintains its aspect ratio.
- Use Merged Shapes as Masks: Insert images and use the merged shape as a clipping mask by placing the image behind the shape and using the shape to define the visible area.
- Group with Text or Icons: Merged shapes can be grouped with text labels, icons, or data points to form complete visual blocks that are easier to move and align.
To learn more about editing merged shapes, see our tutorial about How to Change a Shape in PowerPoint.
Unmerging Shapes in PowerPoint
PowerPoint does not provide a dedicated “Unmerge” button for merged shapes. These merged shapes become single vector objects, and the original individual components are no longer accessible. However, there are a few workarounds and tips to manage this limitation:
- Use the Undo Command: If you just performed a merge and realize you need to reverse it, press Ctrl/Command+Z or click Undo from the Quick Access Toolbar.
- Keep a Backup Before Merging: A best practice is to duplicate the original shapes and place them off-slide before merging. This provides a clean version to revert to in case edits are needed later. You can also create duplicate slides or copies of the PowerPoint file to retain the original shapes separately.
- Use the Fragment Tool: Unlike other merge options, Fragment allows you to retain all parts of the shapes as individual, editable segments. If your goal involves complex edits, start with Fragment so you maintain flexibility.
- Version History: If you have Version History enabled, you can use it to restore an older version of the file to revert to the original shape.
If none of the above apply and you need to change the merged result, you may have to manually rebuild the shape using the same original objects and repeat the merge process with new adjustments.
Final Words
By using each merge option, including Union, Combine, Fragment, Intersect, and Subtract, you can produce professional-looking presentations. Furthermore, if you use Fragment, each resulting section is independently editable. You can assign different fills, outline styles, or animations to each piece, ideal for creating multi-part visuals or building layered diagrams that evolve over several slides.
The text within the combined shapes often becomes unified, subtracting part of the text from one shape. As you can see from the images in this tutorial, two shapes titled ‘Money’ and ‘Time’ were merged using different variations, with only text from one shape remaining after the shapes were merged. It’s best to label your shapes once the merger has been completed to ensure that you don’t miss out essential labels later on.
If you want even more design-ready resources, explore SlideModel’s PowerPoint Shape Templates designed using shapes to create smart and easy-to-edit designs with editable infographics, illustrations, business diagrams, maps, dashboards, and more.