Images are often used in presentations to add visual appeal, highlight key ideas, or support key messages. However, sometimes even a simple image can make a slide feel cluttered or distract from the main content. Adjusting image transparency in such a case can help balance visuals and text. If you’re wondering how to make an image transparent in Canva, the platform provides simple tools to adjust image opacity, remove backgrounds, and create layered visual effects. These features are especially useful when designing presentations, social media graphics, marketing visuals, or infographics.
In this guide, we’ll explain several ways to adjust transparency in Canva, including how to reduce the opacity of an image, how to make part of an image transparent, and how to make an image background transparent using Canva.
Method 1: How to Adjust Image Transparency in Canva
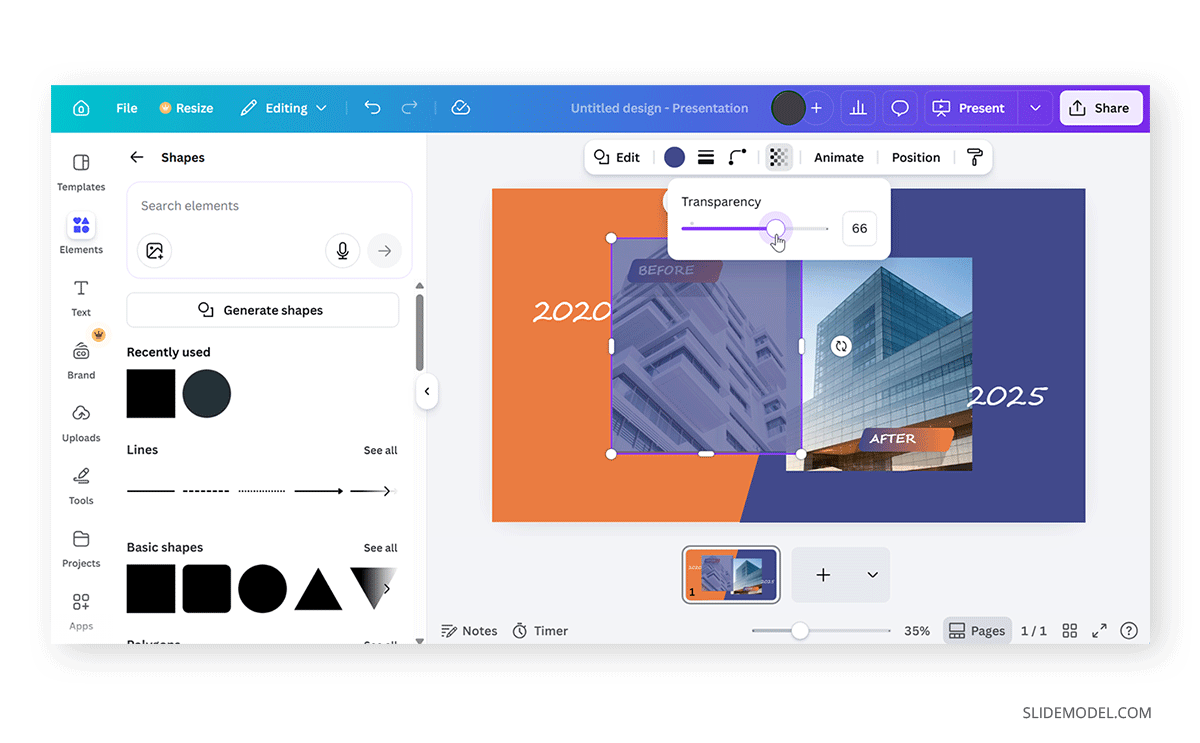
The quickest way to make an image transparent in Canva is by adjusting its opacity. This allows you to fade the image, so it blends more naturally with other elements on the slide. This technique is especially useful when placing images behind text in presentation slides.
Step 1: Open your Canva design and place the image on the slide or canvas. You can upload your own image or choose one from Canva’s photo library.
Step 2: Click on the image to activate the editing toolbar at the top of the screen.
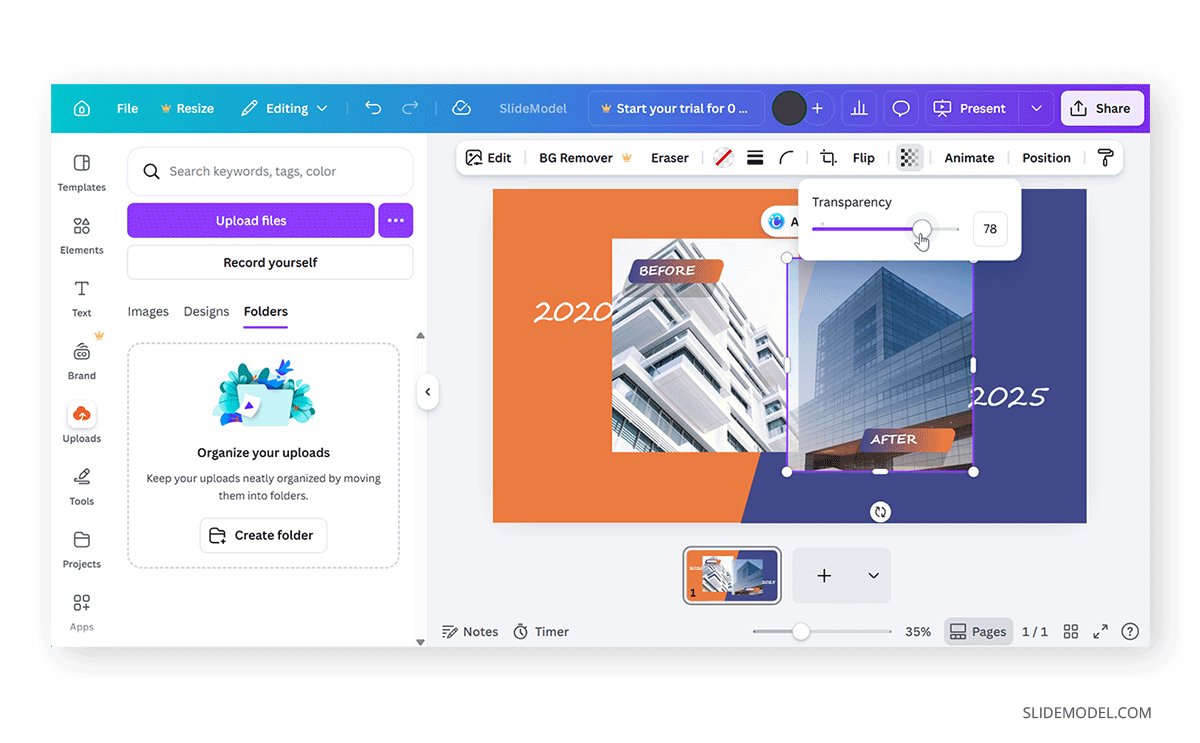
Step 3: In the top toolbar, look for the Transparency icon. It usually appears as a small checkerboard symbol.
Step 4: Adjust the opacity by moving the transparency slider to the left. In the menu, 100% means the image is fully visible, whereas lower values gradually fade the image. Try adjusting the slider until the image looks balanced with the rest of the design.
Method 2: How to Make an Image Background Transparent in Canva
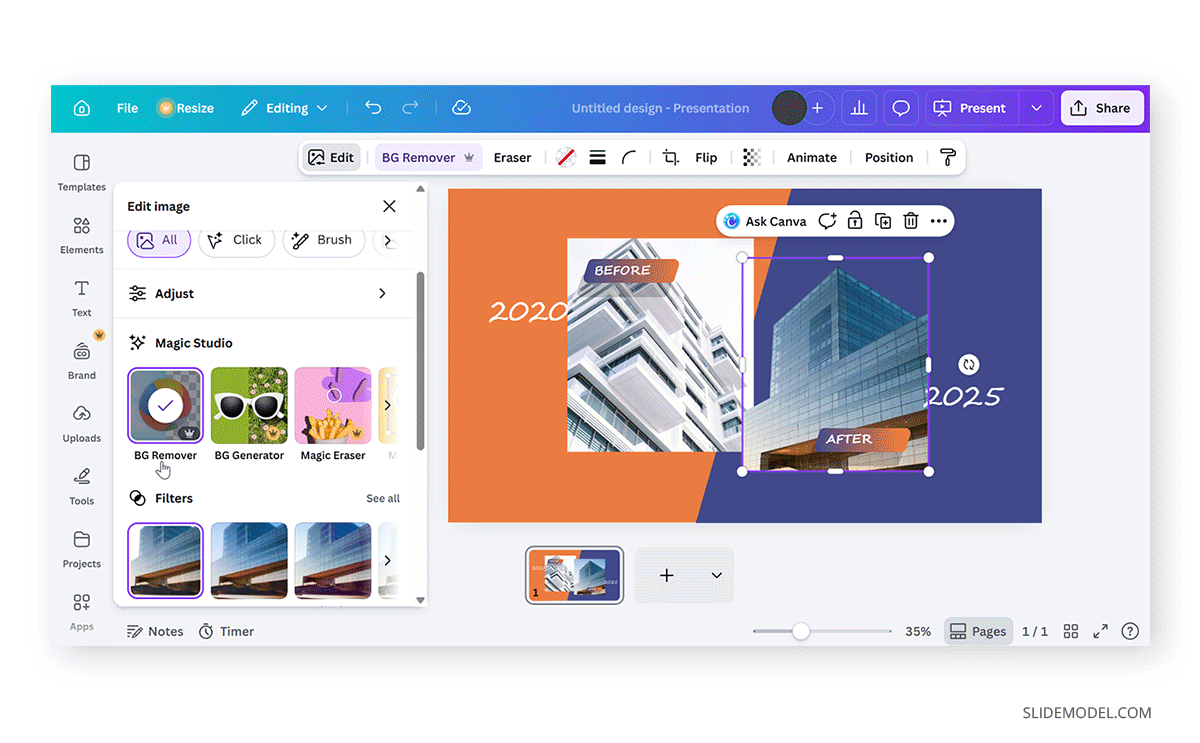
Sometimes you may want to remove the background of an image so only the main subject remains visible. This technique is often used for product photos, profile images, or icons. Canva includes a Background Remover tool that automatically isolates the subject of an image. This is the most common method used when learning how to make an image background transparent in Canva.
Step 1: Add your image to the Canva canvas.
Step 2: Click the image to open the editing options and click Edit from the toolbar.
Step 3: Choose the Background Remover (BG Remover) option. Canva will analyze the image and automatically remove the background.
Step 4: Use the Erase and Reset options to refine the selection. Once completed, the subject remains visible while the background becomes transparent.
Method 3: How to Make Part of an Image Transparent in Canva
In some cases, you may only want to make part of an image transparent rather than the entire image. This technique is useful when creating overlays or highlighting certain areas of a design. One simple way to achieve partial transparency is by layering shapes over an image. You can also use gradient shapes to create fade effects across parts of an image. Gradients allow one part of the image to appear stronger while another fades into transparency.
Step 1: Place the image on the canvas.
Step 2: Go to Elements -> Shapes and insert a rectangle, circle, or other shape.
Step 3: Position the shape over the section of the image where you want transparency.
Step 4: Adjust transparency by selecting the shape and reducing its opacity using the Transparency slider. This creates a transparent overlay effect that partially reveals the image underneath.
Design Tips for Using Transparency in Canva
While transparency can enhance a design, it should be used carefully to avoid making elements difficult to see. A few minor adjustments and considerations can make the difference when you are trying to make your design legible and easy for the audience to view.
Text Legibility: If you place text over transparent images, ensure there is sufficient contrast between the text and the background. Blending images with colors that complement them, such as dark backgrounds for lighter images and lighter backgrounds for darker overlay images.
Avoid Overusing Transparency: Too many transparent layers can make a design look messy or unclear. Avoid overusing transparency; often, an opaque picture is good enough for a slide.
Use Consistent Transparency Levels: If multiple images have transparency, try to keep opacity levels similar to maintain a balanced design.
Combine Transparency with Overlays: Adding a subtle color overlay over an image can help reinforce branding while keeping the design consistent. You can also use pre-designed Business PowerPoint Templates to ensure your slide elements have consistent contrast and can be easily paired with images adjusted for transparency.
Avoiding Three Common Mistakes Using Transparency for Images in Canva
When working with transparency in Canva, a few common mistakes can reduce a design’s effectiveness.
Making Images Too Transparent
If the opacity is too low, the image may become difficult to recognize. Overusing transparency in this way can make the image appear obscure and get lost in the background.
Using Transparency with Busy Backgrounds
Complex backgrounds combined with transparency can reduce readability. Avoid using transparency with complex or busy backgrounds.
Poor Image Contrast
Text or icons placed on top of transparent images may blend into the background. These icons or associated text might be critical for the audience to understand the message in the slide, diagram, or photo. Therefore, be considerate of the contrast between text and icons, as they are important parts of the presentation that serve as visual aids for the audience.
Final Words
In Canva, you can use images with reduced transparency to create backgrounds and placeholders, highlight design elements, and explain a process. Subtle adjustments to transparency, such as 75%, 50%, or 25%, can have major design implications. You can also remove the background of images and blend them with standard backgrounds with varying levels of transparency to make your slides stand out.
By understanding how to control transparency in Canva, you can design cleaner presentations, create balanced layouts, and ensure that visuals support your message rather than distract from it. With a few adjustments to opacity and layering, you can transform ordinary images into subtle design elements that enhance the overall appearance of presentations.