For a presenter, clarity, efficiency, and design precision are non-negotiable. One of PowerPoint’s lesser-known, yet incredibly useful tools is the Selection Pane. Whether you’re working on a visually rich presentation with overlapping elements or fine-tuning your animations, the Selection Pane can save time and streamline your workflow. In this article, we will explore how to use the Selection Pane in PowerPoint, including how to access it, its key features, and best practices for using it to manage layered content, improve animations, and design with precision.
What Is the Selection Pane in PowerPoint?
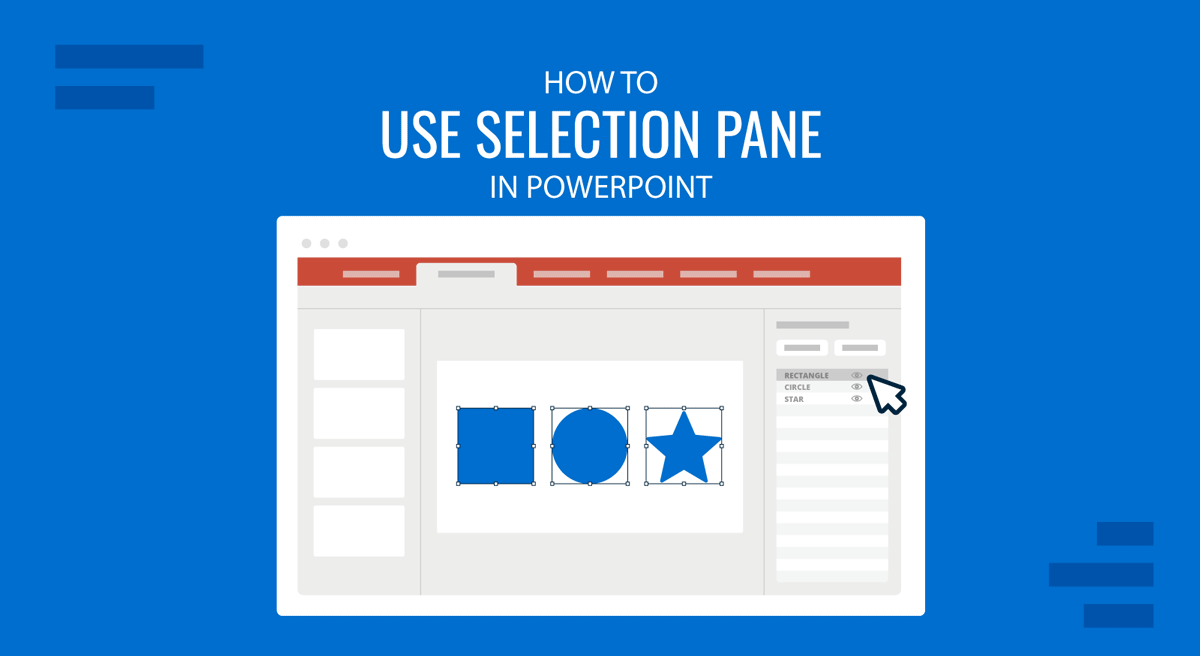
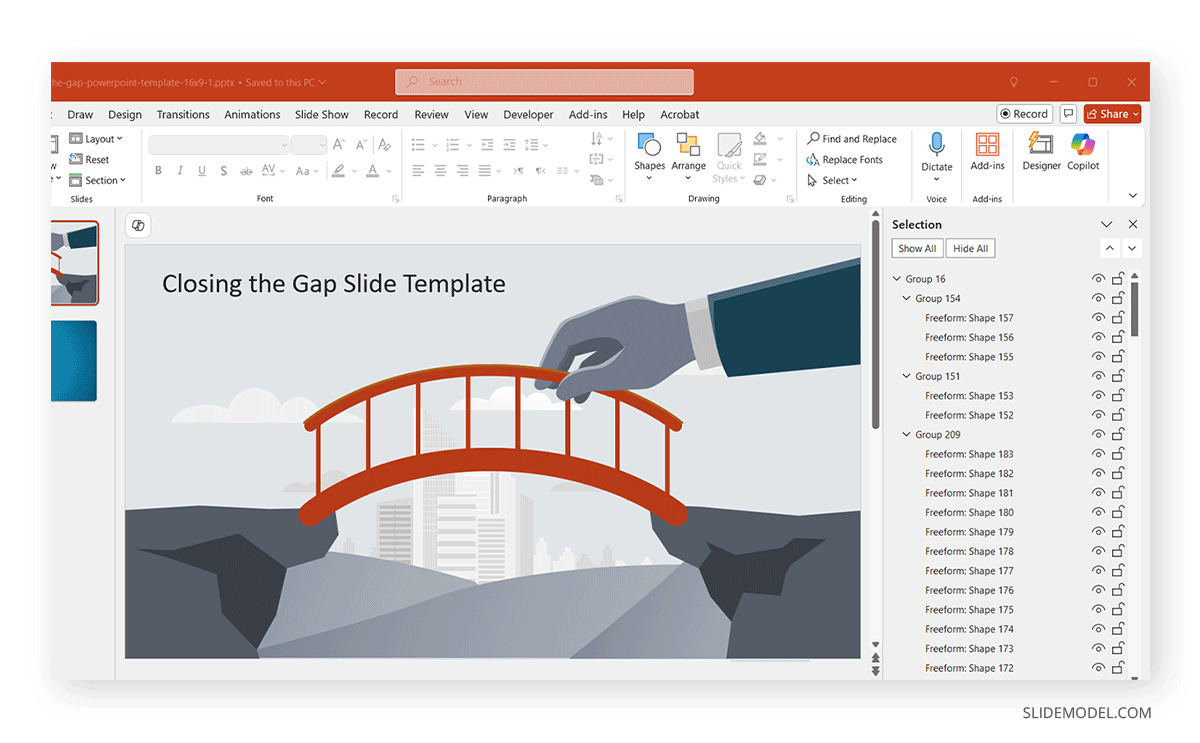
The Selection Pane is a utility that allows users to view and manage all objects on a PowerPoint slide. These objects include shapes, images, text boxes, charts, icons, and more. Each object appears as a list item in the pane, making selecting, renaming, reordering, hiding, or showing them easier. In essence, the Selection Pane is your visual roadmap to everything on a slide, helping you easily manage even the most complex layouts. For example, you can use Selection Pane to organize layers in PowerPoint presentations, hide or show specific shapes, or locate specific shapes easily by name.
How to Access the Selection Pane in PowerPoint
Accessing the Selection Pane is consistent across most recent versions of PowerPoint. Below are a few easy ways to do so.
Method 1
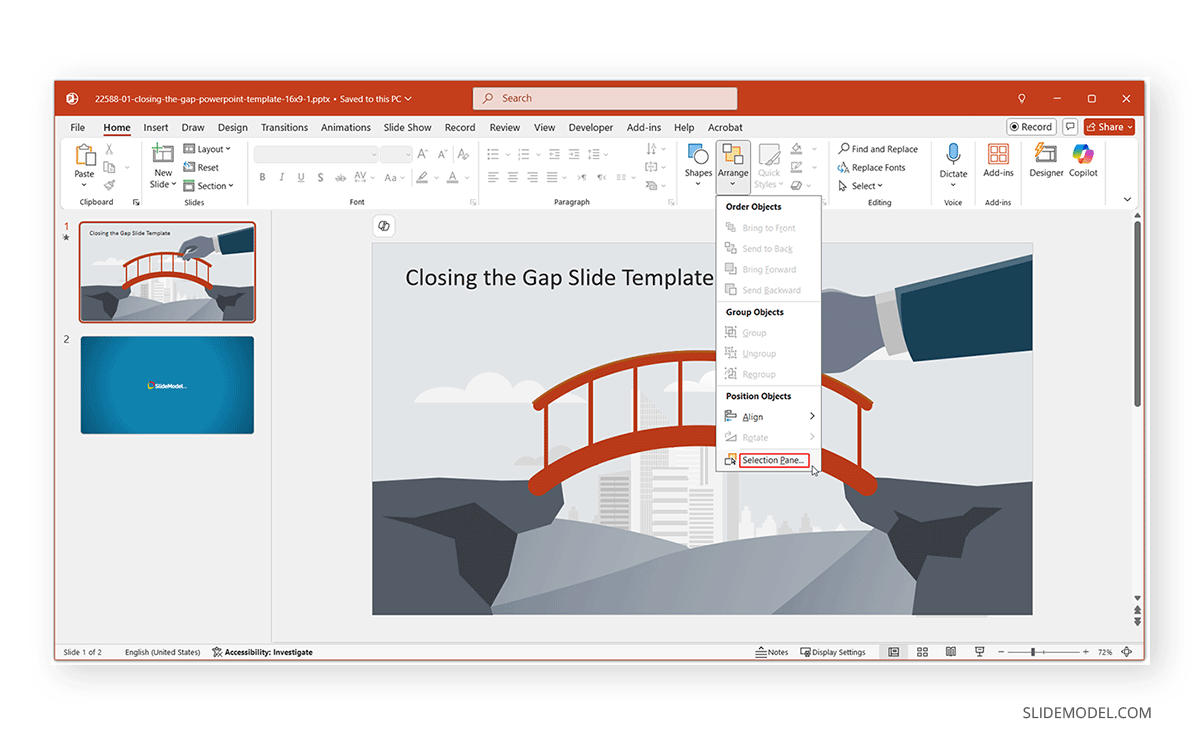
Go to the Home tab on the Ribbon menu, in the Drawing group, click Arrange.
From the dropdown menu, select the Selection Pane.
Method 2
Go to the Format tab (appears when an object is selected), then click Selection Pane.
Method 3
Use the shortcut Alt+F10 to open or close the Selection Pane quickly.
Selection Pane Interface Overview
The Selection Pane lists all objects on the active slide in a top-to-bottom layer order. For each object, you’ll see the following:
- Object name (e.g., Rectangle 1 or Picture 2).
- An eye icon is used to toggle visibility (show or hide an object).
You can:
- Click an object to select it.
- Rename an object by double-clicking its label.
- Click and drag to reorder objects.
How to Transform Presentation Workflow Using the Selection Pane?
The Selection Pane can help transform the workflow by enabling presenters to manage layered objects, making them easier to identify, hiding specific objects (as needed), and managing animations by better object identification.
1. Managing Layered Objects
When working with multiple overlapping shapes, text boxes, or images, it can be difficult to select or modify them directly. The Selection Pane gives you:
- A clear overview of all slide elements.
- The ability to reorder layers by dragging items up or down.
- Control over grouped shapes.
The above-mentioned makes aligning and layering design elements a seamless task.
2. Naming and Identifying Objects
By default, PowerPoint labels objects generically (e.g., “TextBox 1”). In complex slides, this can get confusing. Use the Selection Pane to:
- Rename each object to something meaningful (e.g., “Header Image” or “CTA Button”).
- Easily track which object corresponds to which part of your slide.
Custom naming enhances collaboration and simplifies editing, especially when working on group projects.
3. Hiding and Showing Objects
The eye icon next to each item in the Selection Pane allows you to temporarily hide an object from view. This helps when:
- Editing objects behind other layers.
- Focusing on a specific slide component without distractions.
- Troubleshooting layout or animation issues.
Toggle visibility as needed for cleaner, more efficient editing.
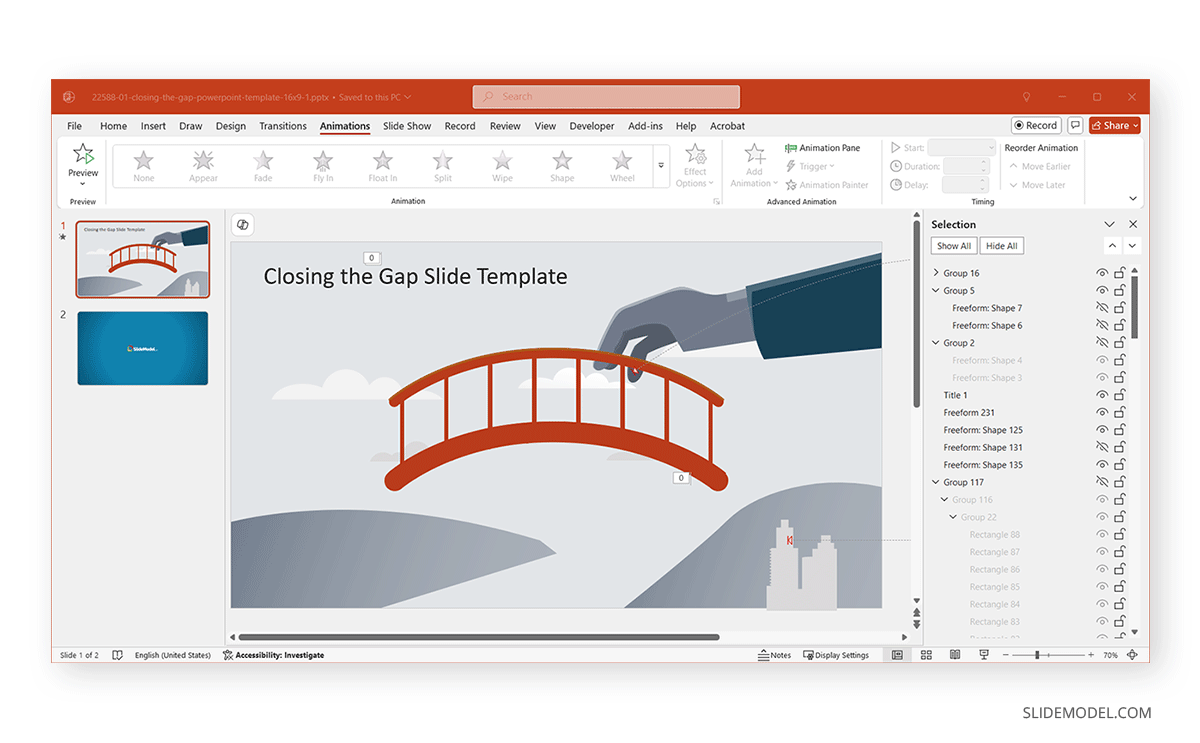
4. Improving Animation Workflow
If you’re animating multiple objects, the Selection Pane becomes indispensable. It allows you to:
- Match objects in the Animation Pane to named items.
- Show or hide objects during animation sequencing.
- Control the layering and timing of animations precisely.
Using both the Selection Pane and Animation Pane in tandem results in smoother animations and less guesswork.
5. Precise Editing and Formatting
Working with overlapping objects often leads to misalignment or editing the wrong item. The Selection Pane lets you:
- Directly select hidden or buried objects.
- Ensure accurate alignment, resizing, and positioning.
- Apply formatting without disrupting your layout.
How to Use the Selection Pane in Practice
Let’s walk through some real-world scenarios, with examples, to discuss the various ways to use the Selection Pane for PowerPoint presentations.
Example 1: Working with Multiple Shapes
When working with multiple shapes, the Selection Pane can help you easily identify objects. This can be particularly helpful when you want to identify specific objects for applying animations or further modification.
Example:
- Insert 5 overlapping shapes.
- Open the Selection Pane.
- Rename each shape (e.g., Red Box, Blue Circle).
- Use the drag-and-drop interface to reorder layers.
- Hide all shapes in a slide, except the ones to focus on.
Example 2: Cleaning Up Animations
Cleaning up Animations is easier when you can identify objects. In this case, the Selection Pane can effectively manage animated slide objects.
Example:
- Rename objects for clarity.
- Add multiple entrance animations to slide elements.
- Use the Selection Pane to manage objects so they are easier to identify in the Animation Pane.
- Adjust visibility to test animations step by step.
Example 3: Preparing a Clean Layout for Printing
If you’re designing for print, use the Selection Pane to prepare a more manageable layout.
Example:
- Hide temporary guides or background elements.
- Ensure visual hierarchy before printing.
- Preview content layout without distractions.
In the example below, we used the Selection Pane to hide a few slide elements from the Closing the Gap Slide Template for PowerPoint to focus on the hand holding the bridge in the illustration.
Best Practices When Using the Selection Pane
Using the Selection Pane effectively requires more than just previewing objects. Below are some best practices to ensure an optimized design process.
1. Rename Objects Early
Get in the habit of renaming your objects as you insert them. This avoids confusion later when you’re trying to animate or reorder items. Use descriptive names such as “Title Text,” “Background Image,” or “Callout Arrow.”
2. Group Similar Elements
For related items—like icons with labels—use the Group function (Ctrl+G / Command+G) and rename the group accordingly. Grouping helps reduce clutter in the Selection Pane and allows for easier repositioning.
3. Use Visibility Toggles Strategically
Avoid temporarily hiding objects while focusing on a specific element or alignment. It’s an efficient way to avoid accidental edits and to visualize content layers.
4. Combine with Guides and Grids
Using the Selection Pane with PowerPoint’s guides and grids helps with alignment and consistency. You can hide layout components to adjust spacing with more precision.
5. Maintain Layering Order Consistently
Establish a logical layering system across all your slides, such as keeping background elements at the bottom and interactive items at the top. This habit improves consistency and reduces the risk of misplacing key objects.
6. Limit Overuse of Hidden Elements
While hiding elements can be helpful, avoid leaving too many hidden objects in your presentation. Over time, these can clutter your file, cause confusion, or be overlooked during final review.
7. Regularly Review the Pane for Cleanup
Before finalizing your presentation, go through the Selection Pane to ensure no redundant or outdated items remain. Delete unnecessary objects and rename any generic labels for clarity.
8. Utilize Selection Pane in Master Slides
When working with Slide Master layouts, the Selection Pane becomes even more important. You can adjust placeholder layers, rename consistent elements, and toggle layout components that apply across all slides.
9. Sync with Animation Pane
Use both the Selection Pane and Animation Pane side by side for animation-heavy slides. This allows you to ensure that each animation corresponds with the correct object, especially when dealing with groups or overlapping items.
10. Leverage It for Accessibility Improvements
Clear object naming and layer organization help improve accessibility. Screen readers often rely on logical order and labels, so structuring your slide with the Selection Pane can enhance user usability.
FAQs
How to see layers in PowerPoint?
To view layers in PowerPoint, open the Selection Pane, which effectively shows you the layers.
How do you access the selection pane in PowerPoint?
To access the Selection Pane, go to Home -> Arrange -> Selection Pane or press Alt+F10.
Where is the selection pane option in PowerPoint?
It can be found under the Arrange menu or by right-clicking any object and choosing Selection Pane from the context menu.
How to use the selection pane?
The Selection Pane allows you to select, rename, reorder, show/hide, and manage the layers of all objects on your slide.
What are the possible uses of the selection pane in PowerPoint?
The Selection Pane can be used to manage layered objects, customize names, toggle visibility, organize animations, and enhance formatting precision.
Final Words
The Selection Pane in PowerPoint is more than just a list of objects—it’s a design and productivity tool that helps you confidently manage complex slides. Whether organizing layered graphics, preparing animations, or finalizing handouts, the Selection Pane provides structure and precision to your workflow.
By mastering how to use the Selection Pane in PowerPoint, you’ll gain better control over your presentations, save time during editing, and deliver cleaner, more professional results. Don’t overlook this feature—it might be the key to elevating your next big pitch or report deck.
Moreover, streamlining object management becomes critical as presentations become increasingly content-rich and interactive. The Selection Pane enhances visual aesthetics, usability, and accessibility, enabling designers to craft presentations that are as functional as beautiful. Integrating this tool into your daily workflow can dramatically reduce errors, improve consistency across slides, and elevate your overall design efficiency. Think of it as your backstage pass to a well-organized, high-impact presentation.