There are many reasons why you may be interested to insert many pictures into individual slides at once using PowerPoint. For example, if you’d like to protect your PowerPoint presentations by avoiding users to change editable fields or data values, then importing the slides as pictures into a new presentation could be a possible approach.
If you want to import hundreds of pictures into PowerPoint slides then it can be really tedious to add each picture file as as an individual slide. However, here we propose a method that let you easily import multiple photos or picture files into PowerPoint as individual slides. The best of this is that you just need to select which files to import from your hard disk (doesn’t matter if it is only one file or 100’s of files) and then PowerPoint will insert all the pictures into individual slides.
Using Photo Album to Batch Import Many Pictures into PowerPoint
Photo Album is a feature available in Microsoft PowerPoint that let you create a photo album from picture files easily. This can be very handy for people who want to create a family photo album but it is also a very powerful tool for professional presenters that need to import many pictures as slides. You can also use this approach to insert multiple pictures into PowerPoint on different slides.
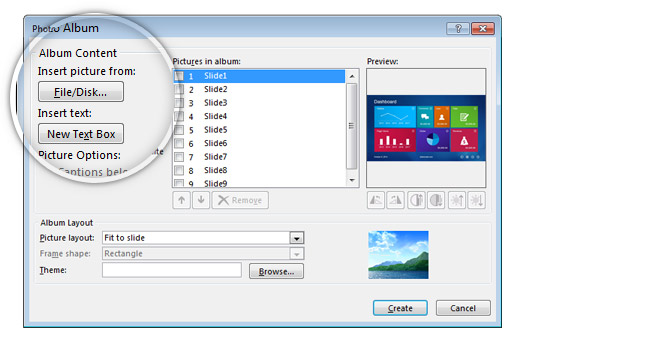
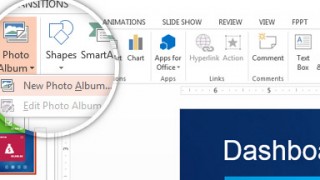
1. Go to Insert > New Photo Album in PowerPoint
Let’s start creating a New Photo Album. Go to Insert -> Photo Album -> New Photo Album and then a new dialog box will appear.

2. Choose the Picture Files to Insert as PowerPoint Slides
Below is an example of the Photo Album dialog box where you can setup how to build a photo album, select the pictures to include in the album, choose the layout and see a preview. If you need help creating the images you can use an AI Image Generator.
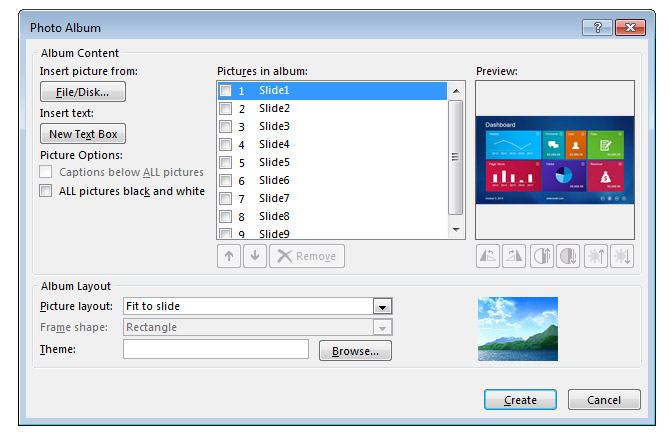
Now, click File/Disk to pick picture files from your computer. This new file dialog let you select which files will be inserted in the album. As soon as you pick the files and accept the changes the pictures will be displayed under Pictures in album check list.
For this example we have exported all the slides from Metro Dashboard template to JPG images and saved them in our local hard disk. Then, we chose all these JPG images in order to make a new photo album following this approach.
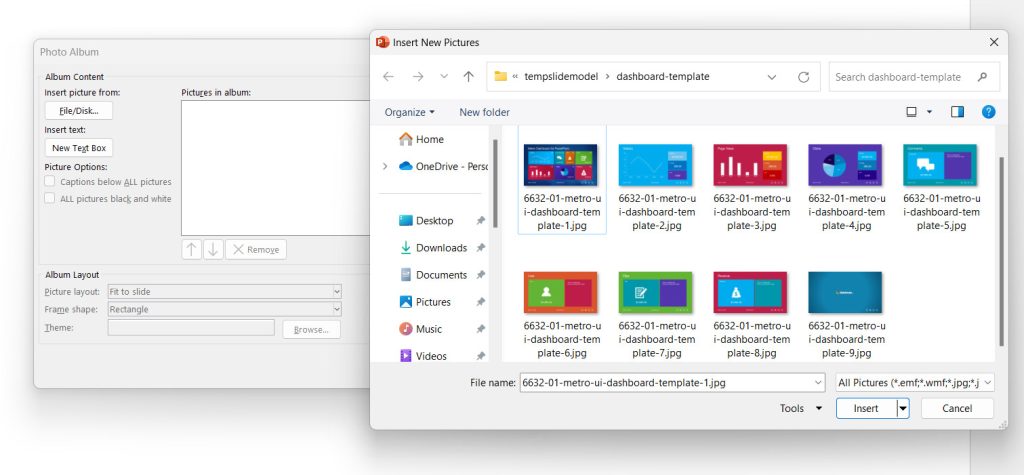
You can use the File Dialog to save multiple files at once (keep Shift key pressed and then select all the files) and then the file names will appear in the file name text box. Then click All Pictures and these files will be selected for the photo album.
3. Choose Fit to Slide Option in Picture Layout
Unless you want to import many pictures in the same slide, make sure to choose Fit to slide option under the Album Layout section in the Edit Photo Album dialog. This will make the pictures to fit the whole slides making them look as the original presentation file but using a background image instead.
Tip: If you want to protect your presentations from edit then you can use this method proposed here to include pictures as PowerPoint slides removing any editable field from the PowerPoint presentation. This can be good while sharing a PowerPoint presentation with colleagues and co-workers for review or sharing a PowerPoint online and at the same time prevent the original file to be copied or edited. Interestingly, this method can be safer than other methods which involve protecting presentation files with password or converting the presentation to slideshow (.ppsx).
The method proposed here let you convert multiple images you have in your hard disk to PowerPoint slides without losing too much time (only a few clicks are required if you have the picture files already saved in your hard disk). Also, this method can be used if you need to add multiple images to an existing PowerPoint presentation.
Protect a PowerPoint Presentation by Inserting Pictures as Individual Slides
If you want to protect PowerPoint presentations by inserting slide pictures as individual slides without editable elements then you can follow the instructions below:
- Open the original presentation (the presentation file you want to protect).
- Go to File -> Save As and save PowerPoint Slides as Images.
- Choose the output folder where presentation files will be saved.
- Open a Blank Presentation in PowerPoint
- Go to Insert -> Photo Album -> New Photo Album
- Using the method proposed in this article, insert all the images previously saved in your hard disk.
- Save the new presentation with a new file name by going to File -> Save As and now choose the .pptx file format. We recommend you to identify the file name with a suffix my-presentation-noedit.pptx or something like that, in order to recognize easily that it is the modified version.
Now you can safely share the presentation with any colleague, co-worker or classmate or even publish the PowerPoint online.
Protecting the images using this approach does not guarantee someone won’t be able to edit the images. It is not the same as protecting the document with advanced protection mechanisms, for example, the ones that you could get by using digital signature protection. The protection mechanism we describe here is a high-level solution to prevent images from accidentally moving among the slide canvas.
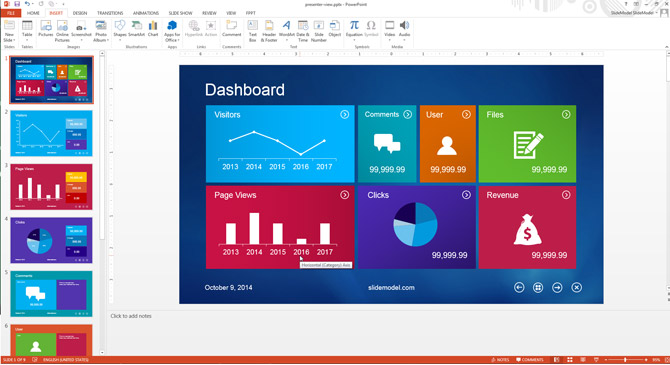
The screenshot below shows an example we have created following the steps above. As you can see, the final result looks very close to the original template. The only difference for the end user is that the slides appear as images and there are no editable fields. Shapes nor pictures inside the dashboard can not be copied neither.
Alternatively, if you are looking for an additional layer of protection for your presentation, you may consider adding a watermark picture on top of each slide. This can be easily accomplished with the use of an AI picture generator or other graphic design tools. Be sure to add the watermark before exporting the slides as JPG images to ensure that the watermark cannot be edited along with the background pictures.
This tutorial was created following the Photo Album feature in PowerPoint 2013 on Windows but you can also use it in Microsoft PowerPoint 2010. This feature is only available on Windows versions of Microsoft PowerPoint but if you are a Mac user then there is a workaround. You can use the Batch Image Importer tool provided by Andrea Frank from Boston College or a batch import images add-in for PowerPoint 2011.


How can i do this in Powerpoint 2016 mac, that does not have the PhotoAlbum button
Use Keynote which is included Free when you install OS X then export as pptx if you wish
Thanks! This is the best suggestion yet for mac users!
What is the 2016 version of this? I have no album option anywhere. I only have Photo Browser and Picture from File.
This works fine to load a100 images into separate slides in seconds, and fit them to the frames.
However many of the images then show as very coarse, as though only a thumbprint had been expanded. I can get the full detail of the images back by “changing” the image to the same file.
Second try.
This works fine, except that many slides show the images as very coarse, as if a thumbprint had been expanded. How can I get the full details of the images into the slides?
I can get around this by “changing” the image for the original file, when all comes right, but this is a nuisance!
Thanks
Sean Karley
3/17/2018
Sean: i am having the same problem. i loaded 200 slides and about 30% of them were very coarse. i think this occurs because the default setting in Power Point 2016 is to “compress pics” to 220kb? I couldn’t figure out how to prevent this in advance of creating the new photo album, because when you hit the “create” tab, it automatically creates a “new” presentation, with the auto-compress feature as the default. so i had to use your work-around (“change picture” option) to correct all the coarse photos. definitely a nuisance.
I am able to create ppt but in black and white. How to change this into colour photos and what is the options.
I do believe all of the ideas you have presented to
your post. They’re really convincing and will definitely work.
Nonetheless, thhe posts are very quick for starters.
Could you please lengthen them a little from subsequent time?
Thanks for tthe post.
This is great, a big timesaver – thanks so much!
Nope. I have PP 2020 and there NO “photo album” button.
I taught MS Office back in the 90s – Powerpoint, Word, Excel, Access, Outlook. It was brilliant and worked effortlessly.
It’s got progressively worse since then. I find it surprising MS even still in business, appalling.